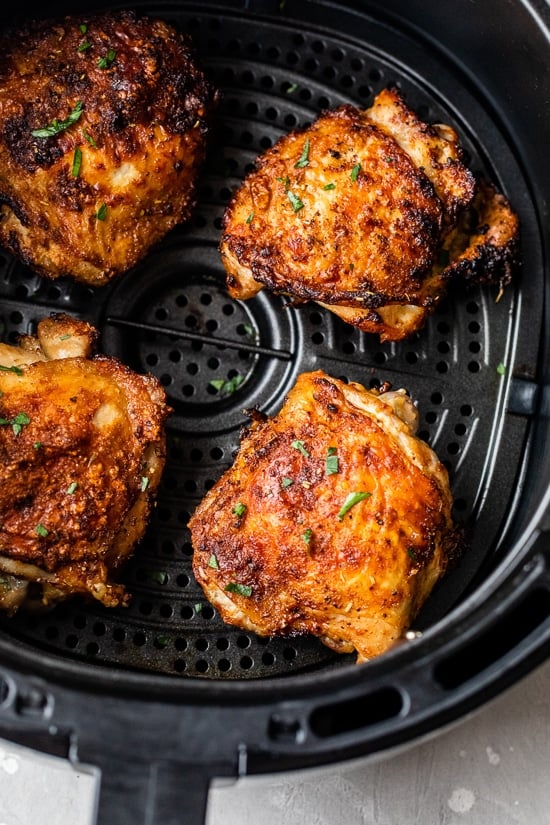
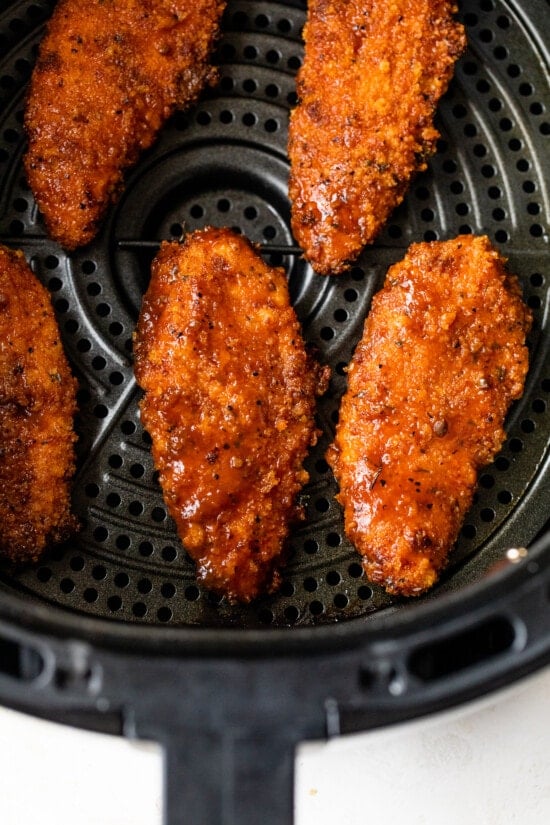
My air fryer is one of my favorite kitchen appliances. It’s really revolutionized making dinner, offering up a way to get that deep-fried crispy texture without dousing food in oil! I use my air fryer at least twice a week, whether it’s for dinner or party appetizers.
Chicken is one of my go-to proteins when it comes to healthy dishes so it’s no surprise that I’ve combined the two, trying out many different air fryer chicken recipes. Below you’ll find my favorites, ranging from kid-friendly chicken nuggets to healthier versions of air fryer chicken parmesan, air fryer chimichangas, and more.
Why Cook Chicken In The Air Fryer?
Here are a few reasons why I love using my air fryer to cook chicken.
Healthier than frying. The main perk to cooking anything in the air fryer is that you don’t have to add large amounts of oil, so it’s infinitely better than frying.
Crispier than the oven. In addition, most air fryer chicken recipes turn out much crispier than if you made the same recipe in the oven, due to how the air circulates.
Quick and easy. And, finally, most air fryer chicken recipes require just a few minutes of prep, no pre-heating AND less than 30 minutes of cook time. Some of these recipes cook in mere minutes!
Common Questions
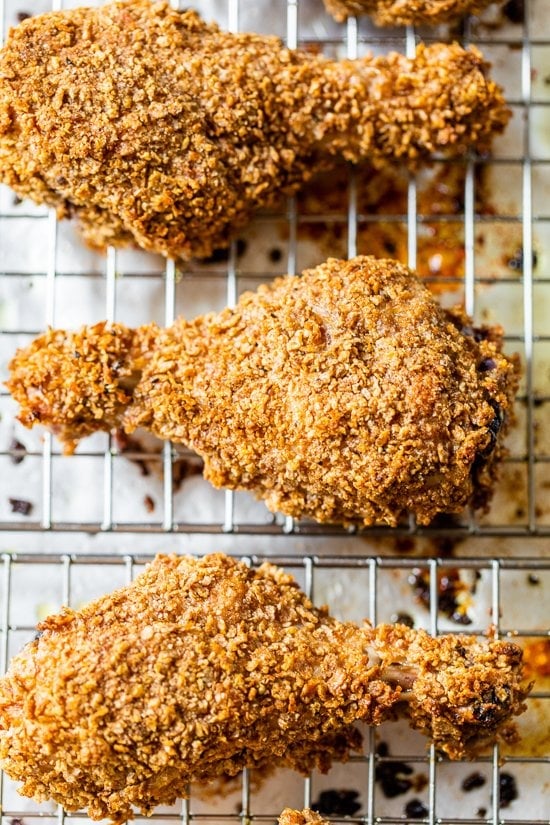
Can you put raw chicken in the air fryer? Yes, absolutely! Most of these air fryer chicken recipes start with raw chicken. Just be sure to cook it until it reaches an internal temperature of 165F.
Why is my chicken tough in the air fryer? If your chicken is tough, you likely cooked it for too long or at too high of a temperature, which caused it to dry out and become tough.
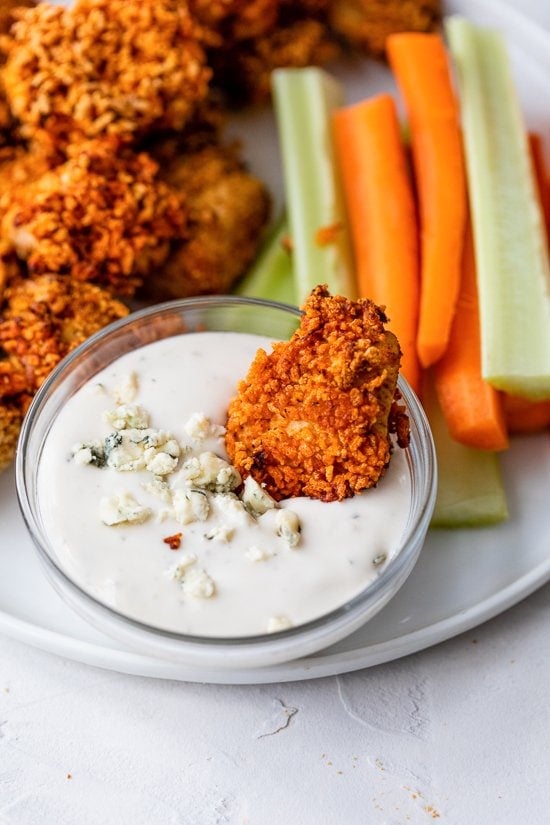
Does chicken need oil in air fryer? Nope. The wonderful thing about making chicken in the air fryer is that, in most cases, no oil is needed. But, for a golden crust on breading I like to spray a minimal amount of oil for best results.
Should you flip chicken in the air fryer? It depends on the recipe but in general, most air fryer chicken recipes should be flipped halfway through to ensure even cooking since the heating element is at the top.
36 Best Air Fryer Chicken Recipes
And now, without further ado, let’s dive right into the recipes. These air fryer chicken recipes range from complete dinners to appetizers and snacks, plus classics like chicken tenders and chicken nuggets. The one thing they all have in common is that they’re easy to make!
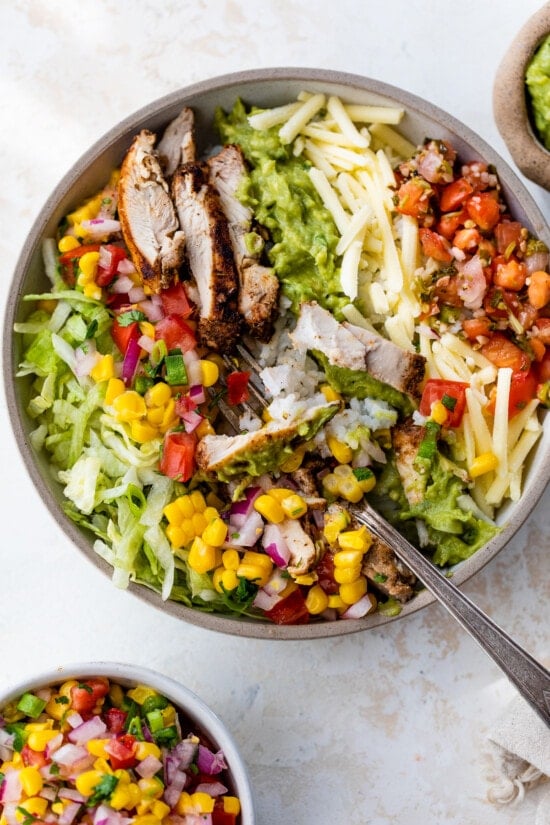
Crispy and perfectly golden, these Air Fryer Chicken Cutlets cook in just minutes and stay perfectly juicy on the inside. Perfect for a quick and easy dinner.
Chicken Eggplant Parmesan featured chicken made in the air fryer topped with eggplant marinara sauce and fresh mozzarella. An easy, healthy weeknight dinner.
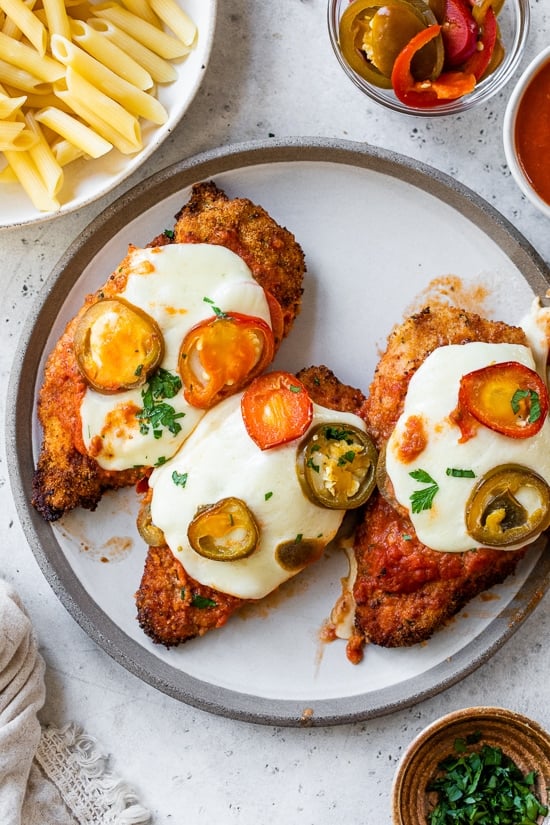
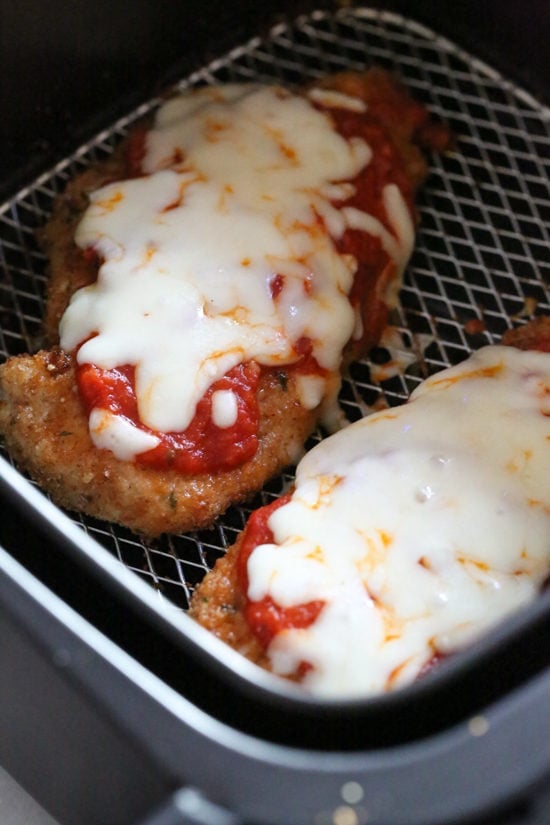
Air Fryer Chicken Parmesan is a healthy alternative to the deep-fried classic…and just as tasty! Tender, crispy, and juicy with perfectly melted cheese, it’s perfect served with a side salad or pasta.
These Buffalo Chicken Eggrolls will quickly become a favorite at every game day party you host! Filled with shredded chicken, buffalo sauce, carrots, and scallions they’re a guaranteed hit.
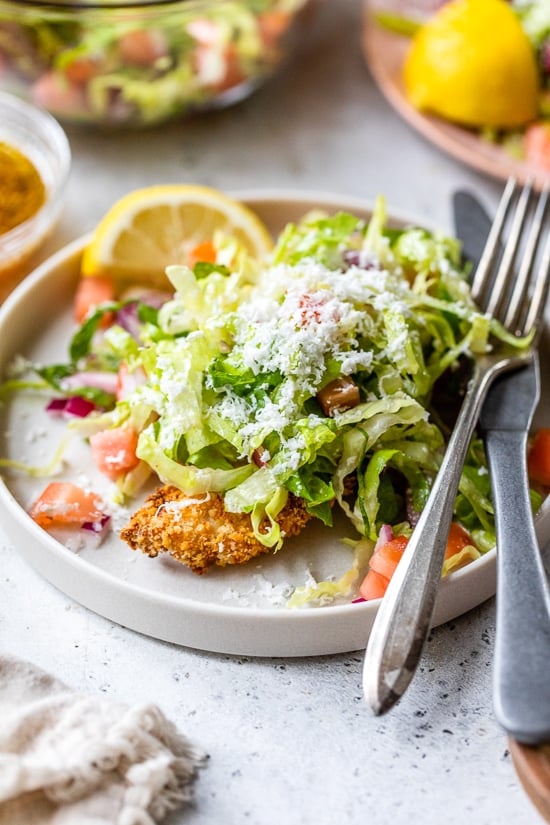
This Bang Bang Chicken Salad begins with tender, juicy chunks of air-fried chicken and irresistible bang bang sauce. Quick, easy, and perfect for lunch!
Here are the ten most popular new recipes I have published so far in 2024. Some of these made me proud. Most were predictable! 😂
What about for you? Any surprises on this list? 🙂
10 most popular new recipes of 2024 (so far)
10. Lamb Korma Curry
I’m thrilled to see a recipe that’s not a quick weeknight meal making it into the Top 10! It’s definitely List-Worthy. 😅 The korma curry sauce is truly amazing—it’s a flavour you won’t find in a jar, and even at a restaurant, you’d have to know where to go to find one that rivals this!
9. Smoky Roasted Tomato Soup
I was also really happy to see this make The List! I wasn’t sure if it would appeal, thought perhaps it wasn’t exciting enough for you.😅 But what I really like about this soup is that it’s a really great way to make something tasty out of lacklustre tomatoes, which is sadly all too common in grocery stores here in Australia. So imagine how great it is when tomatoes are season!
8. Crispy Oven Baked Quesadillas
Strong performer to make the top 10 list because I only published it last month! This is a really handy recipe because you can make multiple quesadillas at the same time in the oven rather than flipping them one by one on the stove. Who’s got time for that when you’ve got a hoard of hungry teenagers!
7. Sausage Ragu with Pappardelle Pasta
I feel like the word “ragu” always gets your attention. 😂 Though in all seriousness, this one’s pretty special because it gets a massive flavour leg-up by using sausages for the meat, and economical to make too. The richness and depth of flavour in it is really, really good!
6. One-pot Moussaka Beef Rice Pilaf
Hazarding a guess for why this made The List! Let’s see….convenience of a meal in one pot…. plus the name (everybody loves Moussaka!)…plus maybe the photo looks appealing, with the juicy looking tomato stained rice with the shiny balls of chickpeas?
5. My 14 favourite low-calorie dinners
It was early January when I published this, when New Years’ resolutions “to be healthier” were still fresh in everyone’s mind!
4. Tray bake lamb kofta meatballs and vegetables
I love a tray bake that’s a little different, like meatballs and vegetables! Works perfectly with the bonus that all your meatballs remain perfectly round, unlike when pan frying when one side always seems to flatten!
3. Singapore Chicken Vermicelli Noodles
Australia is mad for Singapore noodles! But they are kind of a pain to make – you need a little bit of Char Sui (Chinese BBQ Pork) and freshly peeled prawns. So I made a tonight version using using chicken instead. Instant hit! (I feel this might be happening for my own dinner tonight.)
2. One pot Chicken Risoni with Crispy Salami
Why I think you love it: Because we all love a one pot recipe! Oozy, creamy risotto vibes with a whole lot less work. Also, the crispy salami. It’s worth making this just to experience the crispy salami! #BetterThanBacon
1. Lemon Garlic Salmon Tray Bake
Why I think you love it: Because, everything you need for a meal cooked on one tray! Fast prep. Less washing up. And tasty! Love the lemon garlic flavour on the salmon.
And that rounds off the top 10 most popular recipes of 2024 (so far!). Even though it’s not a recipe, I’m still going to drop in an FAQ, mainly cause it’s a new website design toy and I’m still having fun playing with it. 😂
10 most popular recipes of 2024 FAQ
Because it would be too organised to have published this at around, say, the end of June at the halfway mark for 2024. I can’t think that far ahead when it comes to content I publish on my website! It’s very much in the now, what I’m thinking of right now, what’s happening in my life, what I’m cooking in the kitchen right now!
It does bring me to a topic that’s quite close to my heart. Some people find it hard to work in the “fly by the seat of your pants” style that I’ve adopted for my website. Magazines, for example, are shooting recipes months and months ahead of when they are published.
I can’t do that. Things go stale for me.
I publish what I’m making at the time. Well, more to the point, recipes I finish working on at that time! At any given moment, I usually have multiple recipes on the go, but it’s difficult to predict when I’ll finally be happy with it. Might be version 3 or 30!
While this creates a somewhat chaotic and hectic working style, it also means that recipes I publish are in real time and I think you sense that with the enthusiasm with which I describe the recipes and the stories that accompany them.
Or maybe, that’s just me trying to justify my disorganisation. 😂
It had to be a new recipe that I published during 2024.
Based on the number of page views for that recipe from the publish date through to today, Tuesday 27 August 2024.
It’s an analytical tool called Parse.ly that provides real time and historical data that I use to understand the performance of recipes I publish.
We got it when the old Google Analytics reporting tool was closed down and migrated to GA4. I find GA4 incredibly difficult to use and there’s some information that I can’t get at all to monitor how my website is performing!
So we had to find another solution and found Parse.ly which, as far as we know, is the only tool available that meets our needs and is easy to use, bearing in mind IT and I are not friends!
t’s a service provided by WordPress VIP which is an enterprise level WordPress hosting providing.
But it is a premium service and it comes with a hefty price tag. It hurts. But I can’t live without it!!
I know. I am as unhappy as you are. 😩 For example, I truly believe to my very core that if I had published Cheesymite Scrolls earlier in the year, it would easily be in the top 10. I have faith in Australia! 😃
I actually do monitor the page views of new recipes very closely for the first 48 hours, and that’s the real method by which I track the popularity of a particular recipe on a day to day basis.
There’s no report I can run to capture that exact data accurately for all the new recipes of 2024 to compare like-for-like. But I do know, for example, Pistachio Cake which I published a couple of weeks ago outperformed average with over 100,000 readers in the first 48 hours. However, it’s nowhere near in the top 10 because I only published it recently!
Pistachio Cake was a surprise hit performer straight out of the gate, with over 100,000 views in the first 48 hours. I did not expect that!
Tell me in the comments below what you thought of The List! Any surprises? Any disappointments? I personally was a little sad that Crispy Salt & Pepper Squid wasn’t on the list, because we worked so hard on that recipe. Hand on heart, between JB, my brother and I, I think we probably made over 30 versions before we cracked the code. And still, to this day, yet to have one as good, even at a restaurant!
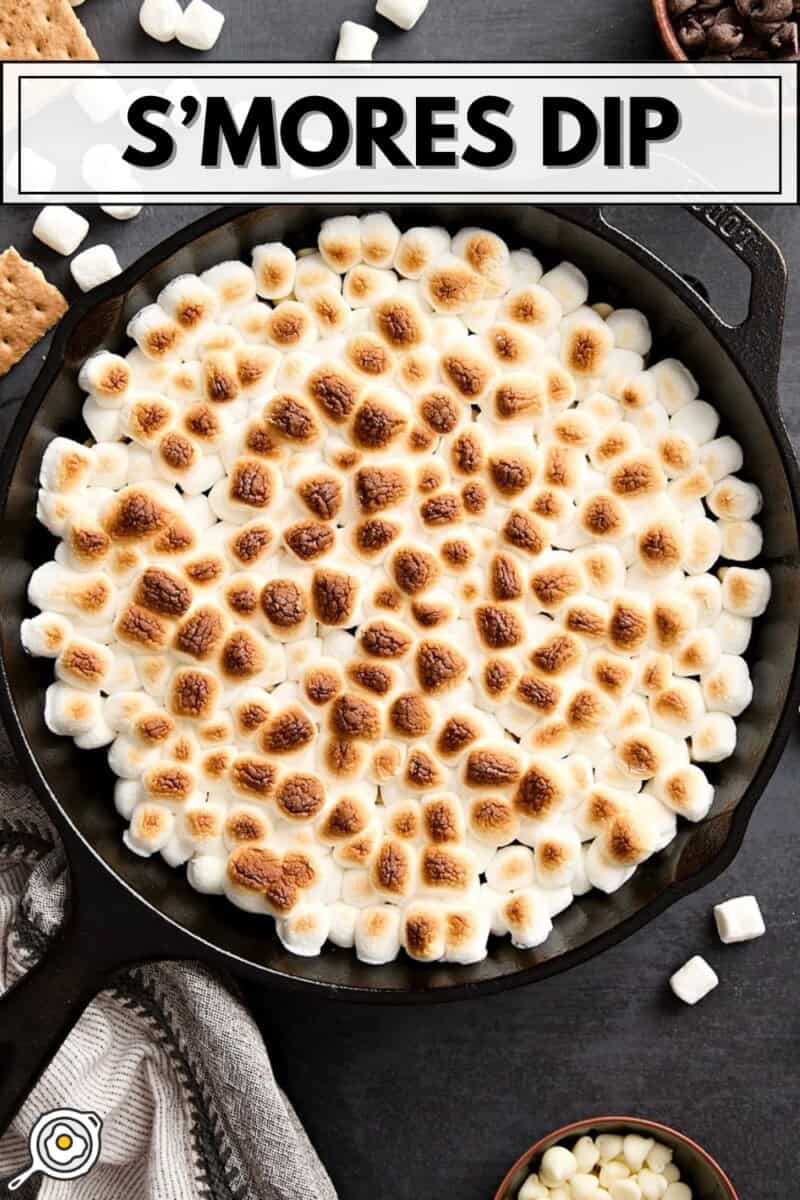
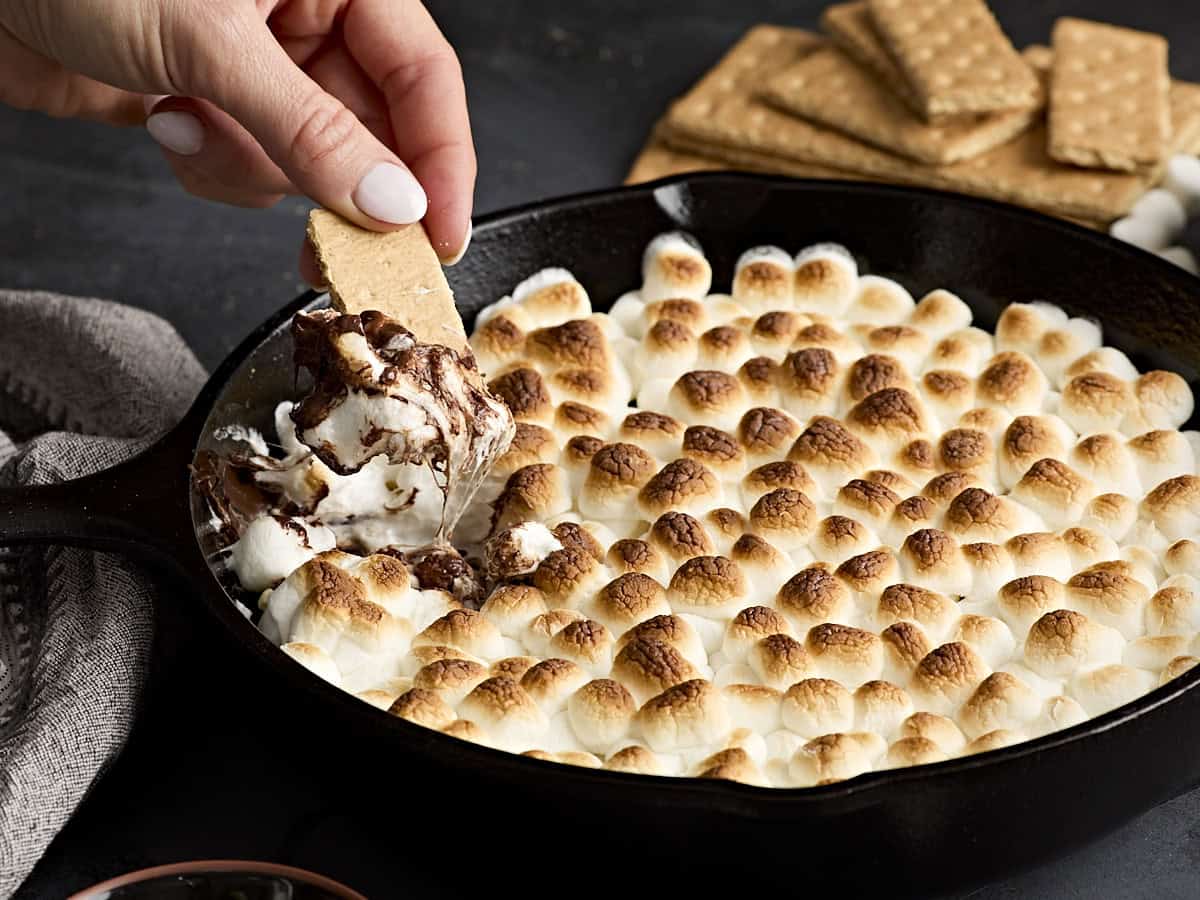
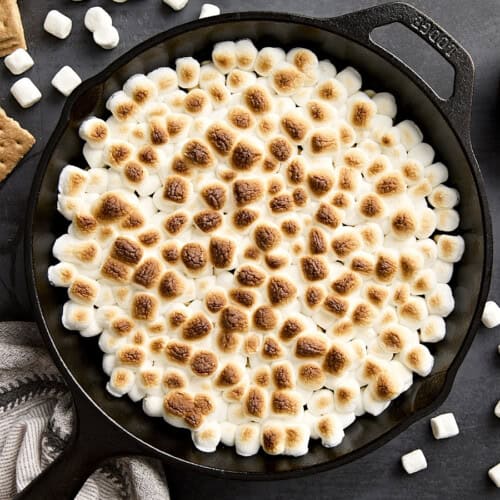
Camping is one of my favorite budget-friendly activities. Whether it’s a girl’s trip or a family affair, count me in! You know what goes hand in hand with camping? S’MORES! And boy, do I have the easiest version of that camping menu classic for you. This skillet S’mores Dip recipe is the cleanest, mess-free way to serve s’mores! Zero mess, zero fuss. All you need is just 3 ingredients and a box of graham crackers; this is the easiest dessert ever!
Here in Tennessee, the weather stays hot until October, so I always associate camping with early autumn. It’s something I look forward to sharing with my daughter now that she’s 3 and a little more adaptable. You already know this s’mores dip will be on the menu for our next camping trip! It gives us all the flavors and fun of s’mores with minimal cleanup. Plus, it’s perfect for little hands (and big hands, too!) to dip and enjoy. Just be careful to not touch the skillet—she’s hot!
What is S’mores Dip?
I think most of us are familiar with traditional s’mores: graham crackers sandwiched with a layer of chocolate and a big toasted marshmallow. Well, with my s’mores dip recipe, we’re ditching the roasting stick and building our s’mores right in a cast iron skillet! I layer semi-sweet chocolate chips AND white chocolate chips for the ultimate indulgence (but on a budget, of course), then top it all off with mini marshmallows. Everything melts together in the oven (or on a hot grill or over a campfire if you have the right set up), and voila! You have a delicious, ooey-gooey s’mores dip to scoop up with graham crackers.
Here’s what you’ll need to make this easy s’mores dip recipe:
Semi-Sweet Chocolate Chips: The base of this dip is made with a layer of semi-sweet chocolate chips. You can also use milk chocolate or dark chocolate chips, or even a chocolate bar broken into small pieces.
White Chocolate Chips: Adds a creamy, sweeter contrast to the semi-sweet chocolate chips.
Mini Marshmallows: I prefer using mini marshmallows as they melt quickly and evenly. You can also use regular-sized marshmallows or jumbo marshmallows cut in half.
Graham Crackers: Honey or cinnamon-flavored graham crackers both work well as dippers—choose your favorite!
What Else Can I Add?
This is one recipe you really can’t mess up! Feel free to get creative and add your own twist. Some fun ideas include:
Peanut butter or butterscotch chips
A drizzle of caramel sauce on top
Dollops of peanut butter between the chocolate and marshmallow layers
Chopped nuts (peanuts, almonds, pecans) mixed in with the chocolate chips
Instead of graham crackers, try dipping with cookies, fruit, or pretzels/Ritz crackers (salty and sweet is always a winning combo!)
Do I Need a Cast Iron Skillet?
Cast iron heats up evenly and stays hot for a long time, making it the perfect vessel for this s’mores dip. The chocolate melts quickly and stays melted for longer in a cast iron skillet. However, you can make this recipe in any oven-safe dish or pan. Just keep an eye on the dip, as it may cook a bit faster or slower, depending on your dish.
Chocolate can burn and become grainy if heated for too long. Evenly layer the chocolate chips and marshmallows, and switch to broil very briefly once the marshmallows start to puff up. The chocolate will continue melting from the residual heat without overcooking! If you’re doing this over a campfire or on a grill, you won’t get the toasty marshmallow appearance but they will still become gooey and warm. Yum!
Storage and Reheating Instructions
One of my favorite things about this s’mores skillet dip is how it can be reheated multiple times so nothing goes to waste. Just pop it back in the oven until warmed through and melty. You can also store any leftover dip in the fridge for 3-4 days in a microwave-safe container and reheat as needed.
S’mores Dip
This oven baked S’mores Dip recipe is the cleanest, mess-free way to serve s’mores year-round! Zero fuss with just 4 ingredients.
Preheat oven to 350 degrees. Spread 1 ½ cups semi-sweet chocolate chips on the bottom of your cast iron skillet.
Then, spread ½ cup white chocolate chips across the top of the semi sweet chocolate chips.
Top with 1 cup mini marshmallows. Bake at 350 degrees until marshmallows on top have puffed up and are starting to brown, about 8 minutes.
Turn oven on broil for 2 minutes, or until the marshmallows on top are toasted to your liking. Remove from oven and serve hot with ½ a box of graham crackers! Be careful, the cast iron skillet stays hot for a while. Scoop with care.
No camping trip or bonfire necessary; this easy skillet s’mores dip is a year-round treat I’ll be making on repeat!
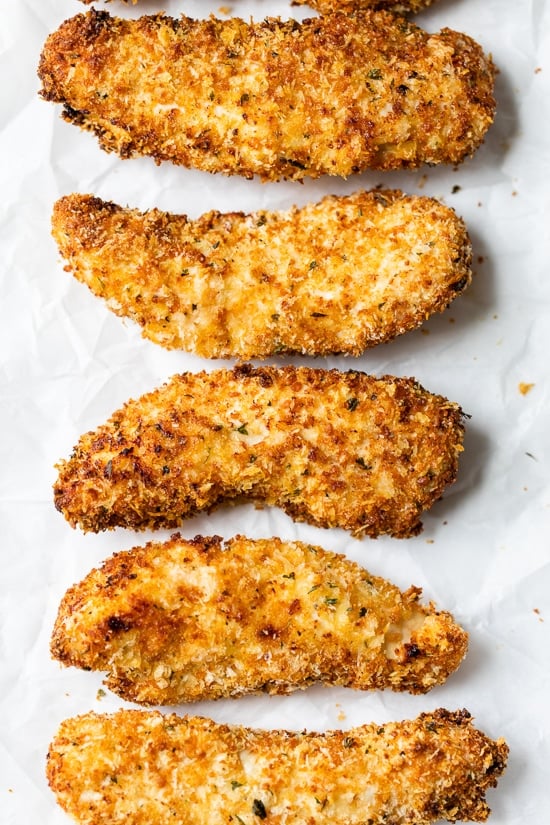
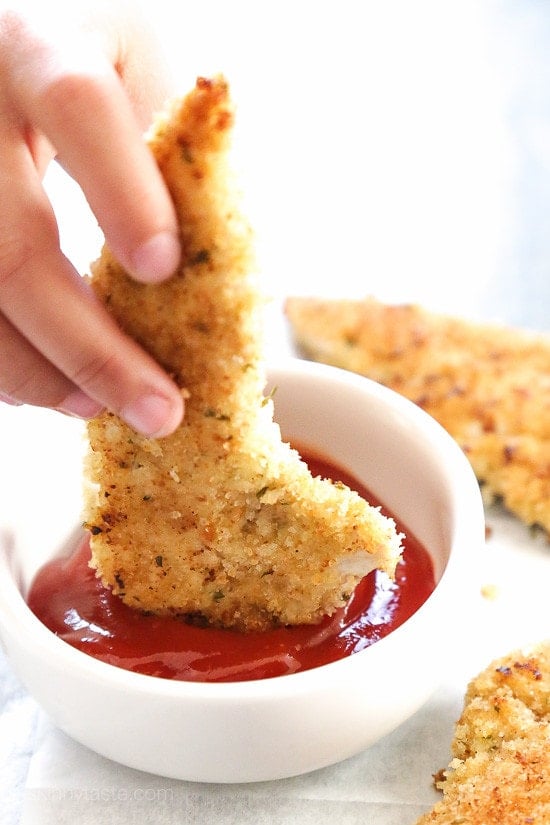
Golden Homemade Chicken Tenders with a Sweet Honey Mustard
Hello, friends! I don’t know about you, but I absolutely love homemade chicken tenders or chicken fingers—especially when they’re crispy on the outside and tender and juicy on the inside. I make them with panko breadcrumbs and a bit of shredded coconut to give them a really great flavor.
To top it off, I whip up a little spicy honey mustard sauce that takes the whole dish to the next level. When I say they’re crunchy, juicy, and downright delicious, I’m not exaggerating.
Perfect Homemade Chicken Tenders: A Combination of Crispiness and Juiciness
When we talk about the perfect chicken finger, what are we really looking for? Well, it’s all about balance. You want a tender that’s crispy on the outside but moist and juicy on the inside. Achieving this balance starts with choosing the right kind of chicken.
For the best homemade chicken tenders, I recommend using chicken tenderloins if you can find them. These are the small, thin strips of meat that are naturally part of the chicken breast. They cook quickly and stay juicy, making them ideal for this dish. If tenderloins aren’t available, you can always use chicken breasts cut into strips. Just make sure they’re not too thick, or you’ll end up with a tender that’s golden brown on the outside but undercooked inside.
The Secrets to Making Perfectly Crispy Homemade Chicken Fingers
These are the little tricks I use to make my chicken fingers crispy, flavorful, and tender, with that extra delicious twist:
1. Panko Breadcrumbs and Coconut: Instead of using regular breadcrumbs, I use panko breadcrumbs and shredded coconut to create a unique, flavorful, and extra crispy coating for my chicken tenders. The panko gives them a light, airy crunch, while the coconut adds a subtle sweetness and extra texture.
2. Cornflakes and Cornmeal: To add even more crunch, I include crushed cornflakes and a bit of very fine cornmeal in the breading mixture. This combination really enhances the crispiness of the chicken tenders.
3. Seasoning the Breading: I always make sure to season the breading mixture with cayenne pepper (for a subtle heat in the background), smoked paprika, and salt. This way, the tenders are flavorful all the way through.
4. Proper Dredging Technique: I like to emphasize the importance of dredging the chicken in flour before dipping it in the egg mixture. The flour dries the surface of the chicken, allowing the egg to adhere better, which in turn helps the breadcrumb coating stick more effectively.
5. Oil Temperature: I always make sure to maintain the right oil temperature—about 325°F to 350°F—when frying. This ensures that the chicken tenders cook evenly and stay moist and juicy inside while becoming perfectly crispy on the outside.
How to Serve Chicken Tenders
Here are a couple of suggestions
Dipping Sauces
The right dipping sauce can take your chicken tenders to the next level. Honey mustard, barbecue sauce, ranch, or even a spicy sriracha mayo can add a delicious twist. If you’re feeling adventurous, try making your own honey mustard sauce at home. A blend of Dijon mustard, honey, a bit of lemon juice, and a touch of cayenne pepper will give your tenders a sweet and spicy kick that’s hard to beat.
Sides
Chicken tenders pair beautifully with a variety of sides. For a classic combo, serve them with French fries or a creamy coleslaw. If you’re aiming for a healthier option, roasted vegetables or a fresh garden salad are excellent choices. And don’t forget about the bread! A warm, buttery biscuit or a slice of garlic bread can be just the thing to round out your meal.
Suggested Pairings: A Culinary Match Made in Heaven
Pairing chicken tenders with the right sides and beverages can transform a simple meal into a feast.
Beverages
If you’re looking for a refreshing drink to accompany your chicken tenders, a cold glass of lemonade or iced tea is always a winner. For adults, a crisp white wine like Sauvignon Blanc or a light beer pairs perfectly with the tender, juicy chicken.
Salads
Chicken tenders are fantastic atop a salad. A Caesar salad with crispy chicken tenders, Parmesan cheese, and crunchy croutons is a hearty, satisfying meal. Or go for something lighter with a mixed green salad topped with sliced tenders, cherry tomatoes, cucumbers, and a balsamic vinaigrette.
Storing and Reheating: Enjoying Leftover Chicken Tenders
If you happen to have leftover chicken tenders (though I doubt you will), storing them properly is key to maintaining their deliciousness. Place the leftover chicken tenders in an airtight container and store them in the refrigerator for up to three days.
When it comes time to reheat, avoid the microwave if you can—it tends to make the breading soggy. Instead, reheat the tenders in an oven at 350 degrees F for about 10 minutes or until they are heated through and crispy. You can also use an air fryer for an even quicker option. Just a few minutes at 375 degrees F, and they’ll be as crispy as when you first made them.
Ready to Make Your Own Homemade Chicken Tenders?
Homemade chicken tenders are not only easy to make, but they’re also a crowd-pleaser. Whether you’re frying them up in a skillet or opting for a healthier baked version, you can’t go wrong with this classic dish. Serve them with your favorite dipping sauce, pair them with some tasty sides, and enjoy a meal that’s crispy, juicy, and downright delicious.
So, what are we waiting for? Let’s get cooking!
Homemade Chicken Tenders Recipe with Honey Mustard Sauce
These Juicy and Crispy Chicken Fingers are a delightful treat! Coated with a unique blend of panko breadcrumbs, shredded coconut, and crushed cornflakes, they are perfectly crispy on the outside while remaining juicy and tender on the inside. Paired with a delicious spicy honey mustard sauce.
Course Appetizer, Brunch, Dinner, Lunch
Cuisine American
Servings 4servings
Calories 903.83kcal
1poundChicken Tenderloins, or Chicken Breast cut into strips
1cupAll-Purpose Flour
2Eggs, beaten
2cupsPanko Breadcrumbs
¾cupUnsweetened Shredded Coconut
2cupsCrushed Cornflakeswhen crushed becomes about 1 cup
¼cupFine Cornmeal
¼teaspoonCayenne Pepper
2teaspoonsSmoked Paprika
2teaspoonKosher Salt, divided
1teaspoonBlack Pepper
1cupVegetable Oil, for frying
For the Honey Mustard Sauce:
2Eggs
2tablespoonsDijon Mustard with Seeds
4clovesGarlic, minced
4tablespoonsHoney (the Chef used Acacia Honey)
½teaspoonRed Chili Pepper, finely chopped
1teaspoonSpicy Harissa (optional)
1tablespoonYellow Mustard
¾cupLemon Olive Oil (or regular olive oil)
1tablespoonLemon Juice
Salt and Pepper, to taste
Prevent your screen from going dark
Begin by preparing the coating for the chicken. In a large bowl, combine the panko breadcrumbs, shredded coconut, crushed cornflakes, fine cornmeal, cayenne pepper, smoked paprika, and 1 teaspoon of salt. Mix thoroughly to ensure even distribution of spices and textures.
In 3 separate dishes, the Chef used small lasagna pans, add in one the flour, the other 2 beaten eggs and the other the previously mixed bread crumb make sure each dish is properly seasoned with salt and black pepper.
Dip each chicken strip first in the flour, shaking off any excess, then in the beaten eggs also shaking off any excess, and finally coat it in the panko mixture, pressing lightly to adhere the coating.
Heat the vegetable oil in a deep-frying pan to 325°F (160°C).
When the oil is at temperature, start to cook the chicken strips in batches, making sure not to overcrowd the pan. Cook each strip until golden brown and cooked through. The internal temperature should not exceed 155°F (68°C). Drain on paper towels or a drying rack and set aside.
For the sauce, combine eggs, dijon mustard, garlic, honey, chili pepper, harissa, yellow mustard, and lemon juice in a blender or with an immersion blender. Slowly add the lemon olive oil while blending to create a thick, emulsified sauce. Season with salt and pepper to taste.
Serve the chicken fingers hot with the honey mustard sauce on the side. Enjoy the crunch and juiciness of these delicious chicken fingers with a perfect blend of sweet and spicy flavors from the sauce!
Achieving That Perfect Crispy Coating
Want to know the secret to super crispy chicken tenders? It’s all about the breading. For an extra crispy coating, use a combination of panko breadcrumbs and finely crushed cornflakes. The panko gives the tenders that light, airy crunch, while the cornflakes add a subtle sweetness and additional crispiness. Before you dredge the chicken, be sure to season the flour with salt, pepper, and a little garlic powder. This ensures that every bite is packed with flavor, even before you get to the breading. And speaking of breading, don’t rush the process. Take the time to dredge the chicken in flour, then dip it in a beaten egg mixture, and finally coat it with your breadcrumb mixture. Make sure the chicken is fully covered for maximum crispiness.
Bonus Pro-Tip: Baking for a Healthier Option
If you’re looking to cut back on calories but don’t want to sacrifice that delicious crispy texture, baked chicken tenders are the way to go. Preheat your oven to 400 degrees F and place the breaded chicken tenders on a wire rack set over a baking sheet. This allows the hot air to circulate around the chicken, giving you a crispy exterior without the need for frying. To make sure they come out golden brown and crunchy, spray the tenders lightly with cooking spray before baking. Bake for about 15-20 minutes, flipping them halfway through, until the chicken is cooked through and the coating is crispy. Trust me, your homemade chicken tenders will still be juicy and full of flavor.
While chicken tenders, also known as chicken fingers or chicken strips, might seem like a modern creation, they’ve actually been around for a while. They can be traced back to the 1950s in the United States. Some say they were first served in Manchester, New Hampshire, at the Puritan Backroom, a family-run restaurant that’s been a local favorite for decades. However, like many iconic dishes, the exact origin is up for debate. What we do know is that chicken tenders quickly became a staple in American cuisine.
Frequently Asked Questions About Homemade Chicken Fingers
1. What is the best way to make homemade chicken tenders crispy?
To achieve crispy chicken tenders, use a combination of panko breadcrumbs and crushed cornflakes for the coating. Ensure the chicken is dry before breading and follow a three-step process: flour, egg wash, and breadcrumb mixture. Cooking them at the right temperature—baking at 400°F or frying at 350°F—will also help attain a perfect crunch.
2. How can you keep homemade chicken tenders moist and juicy?
Marinating the chicken tenders in buttermilk or a seasoned yogurt mixture for at least 30 minutes helps lock in moisture and tenderize the meat. Cooking them until they reach an internal temperature of 165°F ensures they are fully cooked yet still juicy. Avoid overcooking, as it can dry out the chicken.
3. Can you make homemade chicken tenders ahead of time and freeze them?
Yes, you can prepare and bread the chicken tenders in advance, then freeze them on a baking sheet before transferring to a freezer-safe bag. When ready to cook, bake them directly from frozen at 400°F for 20-25 minutes or fry until golden and cooked through. This method provides a convenient, homemade option for quick meals.
4. What are the best dipping sauces to serve with homemade chicken tenders?
Popular dipping sauces include honey mustard, barbecue, and ranch dressing, which complement the savory flavor of the tenders. For a spicy kick, try sriracha mayo or buffalo sauce. You can also experiment with sweet and sour or garlic aioli for different flavor profiles.
5. How should you store and reheat leftover chicken tenders?
Store leftover tenders in an airtight container in the refrigerator for up to four days. Reheat them in the oven at 350°F or in an air fryer to restore their crispiness, avoiding the microwave which can make them soggy. Ensure they are heated through before serving.
6. Can homemade chicken tenders be baked instead of fried?
Absolutely, baking is a healthier alternative that still yields crispy results. Place the breaded tenders on a wire rack over a baking sheet, lightly spray with cooking oil, and bake at 400°F for 15-20 minutes. The wire rack allows air circulation, helping the tenders cook evenly and stay crispy.
7. What kind of chicken should you use for making chicken tenders?
Chicken tenderloins are ideal due to their size and tenderness, but sliced chicken breasts work well too. Cut the breasts into uniform strips to ensure even cooking. Fresh, high-quality chicken will yield the best flavor and texture.
8. How can you make gluten-free homemade chicken tenders?
Use gluten-free breadcrumbs or crushed rice cereal for the coating, and substitute all-purpose flour with almond or gluten-free flour blends. Follow the standard breading and cooking process, ensuring all ingredients, including seasonings and sauces, are gluten-free for a safe and tasty meal.
9. How do you prevent the breading from falling off homemade chicken tenders?
Ensure the chicken is dry before breading and follow the proper dredging steps: flour, egg wash, then breadcrumbs, pressing the coating firmly onto the chicken. Let the breaded tenders rest for 10-15 minutes before cooking to help the coating adhere better. Avoid overcrowding the pan and handle them gently during cooking.
10. Can you make chicken tenders without using eggs?
Yes, you can substitute eggs with buttermilk, milk mixed with a little flour, or dairy-free alternatives like almond milk for binding the breading. These substitutes help the coating stick effectively while also adding flavor and moisture to the chicken tenders.
11. How do you make chicken tenders crispy without frying?
Baking or air frying are excellent methods for achieving crispiness without deep frying. Coat the tenders thoroughly and spray lightly with oil before cooking. Bake at a high temperature like 425°F or air fry at 375°F until golden brown and crispy.
12. What is the best temperature to cook chicken tenders?
For baking, cook at 400°F to 425°F for optimal crispiness and juiciness. If frying, maintain the oil temperature around 350°F. Always ensure the internal temperature of the chicken reaches 165°F for safe consumption.
13. How can you make chicken tenders healthier?
Opt for baking or air frying instead of deep frying to reduce fat content. Use whole wheat or gluten-free breadcrumbs and incorporate seasonings instead of excessive salt. Serving them with fresh vegetable sides or salads also enhances the nutritional value of the meal.
14. Can you marinate chicken tenders overnight?
Yes, marinating chicken tenders overnight enhances their flavor and tenderness. Use marinades like buttermilk with spices, citrus-based mixtures, or yogurt blends. Ensure the chicken is refrigerated during marination to keep it safe and fresh.
15. How do you make chicken tenders more flavorful?
Add a variety of spices and herbs to your breading mixture, such as paprika, garlic powder, onion powder, and dried herbs like oregano or thyme. Marinating the chicken in seasoned liquids or incorporating grated parmesan into the coating can also boost flavor significantly.
16. How do you prevent chicken tenders from drying out in the oven?
Marinating beforehand and coating them properly helps retain moisture. Bake at the appropriate temperature and avoid overcooking by checking for doneness when the internal temperature reaches 165°F. Using a wire rack allows even cooking without drying out the meat.
17. What sides go well with chicken tenders?
Classic sides include French fries, coleslaw, and mashed potatoes. For healthier options, consider roasted vegetables, steamed broccoli, or a fresh garden salad. Macaroni and cheese or corn on the cob also pair deliciously with chicken tenders.
18. How do you make spicy homemade chicken tenders?
Incorporate spices like cayenne pepper, chili powder, or hot sauce into the marinade and breading mixture. You can also serve the cooked tenders with spicy dipping sauces such as buffalo sauce or spicy mayo to add extra heat.
19. How do you reheat frozen chicken tenders?
Preheat your oven to 375°F and place the frozen tenders on a baking sheet in a single layer. Bake for 15-20 minutes, or until they are heated through and crispy. An air fryer set at 370°F for 10-12 minutes is another effective reheating method.
20. How do you make crispy homemade chicken tenders in an air fryer?
Preheat the air fryer to 375°F and arrange the breaded tenders in a single layer, avoiding overlap. Lightly spray with cooking oil and cook for 10-12 minutes, flipping halfway through, until they are golden brown and reach an internal temperature of 165°F.
Chef Jean-Pierre, born in Aix-en-Provence, France, honed his culinary skills at a young age, mastering the art of charcuterie by the age of twelve. Determined to become a chef, he began his formal apprenticeship at L’Oustau de Baumaniere in Provence, one of the world’s best restaurants with a 3-star Michelin rating.
Jean-Pierre continued his apprenticeship on the French Riviera where he worked at famous restaurants, such as L’Oasis at La Napoule, Le Vendome in Aix-en-Provence, and the the Carlton in Cannes. In 1976, he opened The Left Bank Restaurant, consistently recognized as one of the best in America for 22 years by magazines like “Bon Appetit,” “Conde Nast,” “Gourmet Magazine” and “Travel & Leisure.”
Jean-Pierre was also a popular TV personality, having hosted National Public Television series like “Incredible Cuisine” and “Sunshine Cuisine.” He was also nominated for “Best Culinary Video” by the James Beard Foundation and operated the nationally renowned “Chef Jean-Pierre’s Cooking School” and was a sought-after guest on shows like “The Today Show” and “Larry King Live.”
With over 1.9 Million Subscribers to his Chef Jean-Pierre YouTube Channel, he is a widely respected figure in the culinary world, known for his skill and dedication to his craft, but even more so known for making gourmet cooking fun and easy to learn.
Whether Colorado regulators even thought about Joe Emerson isn’t known. Emerson is the Alaska Airlines pilot who took psychedelic mushrooms, had a friend drive him to the airport, and took a jump seat on a flight to San Francisco last October. But Emerson did not stop there. When airborne, he moved into the cockpit to pull levers to shut down the engines, a move that could have taken the lives of all 83 on board.
Nevertheless, regulators from Colorado’s Department of Revenue have finalized the regulations surrounding so-called psychedelic-assistant therapy to begin in 2025. Colorado is joining Oregon in the legalization after voters approved it in 2022.
The new regulations establish Colorado’s psychedelics industry by growing mushrooms, operating a therapy center, or manufacturing psilocybin edibles now with guidance on how to do all of the above legally.
Licensing processes for psilocybin mushroom growers, manufacturers, and drug testing labs are included, as well as so-called “healing centers” where psychedelic-assisted therapy will take place.
Depression and end-of-life distress are among the promised treatments.
The rules spell out permitted and prohibited actions at each of the businesses, offer strict guidance on waste disposal, define drug serving sizes and product labeling requirements, and set penalties for individuals caught breaking the laws, among other things.
Another unit, the Colorado Department of Regulatory Agencies, did set out regulations for people who supervise individuals under the influence of a psychedelic experience. It’s unclear what happens if someone under supervision but on psychedelic mushrooms attempts something like taking down an airplane.
Emerson, who was restrained by the Alaska crew, on the ground faced 83 counts of attempted murder, but prosecutors backed off those charges. Instead, they are going with 83 counts of reckless endangerment. It remains to be seen if there is a plea agreement or trial later this year.
When all this occurred, it is believed that Emerson was experiencing hallucinogen-persisting perception disorder, which is caused by someone taking\ psychedelic mushrooms.
The bottom line for the new regulations is that it’s now legal in Colorado for people 21 and older to possess, share, and use magic mushrooms, including psilocybin, psilocin, DMT, ibogaine, and mescaline not extracted from peyote.
People 21 and older may also grow psychedelic mushrooms in a private residence as long as people under 21 are kept away from them.
(To sign up for a free subscription to Food Safety News, click here.)
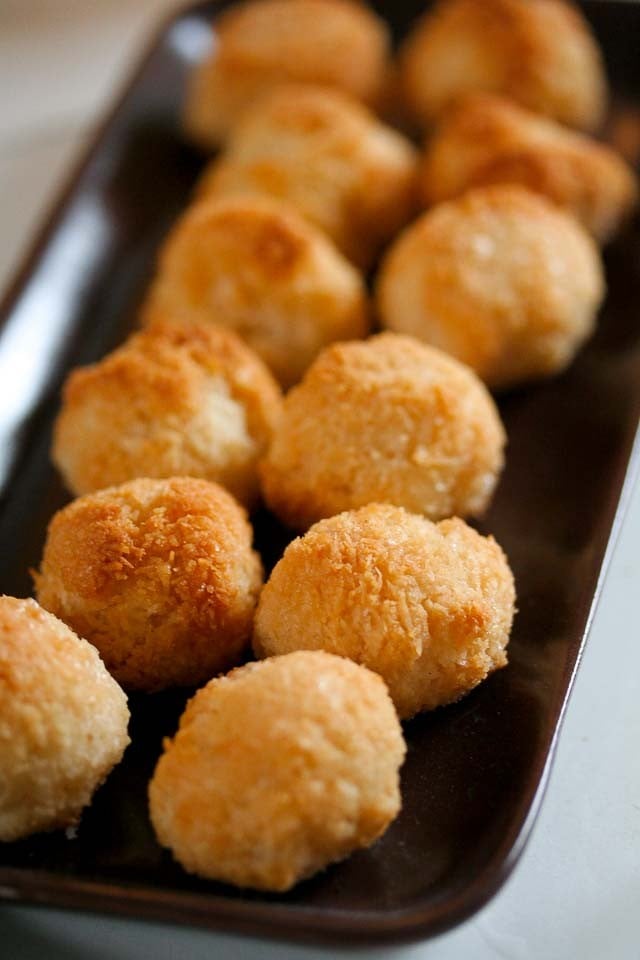
Many people tell me this is one of their favorite recipes from my cookbook, Ready For Dessert. In addition to these fantastic Coconut-Dipped Chocolate Macaroons in it, you’ll find the much-loved recipe for Fresh Ginger Cake, which makes a fantastic dessert served with sliced, juicy peaches or flavorful strawberries and raspberries in the summer, or tangy lemon cream in the winter, as well as my other most frequently requested recipes.
I’m often asked about the different between Parisian macarons and American-style macaroons, like these. Both are egg white-based, however the European version (which was invented in Italy) uses almonds whereas the American ones use coconut. There’s some dispute about how the American ones came to be made of coconut; one theory is that European immigrants who came to the United States couldn’t get almonds, or they were too expensive, so they used coconut.
Another theory is that European companies wanted to ship their macarons over longer distances, so swapped out coconut for the spoilage-prone nuts. Others credit Franklin Baker, an American flour miller, who found the then-exotic shredded coconut more interesting (and less-expensive) to use than nuts. Either way, I like all kinds of macaroons…or macarons.
The French do make coconut cookies, which are called Congolais or Rochers à la noix de coco, usually shortened to Rochers coco, or coconut “rocks.” I’ve not seen them dipped in chocolate in any French bakery – but why not?
I’ve tweaked this recipe over the years and tested them with flour alternatives, which I’ve noted in the headnote in the recipe, and they come out great. You can even skip swiping the bottoms in bittersweet chocolate if you wish. No matter how you make them, I hope they become one of your favorite cookies, too.
Coconut and Chocolate Macaroons
From Ready for DessertI invariably make these cookies when I have extra egg whites on hand. The dough freezes beautifully if I don’t plan to make the macaroons right away. These coconut macaroons can be made without the flour by substituting 2 1/2 tablespoons of cornstarch or potato starch for the flour. Readers have told me the recipe works well with 1/4 cup matzoh meal substituted in place of the flour.
Course Dessert
Cuisine American
Keyword coconut, cookie, macarooon
Servings 30Cookies
4largeegg whites
1 1/4cups (250g)sugar
1/4teaspoonsalt
1tablespoonhoney
2 1/2cups (200g)unsweetened shredded coconut, (see note)
1/4cup (35g)flour
1/2teaspoonvanilla extract or vanilla bean paste
3ounces (90g)bittersweet or semisweet chocolate, chopped
Prevent your screen from going dark
In a large skillet or wide saucepan, mix together the egg whites, sugar, salt, and honey.
Over low heat on the stovetop, stir the egg whites and sugar together until the mixture is tepid, but not warm or hot. You don’t want to cook them; just warmed slightly so they are looser.
Add the coconut, flour, and vanilla. Continue to stir the mixture over medium heat for a few minutes until it thickens to a cohesive mass. (It’ll be like very thick oatmeal and the bottom will very slightly start to scorch.) Remove from heat. Transfer to a bowl to cool to room temperature.
When ready to bake, line a baking sheet with parchment paper or silicone baking mat and preheat the oven to 350º F (180ºC).
Form the dough into 1 1/2-inch (4cm) rounds in your hands, squeezing the dough to coax them into rough rounds (remember, the French call them “rocks,” so they can be a uneven – for smoother rounds, dampen your hands), then place them evenly spaced on the baking sheet. Bake the macaroons until deep golden brown, about 18 to 20 minutes. Cool completely.
To dip the macaroons in chocolate, melt the chocolate in a clean, dry bowl set over a pan of simmering water (or in a microwave.) Line a baking sheet with plastic wrap or parchment paper. Dip the bottoms of each cookie in the chocolate and set the cookies on the baking sheet. Refrigerate 5-10 minutes, until the chocolate is set.
Unsweetened shredded coconut is available in most natural food shops or you can purchase it online. Flaked coconut is larger and I haven’t tried these macaroons with the flakes but if that’s all you have, I would pulse the flakes in a food processor a few times until they’re finely shredded. Storage: The baked macaroons will keep for up to three or four days if stored in an airtight container. If dipped in chocolate, store the cookies in a cool place. The dough can be refrigerated for up to one week or frozen for at least two months.
Lyn found this recipe and thought it would be good for our no meat Monday meal. It was! I love the taste of toasted sesame oil and have never used sesame paste so I thought give it a try. Couldn’t find it in the grocery stores in our area and seeing that there were no chinses markets close enough so it was Amazon to the rescue.
Ingredients
1 lbs. fresh noodles or dry 8 oz..
Sesame sauce
4 tbsp (1/4 cup) Chinese sesame paste.
1 tbsp Mayonnaise.
1 tsp Chili Oil (divided – 2 tsp and 1 tsp).
2 tsp sesame oil (divided 1tsp-1 tsp).
3 tbsp light soy sauce.
5 tsp Chinese/Taiwanese black vinegar.
4 tsp water .
1 tsp Chinese/Taiwanese black vinegar rice vinegar or even wine. vinegar is fine if you can’t find this.
4 tsp fine sugar.
1 tsp garlic crushed.
1 ½ fresh grated ginger.
½ tsp fine salt to taste.
1 tsp ground white pepper or a very generous grind of black pepper to taste.
Other optional ingredients
4 hardboiled eggs
160 g beansprouts (2 handfuls)
4 scallions thinly sliced.
Persian or mini cucumber sliced in matchstick size.
Instructions
Bring 3 quarts of slightly salted water to boil in a large pot. Add noodles and reduce heat to maintain a gentle simmer, stirring occasionally, 3-5 minutes until almost tender. See package instructions. The center of noodles should be firm and slightly opaque. Meanwhile place 1 tsp sesame oil in large bowl.
Drain noodles very well in colander add to bowl and mix to coat. Transfer to baking sheet and spread into an even layer. Refrigerate until cold, about 20 minutes.
While this is cooling whisk together sesame paste, mayonnaise, 2 tsp of chili oil and remaining 1 tsp sesame oil. Now add soy sauce, vinegar, water, sugar, 1 tsp garlic, and ginger and whisk until smooth. Season dressing with remaining chili oil and ½ teaspoon of garlic. Add noodles and toss until well combined.
Divide noodles evenly among serving bowls and garnish your choice cucumber, scallions, eggs and bean sprouts or have these on separate plate for others to garnish how they wish.
Info
Chinese sesame paste and tahini are both made from sesame seeds, but they have different ingredients and flavors:
Ingredients
Chinese sesame paste is made from toasted sesame seeds, while tahini is made from raw sesame seeds.
Flavor
Chinese sesame paste has a stronger, nuttier flavor, similar to unsalted peanut butter and fresh-pressed sesame oil. Tahini has an earthy, slightly bitter flavor, with a toasted sesame seed flavor that’s not as sweet as peanut butter
This healthy Sweet Potato Salad with avocado combines sweet, creamy, warm, and cold elements and can be enjoyed warm or cold. It’s a great vegetarian meal or side dish.
Sweet Potato Salad
If you’re looking for a dish that’s not only packed with flavor but also loaded with nutrients, this Sweet Potato Avocado Salad is the way to go. It combines roasted sweet potatoes with creamy avocado and baby arugula and works well as a side or a meatless main dish. Roasting the sweet potatoes brings out their natural sweetness and gives them a slightly caramelized exterior that contrasts beautifully with the avocado. To enhance their flavor, I toss the sweet potatoes in olive oil, salt, and paprika before roasting. Great for lunch or a light dinner. For more hearty salads, try my Kale Salad with Roasted Sweet Potato and Dried Cherries or Green Goddess Potato Salad with baby red potatoes.
Why You’ll Love This Sweet Potato Salad Recipe
The first time I tried warm sweet potatoes tossed with vinegar in this Sweet Potato Tandoori Salad, I fell in love and have been hooked ever since! There’s something about the sweet, salty, acidic combination that just works so well. Here’s more reasons to love this vegetarian salad!
Nutritious: Sweet potatoes, arugula, and avocado are all packed with fiber, vitamins, and minerals, making this colorful salad an excellent way to get your daily dose of veggies.
Easy to Prepare: It’s quick and simple to make and perfect for meal prep, ensuring you have a delicious option ready whenever you’re hungry.
If you make this healthy sweet potato salad recipe, I would love to see it. Tag me in your photos or videos on Instagram, TikTok, or Facebook!
What You’ll Need
This salad combines nutrient-rich vegetables with an apple cider vinaigrette, here’s the ingredients: (See the complete recipe with measurements in the recipe card below.)
Sweet Potatoes: Peel and chop sweet potatoes into small cubes.
Olive Oil: Coat the potatoes in olive oil before roasting them.
Seasoning: Sweet paprika, garlic powder, kosher salt, black pepper
Red Onion adds a little crunch.
Arugula: Peppery arugula complements the sweetness of the potatoes.
Avocado adds a creamy texture and heart-healthy fats.
Roast the sweet potatoes, make the dressing, and toss everything together for this easy sweet potato avocado salad recipe. The recipe card at the bottom has the complete instructions.
Season the sweet potatoes.Roasted Sweet PotatoesMake the dressingToss all the ingredients together then add the avocado.
Season the Sweet Potatoes: Combine the 4 spices in a small bowl. Drizzle the potatoes with oil and season them with the spice mix.
Roast The Sweet Potatoes: Bake the potatoes for about 30 minutes at 400°F, tossing halfway through.
Make the Dressing: Whisk the vinaigrette ingredients in a large bowl and add the red onions.
Make the Salad: Add the hot sweet potatoes to the dressing and let cool for at least 5 minutes. Once cool, add the arugula and toss with olive oil and salt.
Add the Avocado: Divide the salad between 4 bowls, add more salt and pepper if needed, and top each with avocado.
Variations
Potatoes: Substitute butternut squash.
Onions: Replace red onions with shallots or scallions.
Greens: Swap arugula with spinach.
Paprika: Smoked paprika will also work if you don’t have sweet.
Vinegar: Sub white wine vinegar or red wine vinegar.
Sweetener: Use maple syrup or agave instead of honey.
Meal Prep: This salad holds up well as leftovers, making it great for meal prep. Just be sure to add the avocado right before serving to prevent it from browning.
Refrigerator: Store it in an airtight container for 3 days. Eat it cold or let it sit on the counter for 30 minutes to come to room temperature.
More Sweet Potato Recipes You’ll Love
Prep: 15 minutesmins
Cook: 30 minutesmins
Total: 45 minutesmins
Yield: 4servings
Serving Size: 2cups
Preheat the oven to 400F.
Place the sweet potato cubes on a baking sheet. Drizzle with the olive oil and toss. In a small bowl, stir together the paprika, garlic powder, 1/2 teaspoon salt and black pepper.
Sprinkle the spice mixture over the potatoes and toss to combine. Bake 13-15 minutes, toss then bake for additional 13-15 minutes, or until tender.
While the sweet potato is cooking, mix the salad dressing together in a large bowl and add the onions.
Remove the roasted sweet potatoes from the oven and while still hot, toss them into the large bowl with the salad dressing, then let them cool at least 5 minutes.
Once cool, add the arugula, 1 teaspoon olive oil and 1/8 teaspoon salt and toss well.
Divide 4 bowls, adjust salt and pepper to taste then top with 1 ounce avocado in each bowl.
Last Step:
Please leave a rating and comment letting us know how you liked this recipe! This helps our business to thrive and continue providing free, high-quality recipes for you.
Deadlines are approaching for another important governmental function involving food.
The Dietary Guidelines for Americans for 2025 are being worked on to provide advice on what to eat and drink to build a healthy diet that can promote healthy growth and development, help prevent diet-related chronic disease, and meet nutrient needs.
The expert Dietary Guidelines Advisory Committee, whose members were named in early 2023, has met five times, with only one more meeting possible on Sept. 25-26, 2024, if necessary. If there is a sixth meeting, registration details will be made available to the public close to the meeting date.
The committee consists of 20 nationally recognized experts in food and nutrition.
Since 1990, the Secretaries of Agriculture and Health and Human Services have been required by law to publish the Dietary Guidelines for Americans every five years. The expert committee’s recommendations must be handed off to the Secretaries who make the final decisions. The Dietary Guidelines then became the cornerstone of federal food and nutrition guidance.
“The nature of dietary guidance, providing advice on foods and nutrients to eat more or less of, has remained relatively consistent,” according to the government. “However, some of the specific messages have changed as the nutrition science has progressed and the methods used to review the science have advanced.”
The five-year update of the Dietary Guidelines is now winding down and has been a scientifically rigorous, multi-year process.
The U.S. Departments of Health and Human Services (HHS) and Agriculture (USDA) have identified proposed scientific questions with input from federal experts and the public and then gained the review of the Dietary Guidelines Advisory Committee.
It has been up to the committee members to refine and prioritize the questions, collaborate to develop protocols that describe how they plan to review the science, review and synthesize the evidence based on their protocols, present their scientific findings, and consider public comments.
The Committee’s work culminates in a comprehensive scientific report on the current state of nutrition science and provides independent recommendations to HHS and USDA.
Upon delivery of its report to the Secretaries or when its 2-year charter expires, whichever comes first, the Committee’s activities will finish, and the Departments will develop the next edition of the Dietary Guidelines, informed by the Committee’s work, existing evidence-based federal guidance, federal agency input, and public comments.
The Committee examined the evidence using three approaches: Data analysis, food pattern modeling, and systematic reviews. Each approach has its own rigorous, protocol-driven methodology and plays a unique, complementary role in examining the science. For each approach, staff from HHS and USDA supported the Committee’s review of the evidence.
This year’s update of the Guidelines has yet to generate much controversy.
According to the National Institutes of Health, the committee examined the fact that about 36 percent of people in the U.S. are lactose-intolerant.
Earlier, the potato industry was concerned about potatoes’ future in this year’s and future Dietary Guidelines for Americans. But Secretary of Agriculture Tom Vilsack and Secretary of Health and Human Services Xavier Becerra sent a letter to Sen. Susan Collins, R-Maine, assuring her there is no intent or effort underway to reclassify potatoes as a grain under the guidelines.
The USDA and HHS are jointly responsible for updating the guidelines.
“The Dietary Guidelines for Americans is a framework for healthy eating, not a one-size-fits-all mold everyone must fit into,” the letter said. “ The U.S. population is diverse, reflected in what and how we eat. “
While HHS and USDA acknowledge that most Americans do not follow the guidelines, the U.S. wine industry is concerned about following the World HealthOrganization’s guidelines. U.S. dietary guidelines say men can safely have two drinks daily, and women can have one. Canada’s dietary guidelines recommend no more than two drinks per week, with polls showing that 66 percent of people aged 21 to 39 said they would cut back.
The current ninth edition of the Dietary Guidelines for Americans (DGA) is for 2020-25. For the first time, it includes dietary guidelines for children from birth to 23 months.
At the end of the last five-year exercise, HHS and USDA rejected the advice of the last expert panel, which recommended that the guidelines set new lower targets for sugar and alcoholic beverage consumption.
Earlier this year, the German Society for Nutrition (DGE) released new dietary guidelines for Germany, which focus more on plant-based foods and highlight health and sustainability.
Germany’s dietary guidelines call for a 75 percent plant-based diet and a 25 percent animal-based diet. The guidelines also recommend plant-based fats like vegetable oils over animal sources like butter.
(To sign up for a free subscription to Food Safety News, click here.)
When I first wrote about this frozen yogurt recipe in 2007, I started by saying, “Pinkberry Frozen Yogurt has nothing on the recipe in David Lebovitz’s cookbook The Perfect Scoop.” It was peak fro-yo era and in front of me was a book brimming with both wildly creative and classic ice cream flavors. While it might seem a bit peculiar to choose to go the frozen yogurt route over ice cream, Wayne loves yogurt. He had been traveling all week, I chipped the freezer burn off the ice cream maker and churned up the creamiest frozen yogurt for him to enjoy when he arrived home. You should absolutely make some too.
David’s simple, three ingredient recipe delivers a wonderfully tangy, not-too-sweet, creamy white cloud of perfect frozen deliciousness. And, believe me, as a California native, I know good fro-yo when I taste it. It is actually rare thing. You might be tempted to add sweet swirls, crushed fruit, or chocolatechunks. For the first go-around, don’t. Restrain yourself. Use good yogurt and enjoy it straight the first time around. Decide on twists for the future.
Which Ice Cream Maker?
For a long time I used a little Krups Ice Cream Maker, one of the ones you leave in your freezer. It served me well for years, delivering batch after creamy batch. I eventually invested in a Breville Smart Scoop. David has ice cream maker recommendations on his site as well. Spoiler alert,he also has a Smart Scoop but also highlights others at a range of price points.
Frozen Yogurt Variations:
Plain Whole-Milk Yogurt: David noted in the comments below, “I’m glad many of you’ve been enjoying the frozen yogurt and thanks to Heidi for sharing the recipe. To those of you who’ve asked about reducing the fat in the recipe, I often make this with plain whole-milk yogurt which I don’t strain. Simply substitute equal quantities: 1 cup whole-milk yogurt per 1 cup strained yogurt. In the book, I give instructions for making frozen yogurts both ways with plenty of fresh-fruit variations, including strawberry, peach, cherry, and berry. The version Heidi made has a nice tangy yogurt flavor and is creamier than one made with unstrained yogurt. Low-fat yogurt can be used but the frozen yogurt will have a relatively firm texture once it’s deep-chilled in your freezer. Happy churning!”
Almond Saffron: Infuse a pinch of saffron into a couple teaspoons of almond extract for an almond-saffron twist.
With Granola: This frozen yogurt is really great topped with this crunch Peanut Butter Granola


")

")


")


 – Connoisseur Dad, Don’t Let The Title Idiot You")


