This post may contain affiliate links, please see our privacy policy for details.
Crockpot Honey Garlic Pot Roast. We just love this recipe! Beef pot roast is seasoned with garlic and pepper and then braised in a spicy, sweet, and tangy orange honey garlic sauce using tamari and orange marmalade. Shred the beef and toss with the sauce and peppers. Serve the shredded meat and peppers over bowls of rice along with fresh scallions and toasted sesame seeds. These easy bowls never disappoint.
The crockpot cooking season has officially returned, and I’m here for it. Last week, I shared a chicken curry; this week, it’s pot roast, and next week, something even more fun. I’m on a roll with the crockpot. It’s my go-to when the days start getting shorter and the nights chillier.
Around here, the shift from summer to fall is already well underway. Today’s high was 60, but it was sunny, and it felt like fall. Next week, the leaves will begin to turn. It’s coming; I can see the change!
It’s my favorite time, but it goes so fast! Since life is busier than ever, I’m using the crockpot to help out a bit in the kitchen!
This recipe just sounded so delicious—and it is! Some of you might remember my honey garlic chicken. It’s a yummy recipe that everyone loves. I always knew that sauce would be so delicious with shredded beef!
I presented the idea to my older brother, Creighton. He said I had to make it, “sounds so good”. He didn’t need to convince me.
I slow-cooked chunks of beef chuck roast in my favorite honey garlic sauce, but this time, I added orange marmalade, a special ingredient.
The meat came out DELICIOUS.
Here are the details to know
Step 1: the beef
Use a nice cut of beef chuck roast, then cut it into big chunks to help evenly cook the meat. Arrange the meat in the crockpot or use a Dutch oven for oven cooking.
While I love using the crockpot, you can also slow-braise the roast in the oven. This recipe is great either way, so use the method that works best for you.
Season the meat with garlic powder and black pepper. Then, toss with flour. The flour will help the sauce thicken around the meat at the end of cooking.
Step 2: the honey garlic sauce
The sauce brings all the flavor.
Mix the tamari (or soy sauce) with orange marmalade, lemon juice, and honey. The orange marmalade not only adds flavor but creates a sticky sauce that will adhere nicely to the shredded meat.
Then, fresh garlic, ginger, chili paste, and a drizzle of toasted sesame oil. If you don’t have toasted sesame oil, you can easily just omit it from the sauce. I do love the flavor, but it’s not a must.
Like most of my Asian-inspired dishes, I love to use chili paste. More often than not, I use gochujang, a Korean chili paste. The Mother-in-Law’s brand is my favorite. I get the original flavor from Whole Foods or order it on Amazon.
Pour the sauce over the roast, then slowly braise the meat for 5 hours in the crockpot. As the meat slowly cooks, the braising liquid becomes a yummy, spicy, tangy, sweet sauce.
Step 3: shred the meat and add the peppers
Just before the roast is finished cooking, crank the heat up to high, then shred the meat right into the sauce. It should easily fall apart. Mix in the red bell peppers.
Now, cook another hour to help thicken the sauce and cook those peppers.
Step 4: assemble
Serve the shredded beef, peppers, and sauce over bowls of jasmine rice. If you’re feeling fancy, maybe even make some cilantro lime rice. That would be delicious.
Top each bowl with scallions (if you enjoy them) and toasted sesame seeds. I usually add fresh basil too!
Lastly, if you make this Crockpot Honey Garlic Pot Roast, be sure to leave a comment and/or give this recipe a rating! Above all, I love to hear from you guys and always do my best to respond to each and every comment. And, of course, if you do make this recipe, don’t forget to tag me on Instagram! Looking through the photos of recipes you all have made is my favorite!
Crockpot Honey Garlic Pot Roast
Prep Time 15 minutesminutes
Cook Time 4 hourshours
Total Time 4 hourshours15 minutesminutes
Servings: 6
Calories Per Serving: 348kcal
Nutritional information is only an estimate. The accuracy of the nutritional information for any recipe on this site is not guaranteed.
Crockpot
1. Arrange the chuck roast in the crockpot bowl. Toss the cubes of chuck roast with garlic powder, pepper, and chili flakes. Add the flour and toss again. 2. To make the sauce. In a bowl or glass jar, combine all ingredients. Pour the sauce over the chuck roast. Cover and cook on LOW for 5 hours or on HIGH for 3 hours.3. During the last hour of cooking, crank the heat to HIGH. Shred the meat in the sauce using two forks. Add the peppers and cook uncovered. 4. Serve the meat and peppers over bowls of rice. Top with scallions and sesame seeds. Enjoy!
Oven
1. Preheat the oven to 325° F. Arrange the roast in the bottom of a large, oven-safe Dutch oven. Toss the cubes of chuck roast with garlic powder, pepper, and chili flakes. Add the flour and toss again. 2. To make the sauce. In a bowl or glass jar, combine all ingredients. Pour the sauce over the chuck roast, adding 1 cup of water. Cover and roast for 2 1/2 to 3 hours or until very tender.3. Crank the heat on the oven up to 425° F. Add the peppers. Uncover and cook the roast for 10 minutes, until deeply caramelized on top. Shred the meat using two forks.4. Serve the meat and peppers over bowls of rice. Top with scallions and sesame seeds. Enjoy!
Cilantro Lime Rice: 2-3 cups cooked basmati or jasmine rice 1/4 cup cilantro chopped 1 tablespoon fresh lime juice
Disclosure: This post may contain affiliate links, which means I may earn a commission if you click on the link and make a purchase.
Horchata is a rice-based drink from Mexico. While horchata is not traditionally dairy-free this horchata recipe is dairy-free! This recipe has has rice, toasted almonds, brown sugar and vanilla! And if you want to take this horchata to the next level, make my Horchata Coffee!
The First Time I had Horchata
When I first moved to Los Angeles, I’m not gonna lie, I wasn’t super familiar with different types of Mexican food. Living in South Florida, the food that was there was mostly from the Caribbean and South America. But luckily, Instagram showed me the way. I quickly learned the difference of Mexican food from Jalisco, Sonora, Colima and Mexico City.
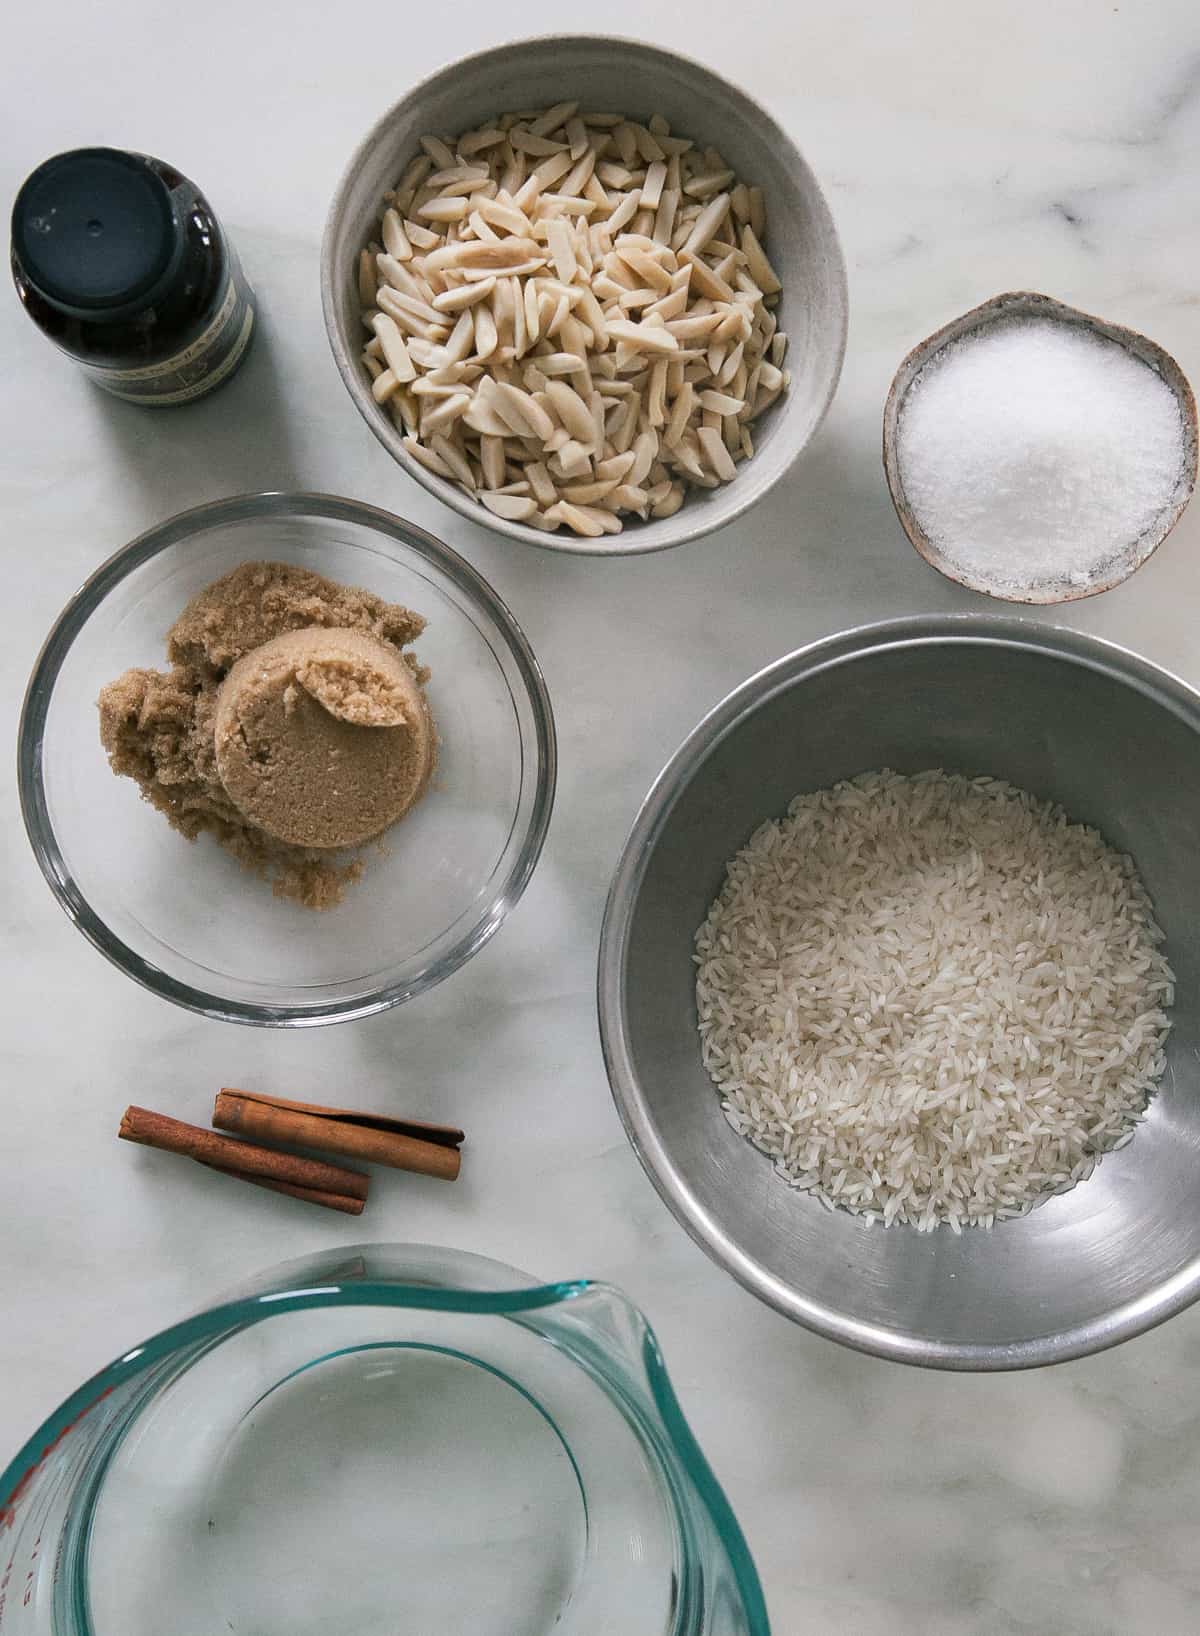
Rice – white rice works best for this recipe. I like to use medium-grain rice.
Almonds – You can use crushed almonds, whole almonds (that you chop) or slivered almonds.
Brown sugar – I love using brown sugar vs. white sugar because the caramelization adds a depth of flavor that is very delicious.
Cinnamon sticks – These give a delicious flavor of cinnamon without the chalkiness of the dried spice.
Where is Horchata from?
Horchata is made in Central America, Spain and Mexico. All of these countries make versions that are slightly different from the other. The one we’re making mostly resembles the Mexican version but even within Mexico it can vary.
What is Horchata?
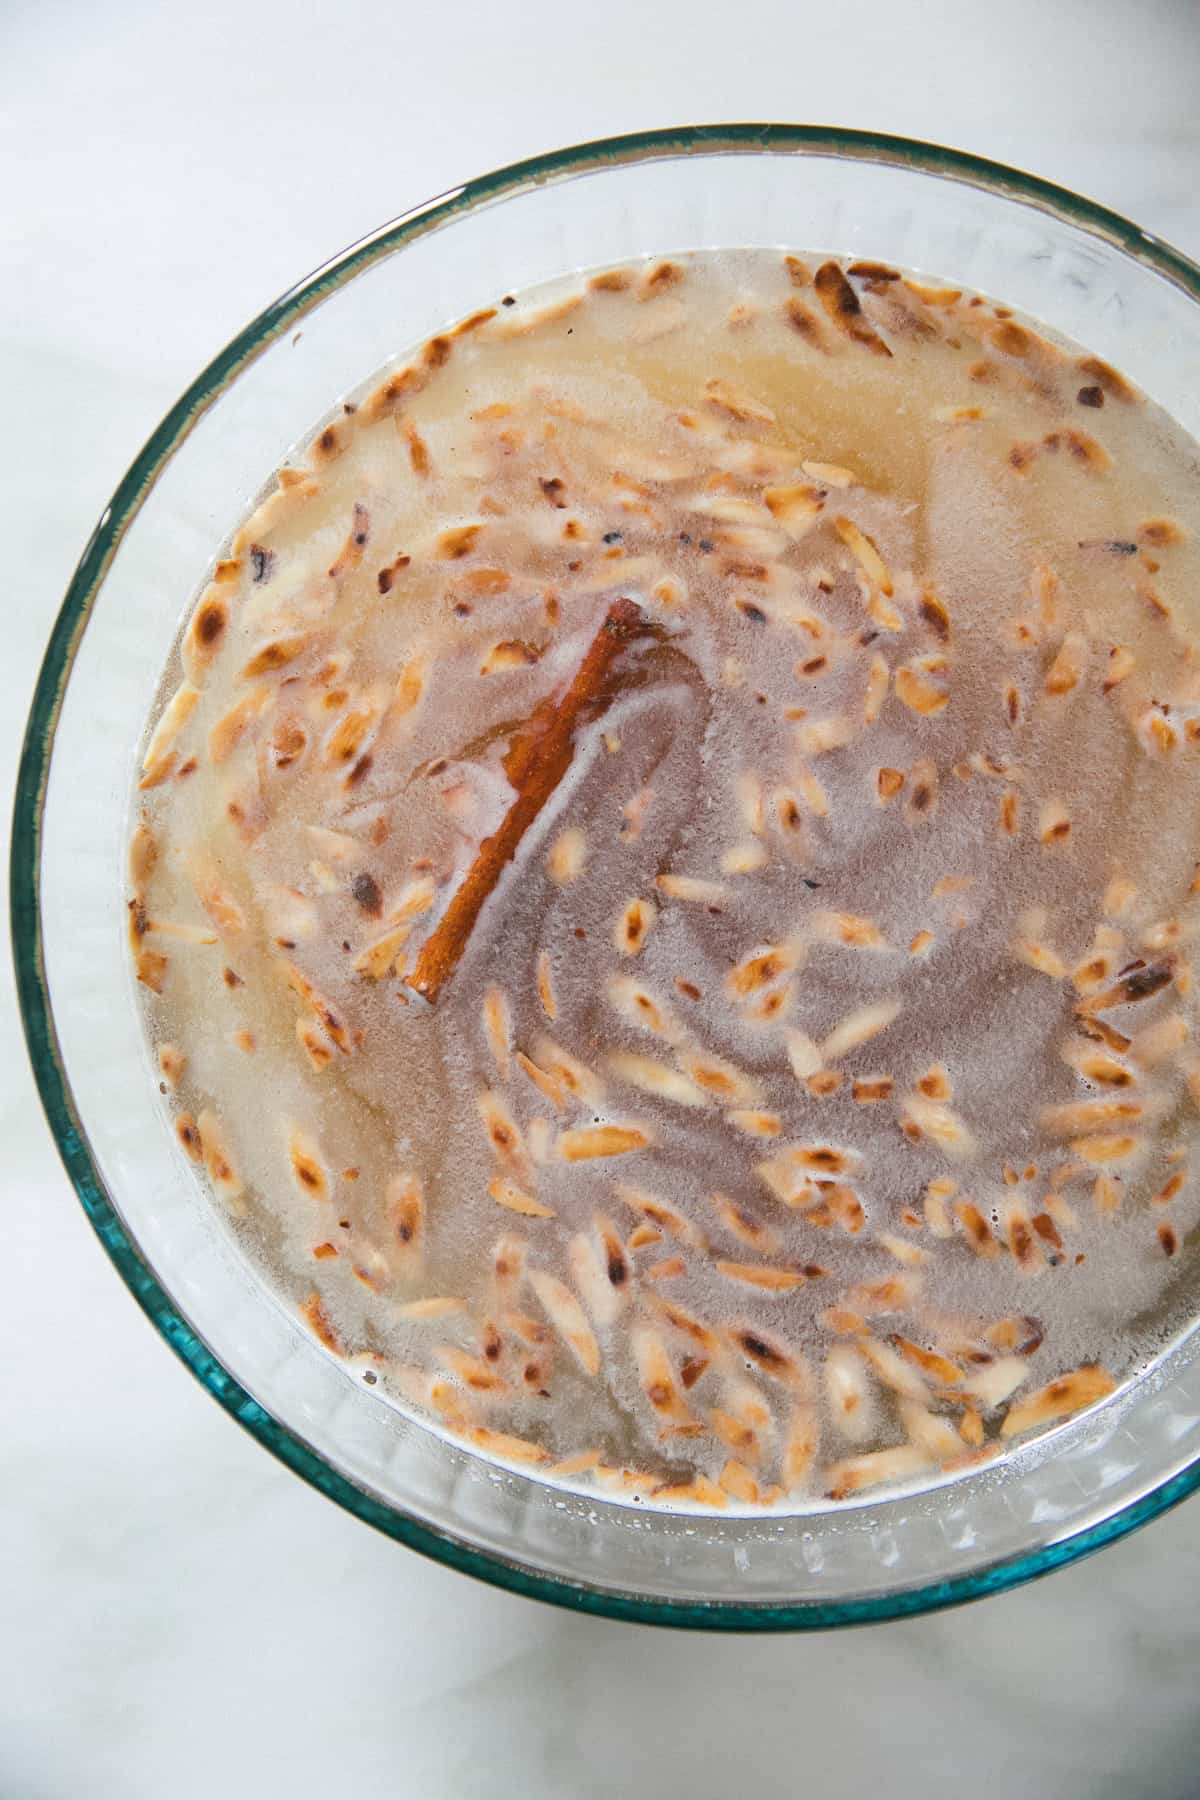
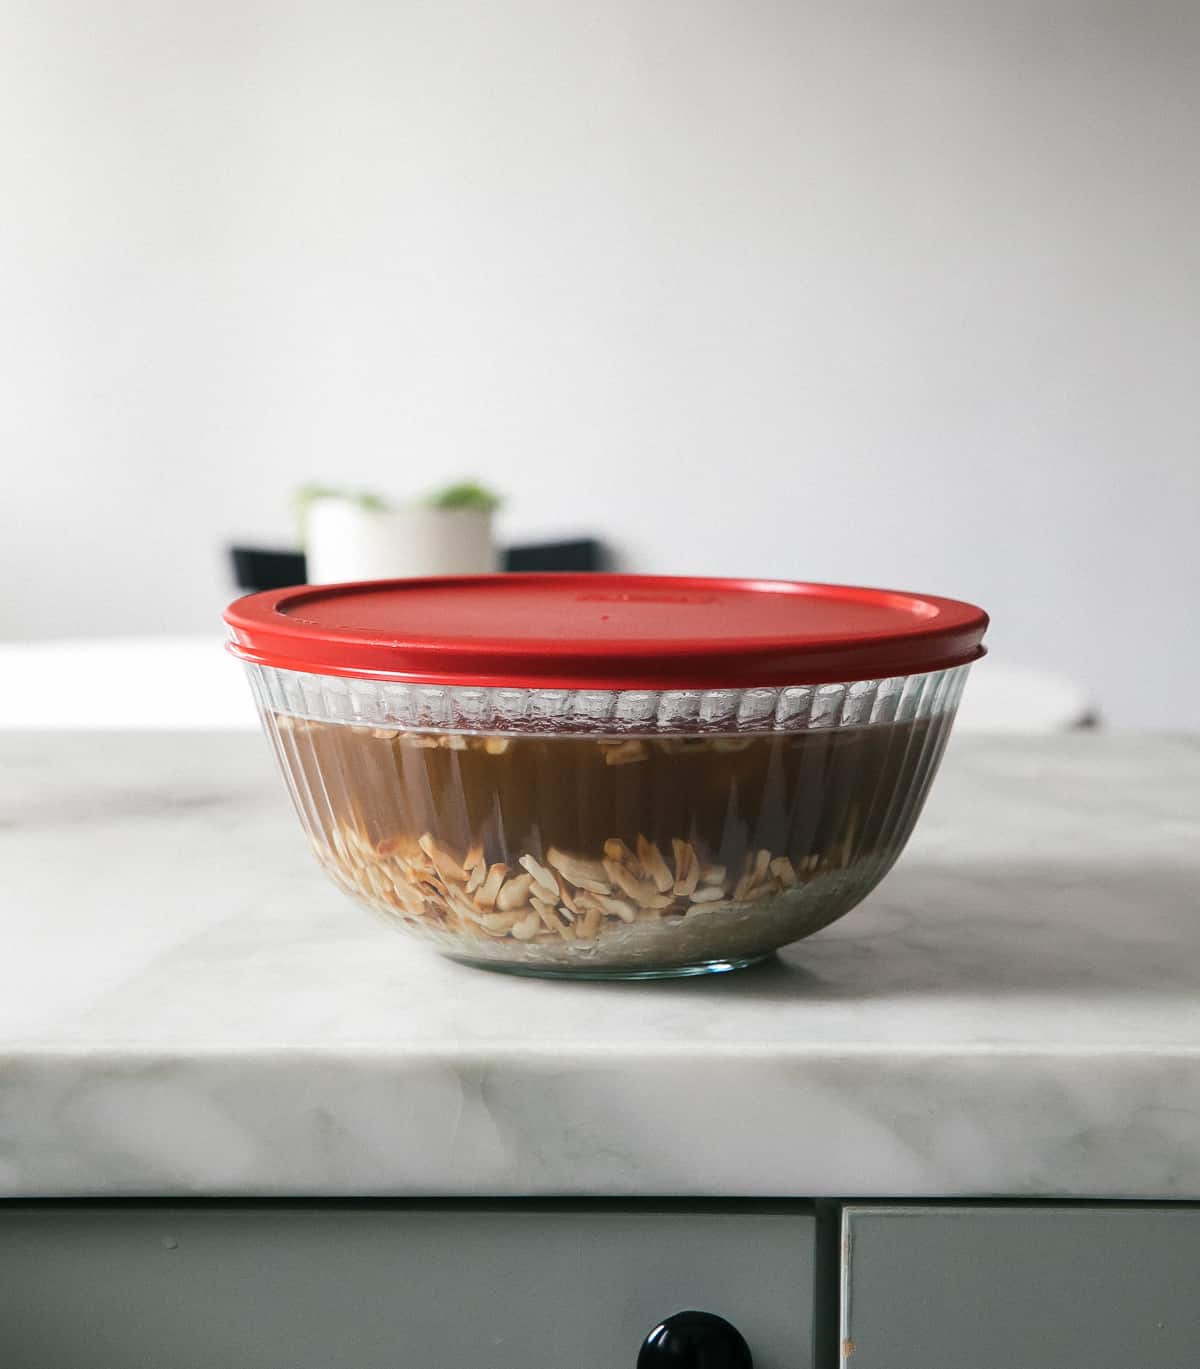
While versions vary, Horchata in Mexico is always a rice-based drink. This version you see here consists of rice, toasted almonds, cinnamon sticks, brown sugar, salt and a bit of vanilla, All of these ingredients are soaked in water for about 4 hours or overnight. This softens all of the ingredients and then when it’s blended, it all marries together. Run it through a strainer and you have a delicious aqua fresca.
How to Make Horchata
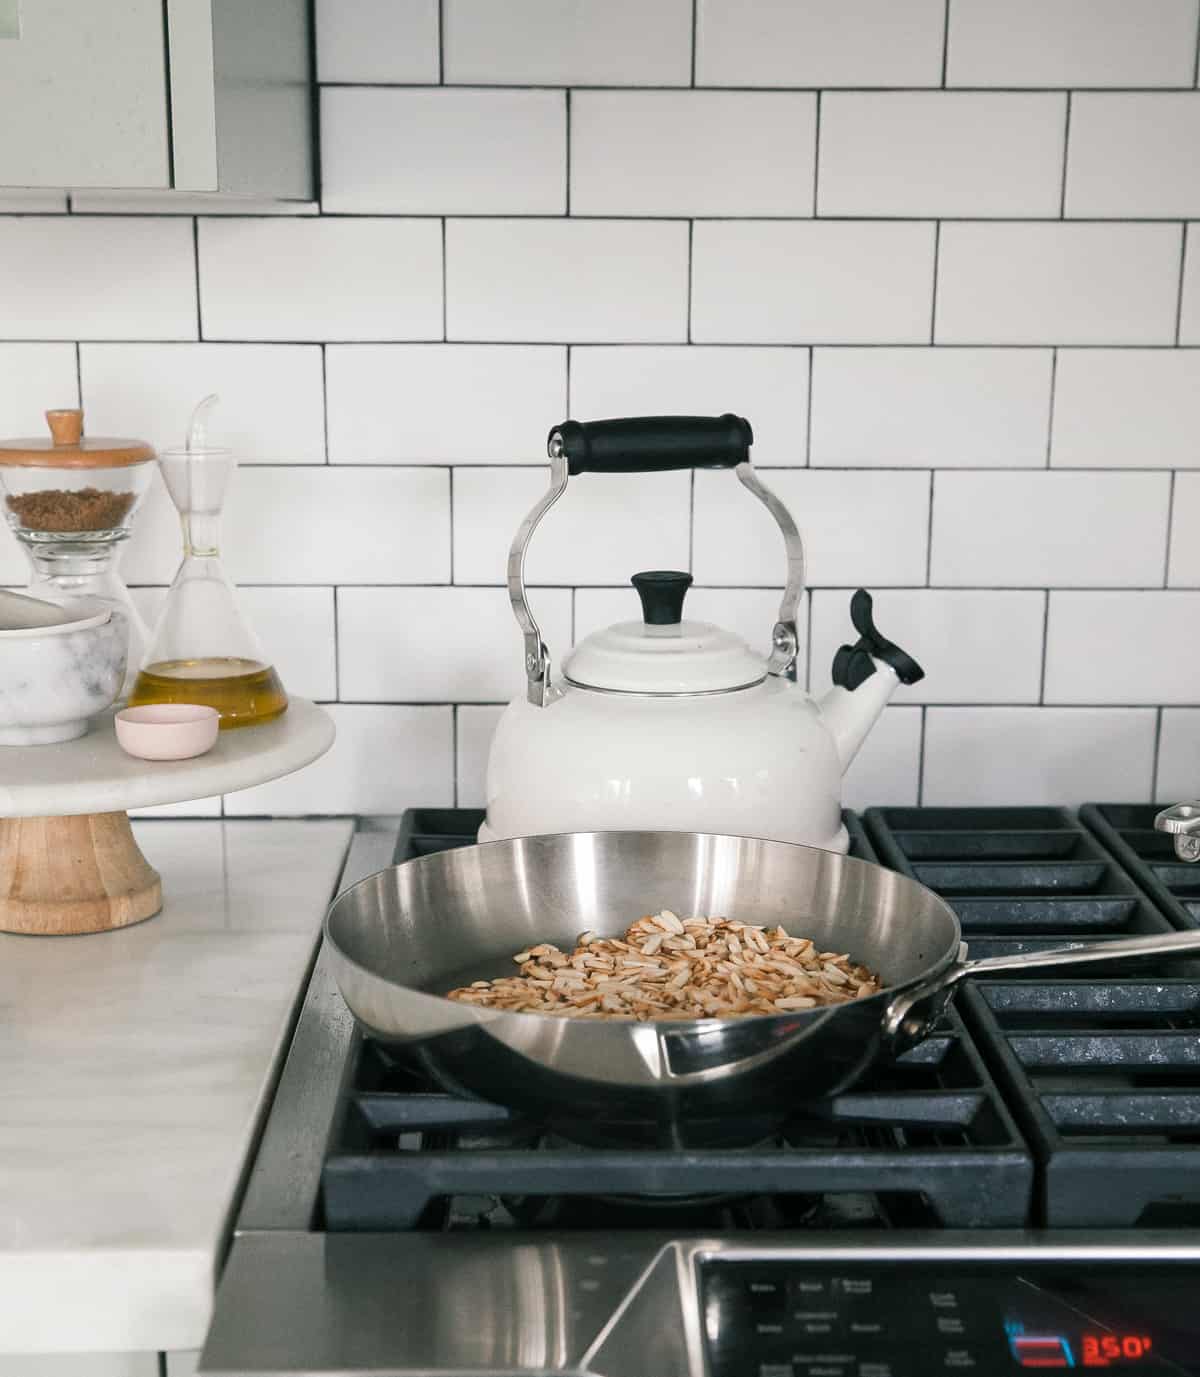
Toast the almonds. This step is my favorite. Remember, we’re only toasting a small amount of the almonds. As a result, it’ll add the absolute best amount of toasty flavor. Pour them to a large bowl.
And then add in the rest of the almonds, rice, cinnamon sticks, vanilla and salt. Pour in the filtered water.
Allow everything to soak for at least 4 hours. I soaked mine for about 6 hours. If you want to store it overnight, I would cover the mixture and stick it in the fridge.
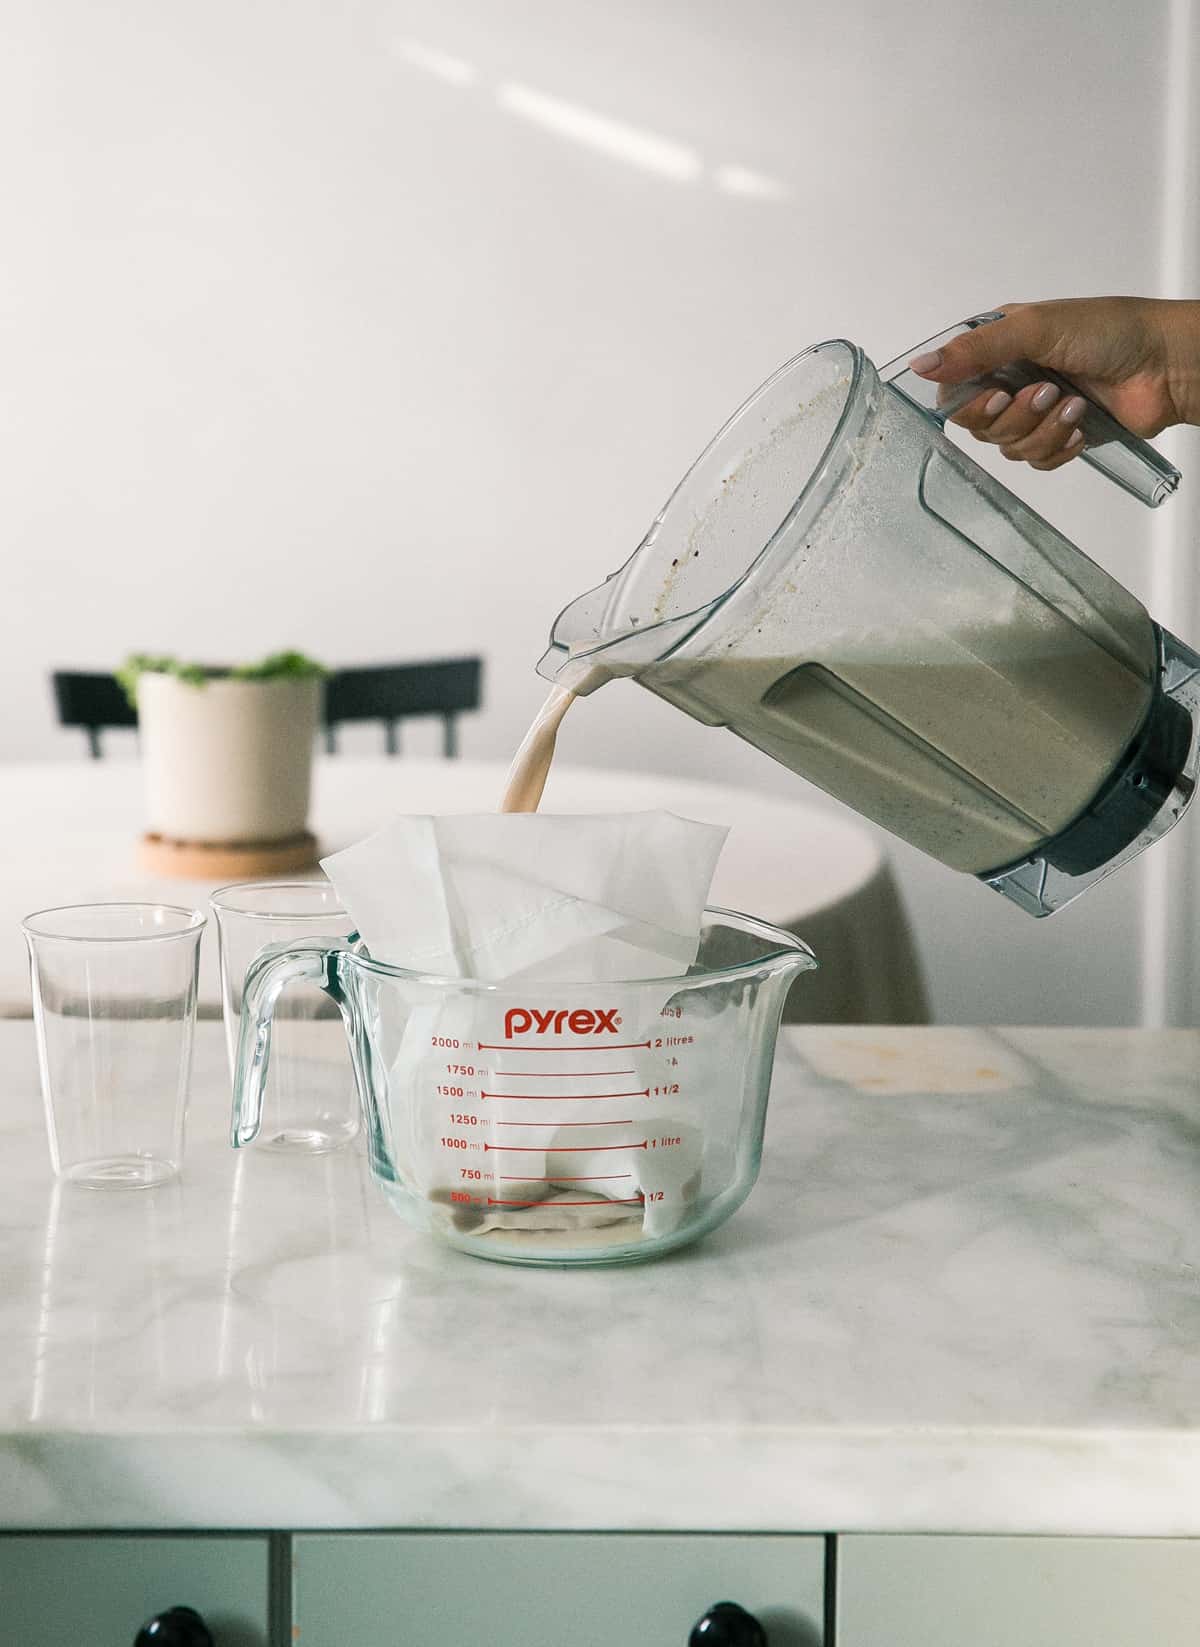
Pour the mixture into the blender. I had to do this in two batches since my blender wasn’t big enough.
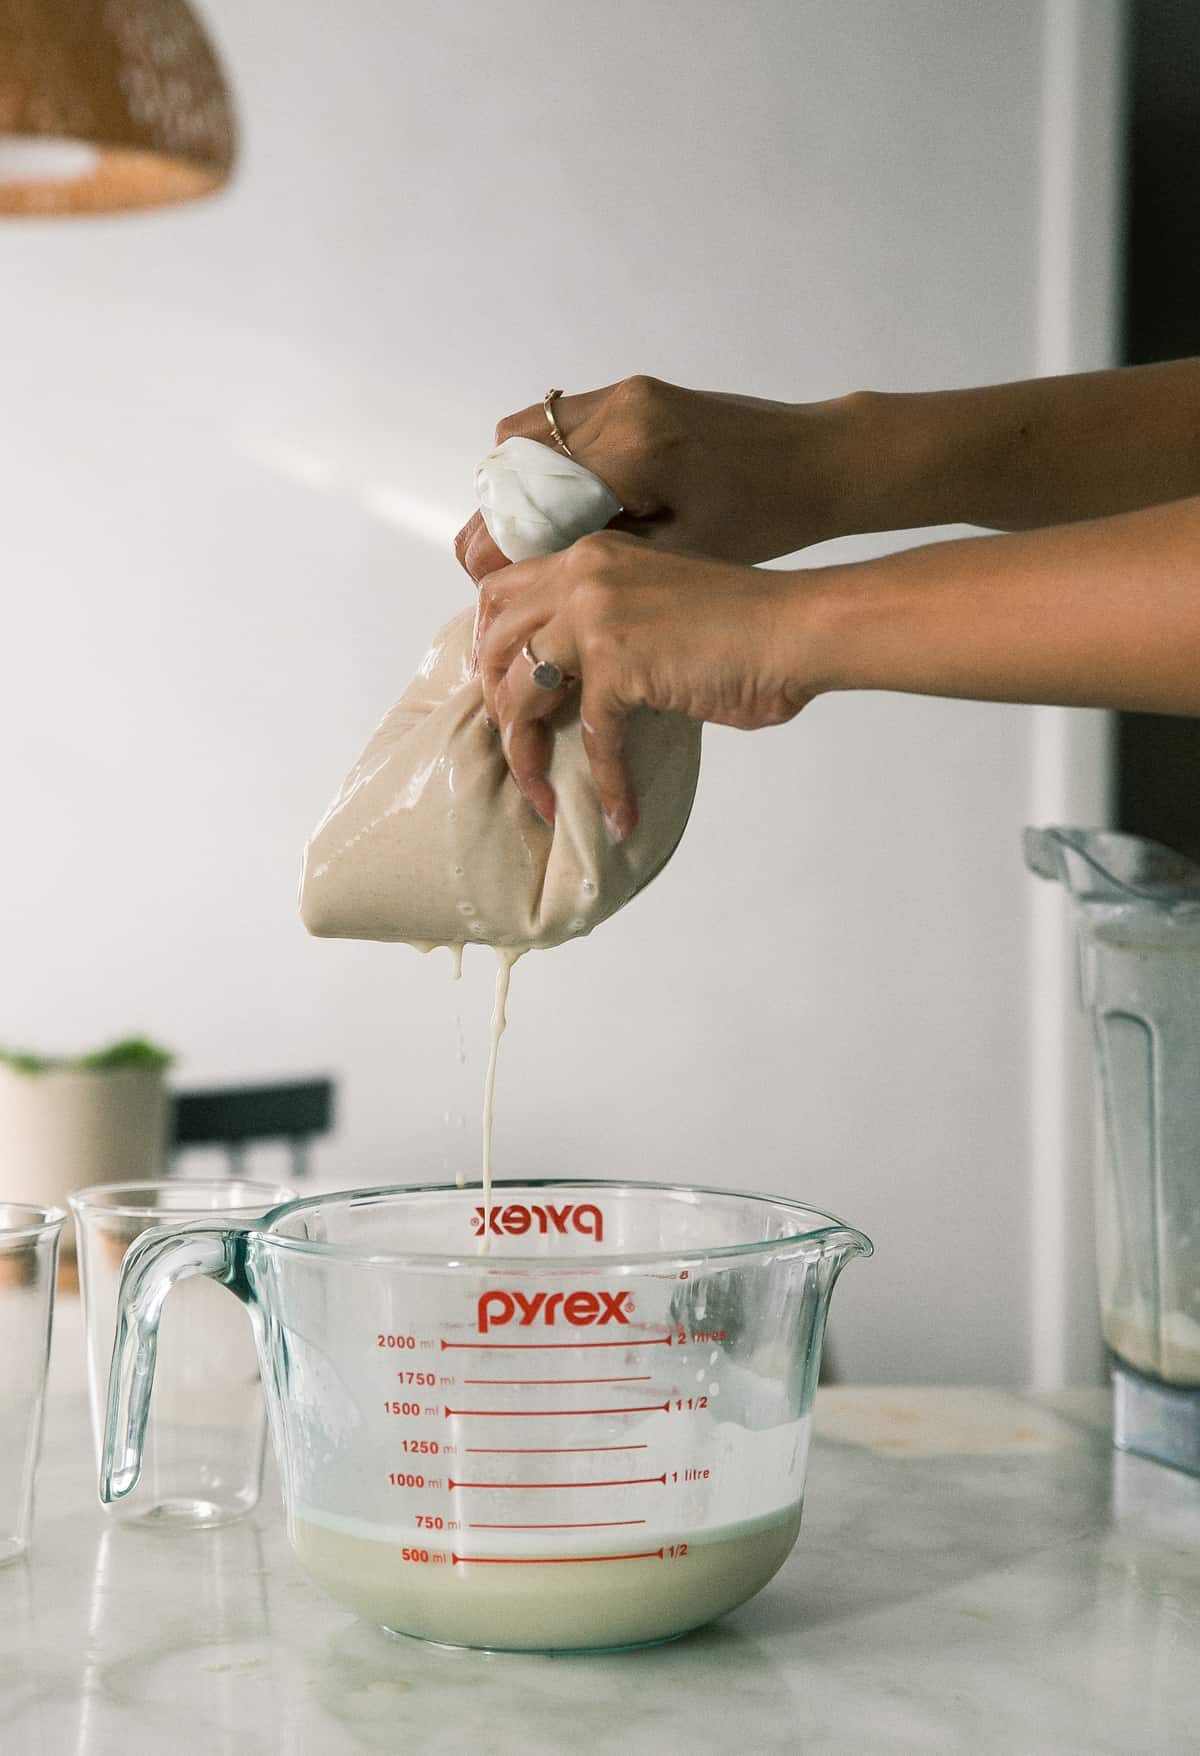
Place a sieve over a bowl and pour it the horchata through it. As a result, it will eliminate a good amount of the pulp.
*Options* I wanted it silky smooth so I passed it through a nut bag. This step is optional. You could also nestle two sheets of cheese cloth on a sieve and pour it through there.
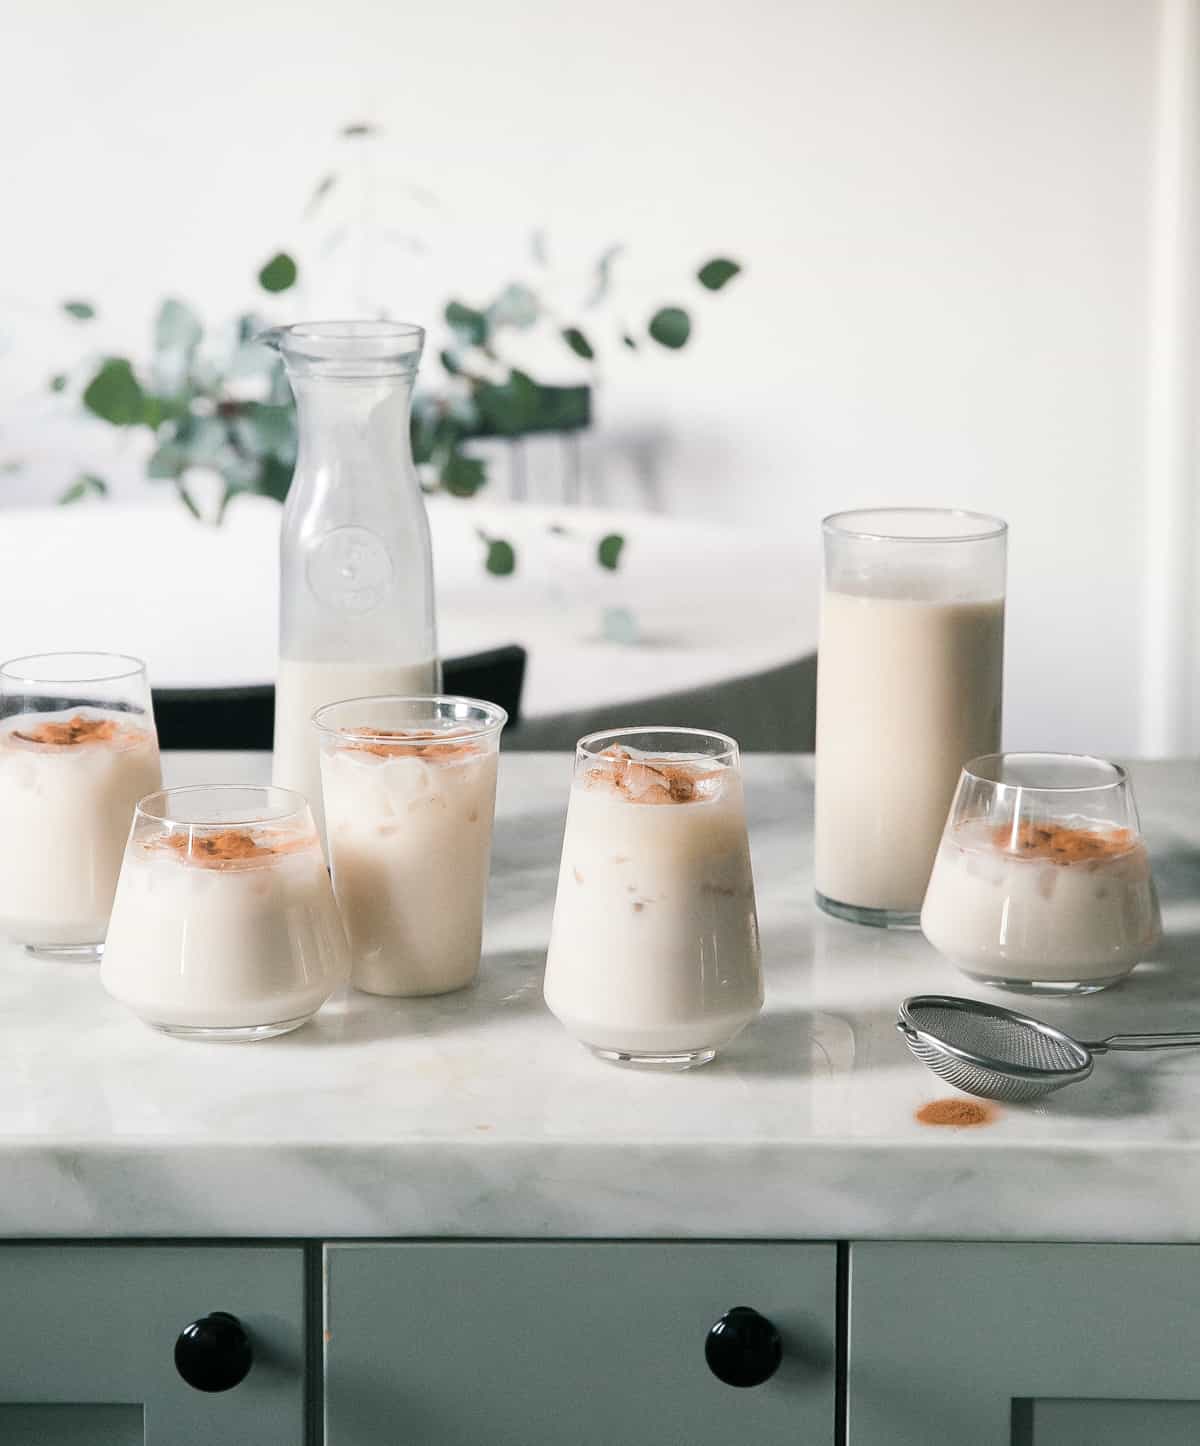
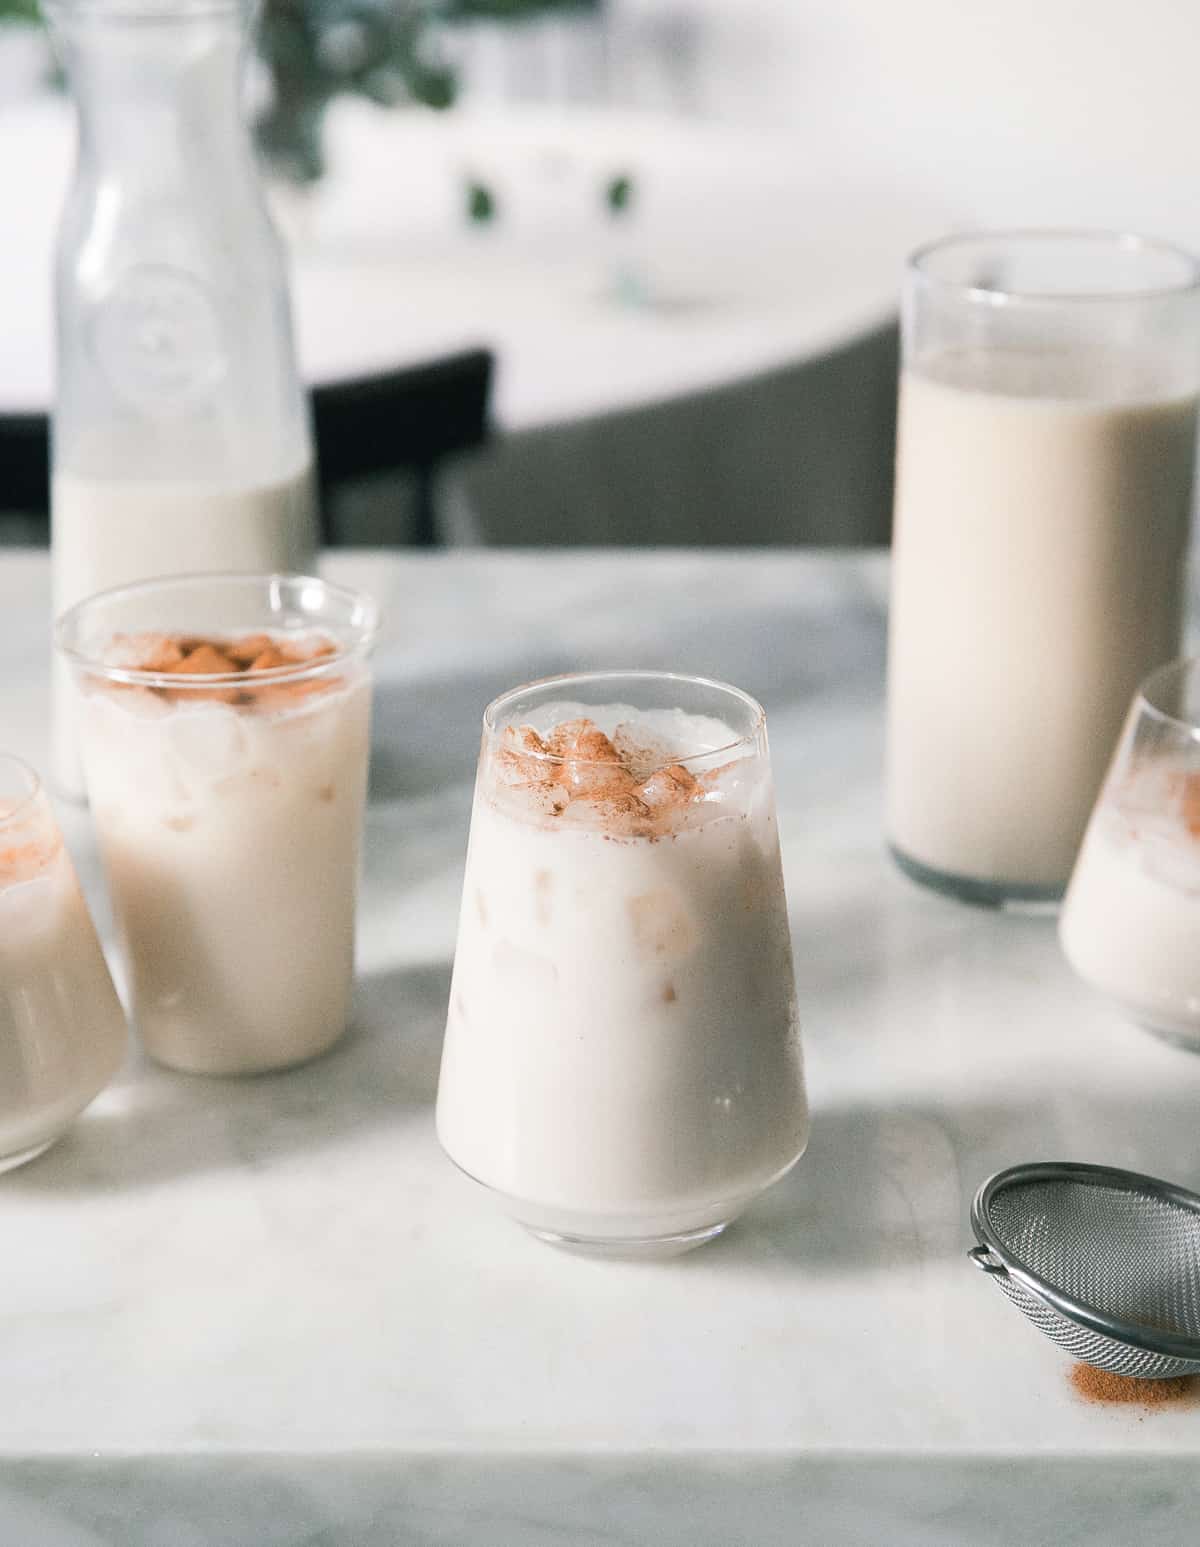
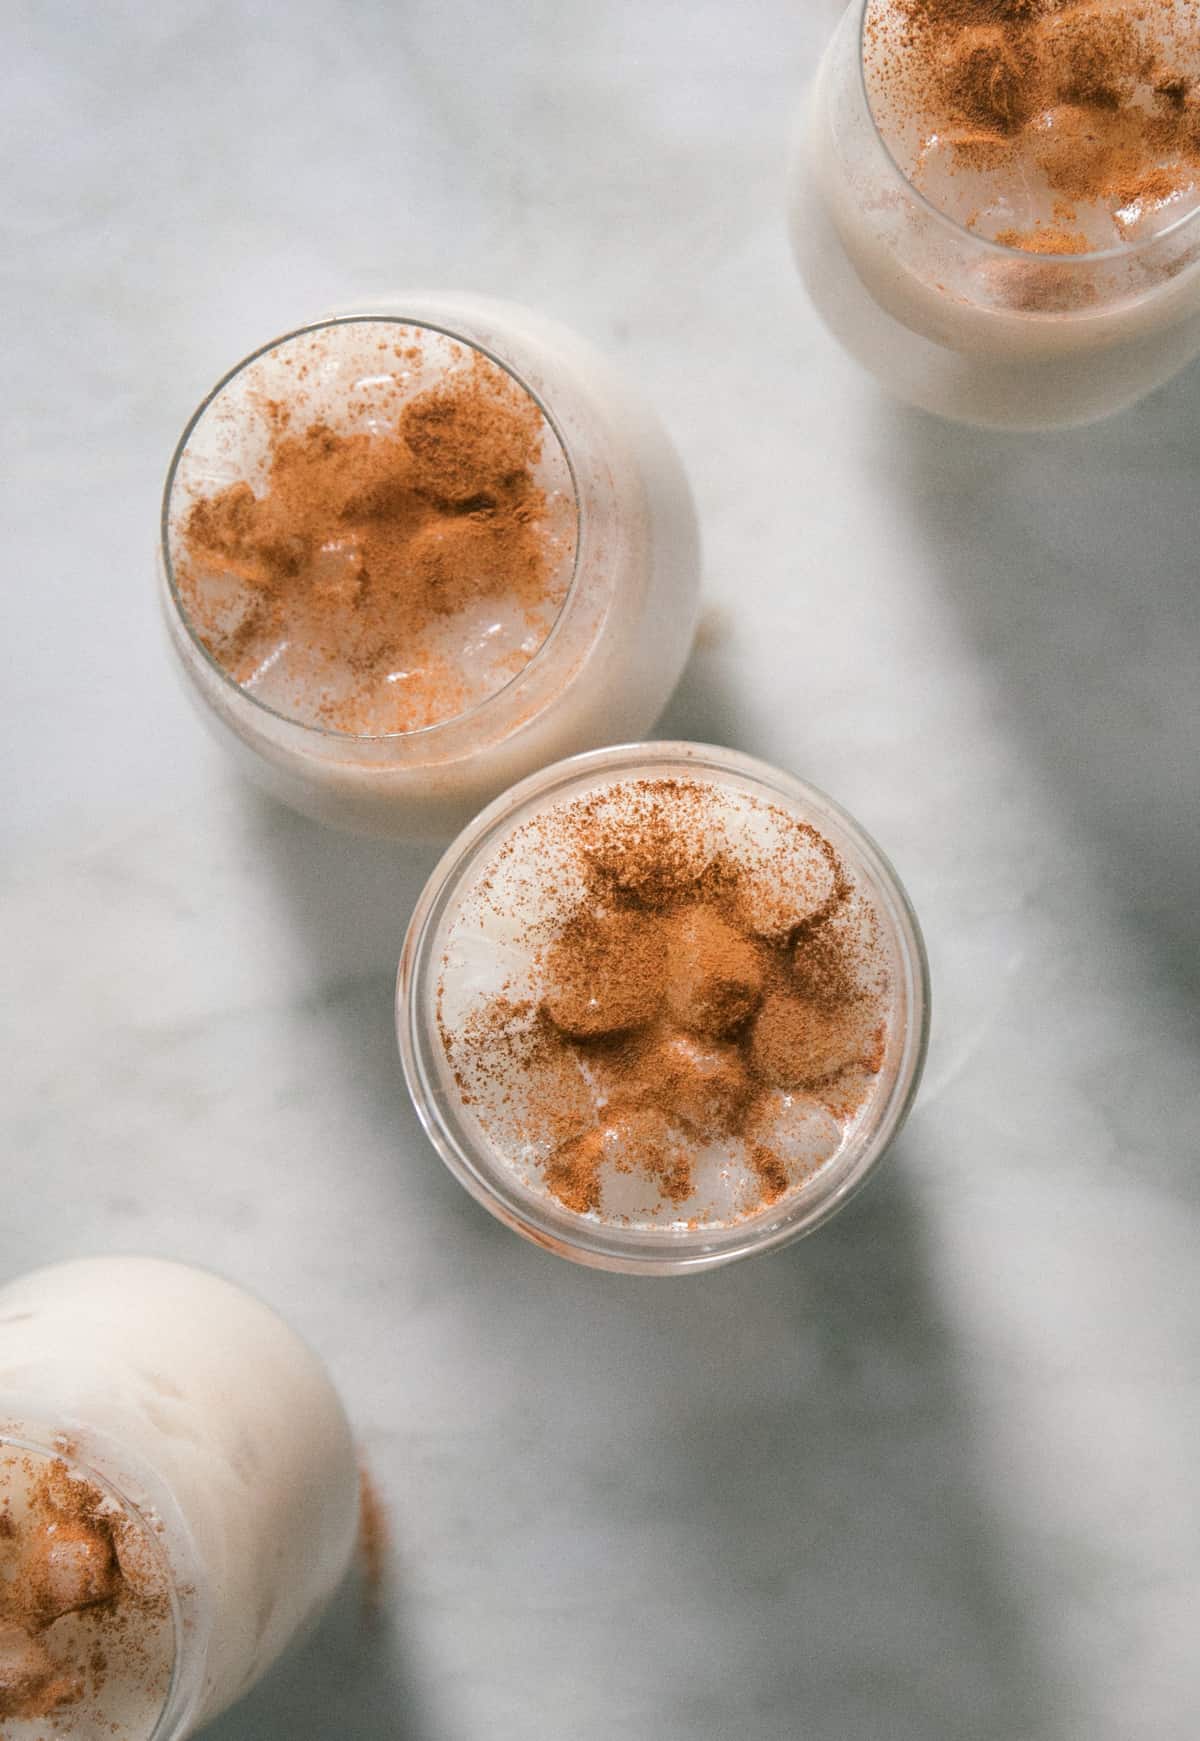
Add ice cubes to glasses.
Pour the horchata in the glasses and top with a bit of cinnamon.
Recipe FAQs
Is horchata Mexican or Spanish?
Horchata originated in Spain but the one that most of us are familiar with is the Mexican-style horchata. The one pictured here is for a Mexican horchata.
What does horchata taste like?
The flavor is warm, rich and refreshing all at the same time.
Does horchata have dairy?
The answer isn’t a total simple one. There are recipes that include dairy (mainly evaporated milk and/or sweetened condensed milk. This recipe for horchata drink is totally dairy-free.
Is horchata usually alcoholic?
Typically horchata isn’t alcoholic. But if you want to, feel free to add a shot of rum, kahlua or Bailey’s Irish Cream. I think all of those would be delicious additions.
Can I use sweetened condensed milk?
Sure, some people love adding sweetened condensed milk to the horchata mixture, instead of sugar. I would say if you include it, be sure to skip the sugar in the recipe.
More Latin Recipes
If you tried this Horchata recipe or any other recipe on my website, please leave a 🌟 star rating and let me know how it went in the 📝 comments below. Thanks for visiting!
In a medium skillet, set over medium-low heat, add 1/4 cup blanched almonds. Toast the almonds until medium golden brown, about 3-5 minutes, tossing them every so often.
Transfer the toasted almonds and untoasted almonds to a large bowl. Pour in the white rice, cinnamon sticks, browns sugar, vanilla extract, salt and filtered water. Mix everything up until combined and cover the bowl. Let sit at room temperature for 5 hours. Or overnight in the fridge.
Depending on the size of your blender, you may need to do this in batches. Transfer the horchata mix (including the cinnamon sticks) to your blender (adding what will fit, giving room at the top for blending). Blend for about 1 minute, until the horchata turns cloudy and white. Pour through a mesh strainer into a bowl to catch the majority of the nut pulp.
Place a nut bag in the center of a bowl and pour the once-strained mixture into the nut bag. This will eliminate the majority of the grit from the horchata and make it silky smooth. Gently squeeze the nut bag so the horchata runs out.
Continue this process until you work with the rest of horchata mixture. Serve over ice and top with a dusting of ground cinnamon
Alternative Straining Methods: I passed the horchata through a medium mesh strainer. And then poured it through a nut bag. If you don’t have a nut bag, you can simply use a fine-mesh strainer. OR you could use place a few layers of cheese cloth nestled in a medium-mesh strainer. To Store: This horchata will keep in the fridge for up to 1 week. Just be sure to stir it vigorously before serving.
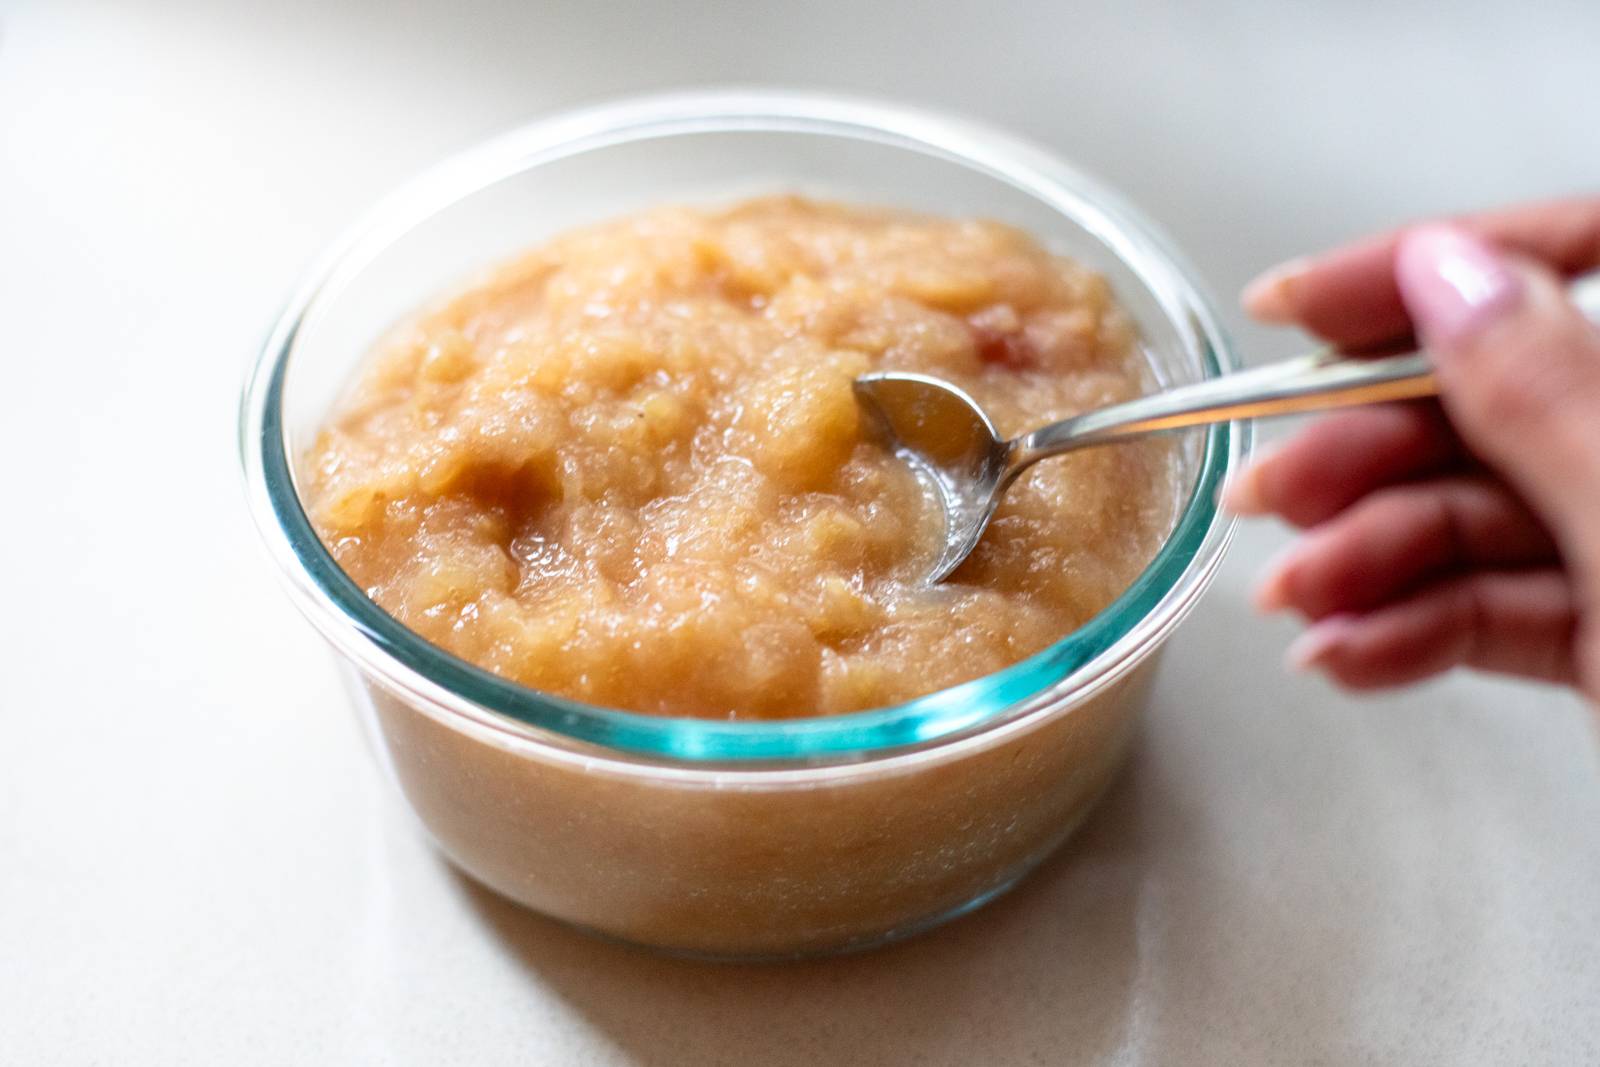
First of all, why is homemade applesauce so good?! Ugh. It’s so good.
It just hits right every time. There’s just enough texture to be interesting, with a naturally amazing sweetness, and the old-school, comforting feeling you get from sitting down with a warm – or cold – bowl of this is unrivaled.
We’ve made this so many this fall, and exactly no one is sick of it yet! My girls are still asking to make it every single week.
Speaking of which, this is hands-down one of my favorite recipes to make with my kids. The process is – dare I say – actually enjoyable. I cut the apples, and they tumble them into the pot. Someone does the cinnamon sticks, someone does the water, and it’s done in about 10 minutes. A perfect, warm, naturally sweet snack. For this season of life, this is the ideal level of kid recipe.
(But, like, “for the kids”, ya know?)
How To Make Applesauce In The Instant Pot
1
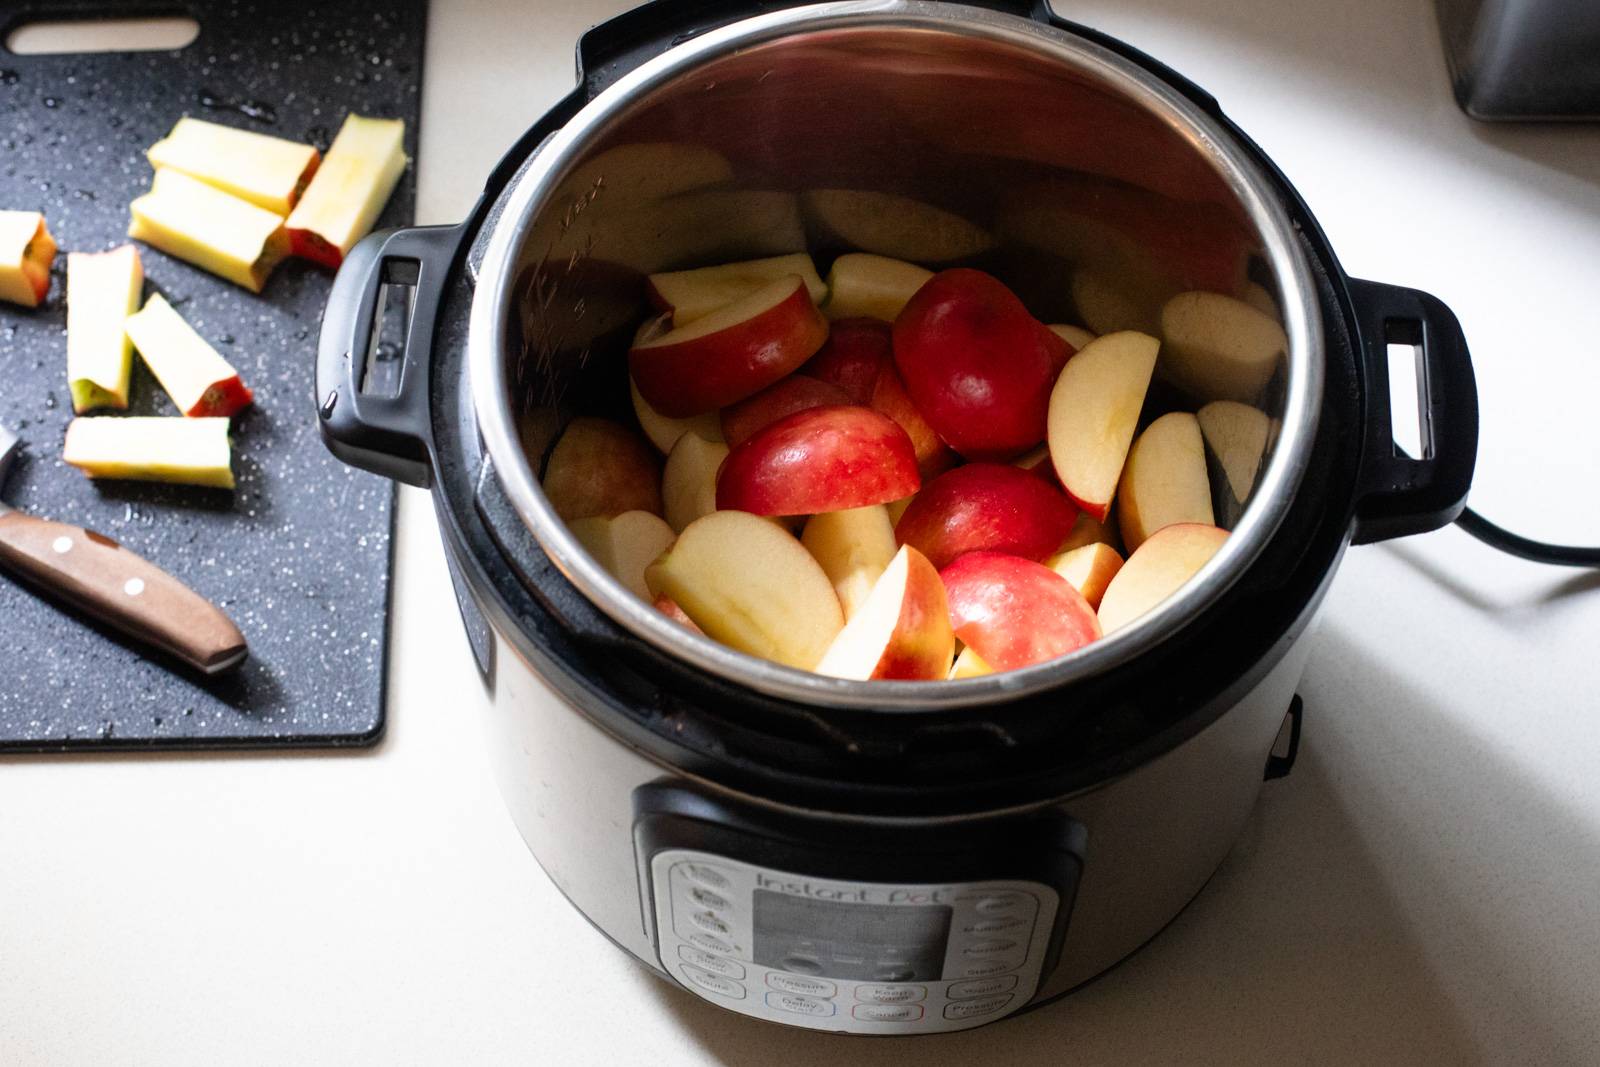
Cut the apples.
Hot take: I don’t peel them! Apple peels are delicious. I just cut the apples into quarters or chunks and toss ’em in the Instant Pot.
2
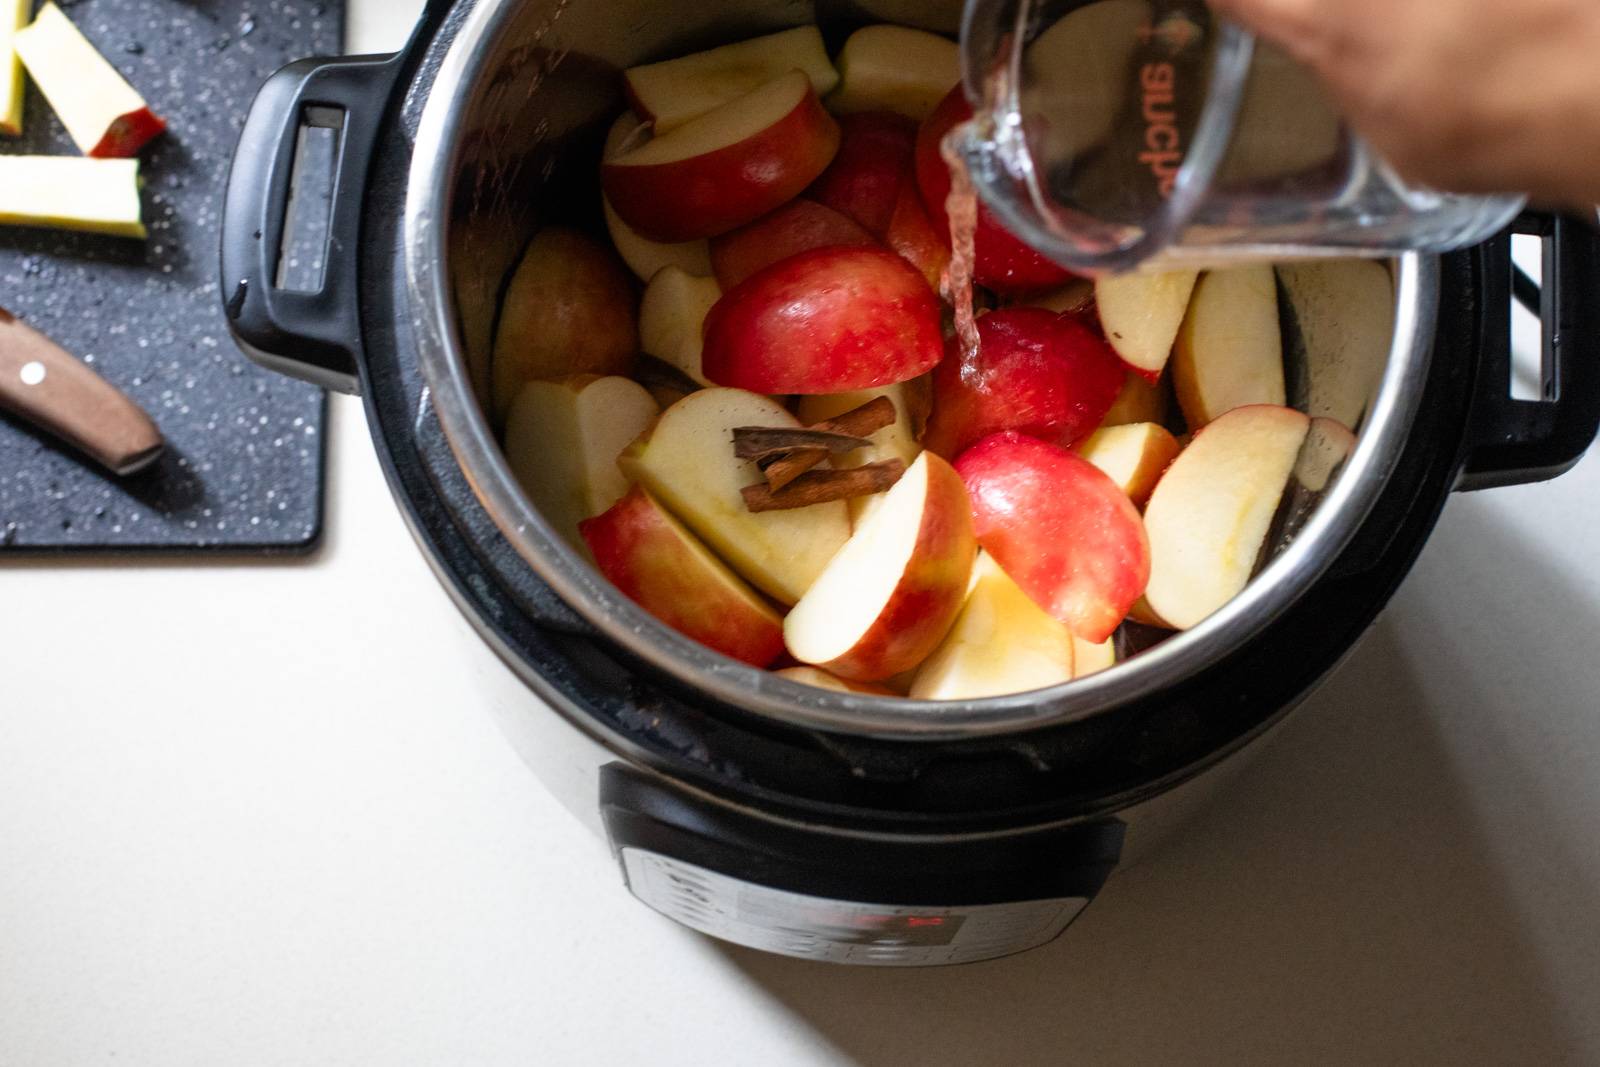
Add cinnamon and water.
I do two cinnamon sticks (or, in this case, some shards of cinnamon stick left at the bottom of the bag) and 1/2 cup water.
3
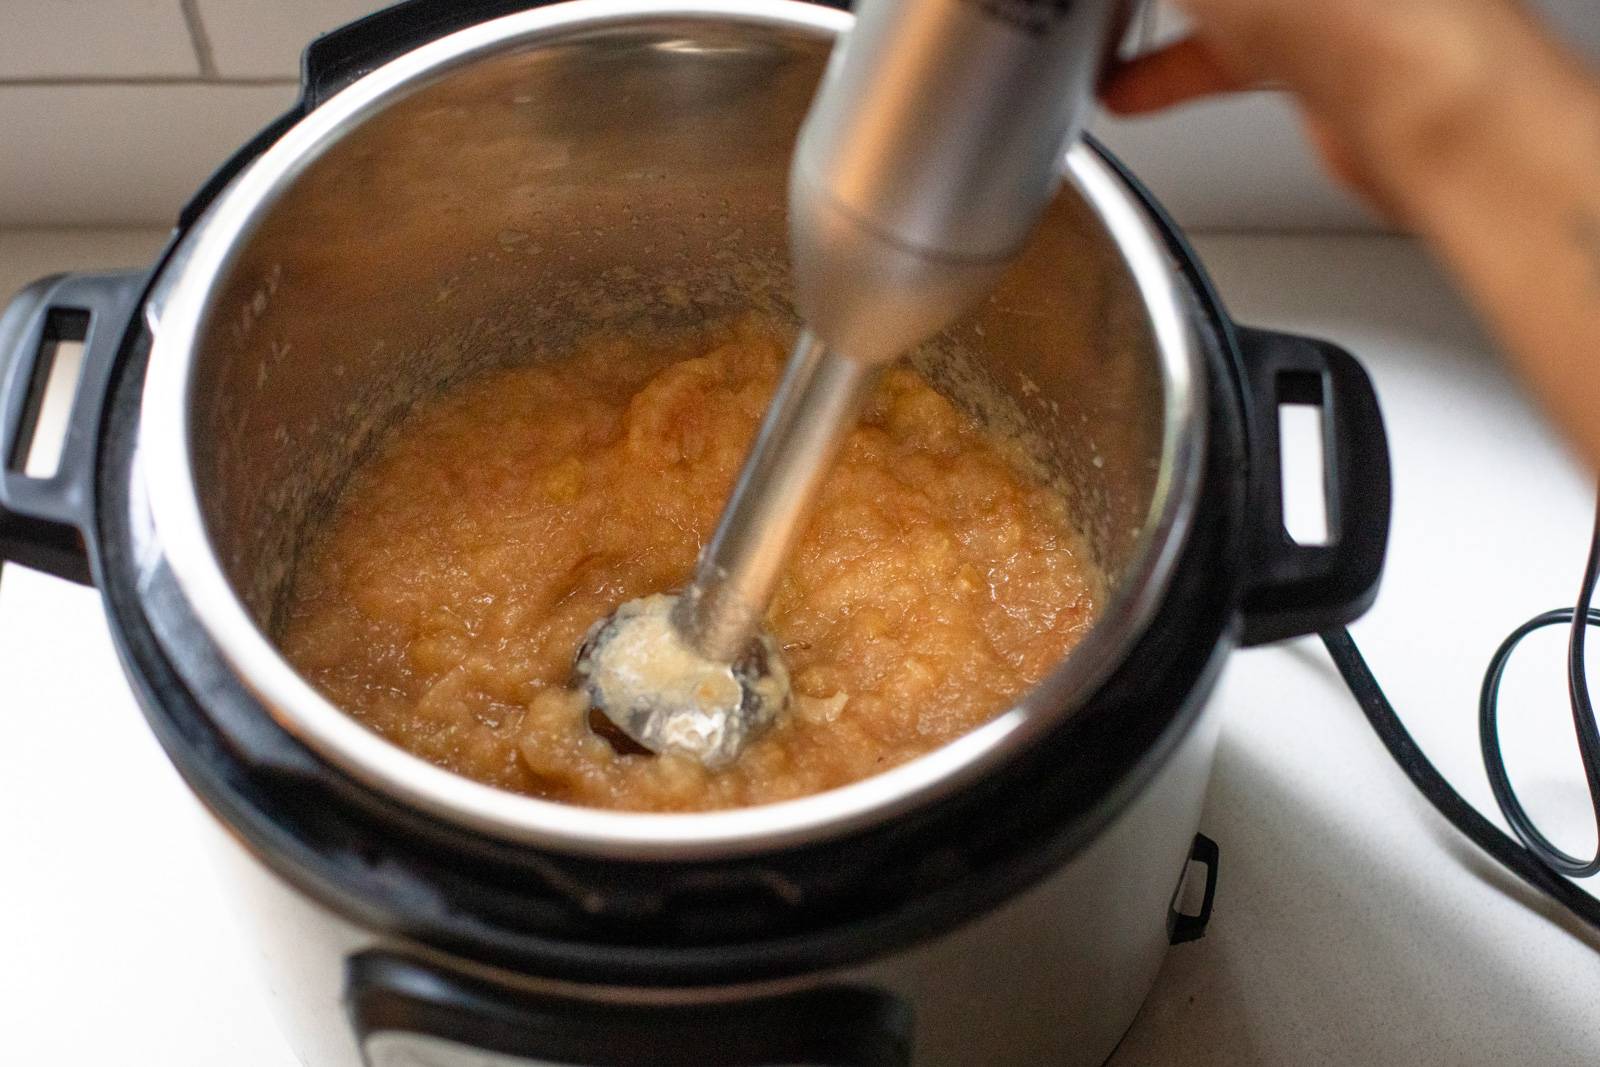
Cook and mash.
I cook the applesauce for 5 minutes – then it’s a quick hybrid mash/blend with the immersion blender.
4
You’re done! Yum.
This is just such a delight in our household. Eaten warm, cold, with a meal, or on its own. Simplicity for the win!
const share_pin_buttons = document.getElementsByClassName( ‘share-pin button’ );
if ( share_pin_buttons ) {
for ( let share_key = 0; share_key {
e.stopPropagation();
window.open(e.target.dataset.href,’targetWindow’,’toolbar=no,location=no,status=no,menubar=no,scrollbars=yes,resizable=yes,width=500,height=500′);
return false;
} );
}
}
Description
My go-to method for homemade applesauce! Just apples, water, and cinnamon. A perfect kid recipe for an afternoon snack!
Ingredients
Units
7–8apples(any kind works! I like Honeycrisp, of course)
2cinnamon sticks
1/2cupwater
Instructions
Cut your apples into chunks, discarding the cores. Place apples in the Instant Pot.
Add cinnamon sticks and water; cook on high pressure for 5 minutes.
Let it rest for 10 minutes before releasing the steam. Stick an immersion blender into the Instant Pot and give it a few whizzes, alternating with some gentle mashing, to get the texture that you want.
You’re done! Enjoy your homemade applesauce!
Notes
Too much blending creates more of a puree, which isn’t my favorite. I like some texture with this. So I just blend enough to break apart any larger pieces of the peel, and then mash it the rest of the way. You don’t *have* to blend it – you could just mash it up and leave those chunks of peel intact! (Or peel the apples ahead of time if that bothers you.) Lots of options!
if ( unit && ( ‘metric’ === unit || ‘usc’ === unit ) ) {
document.querySelector( ‘.tasty-recipes-convert-button[data-unit-type=”‘ + unit + ‘”]’ ).click();
}
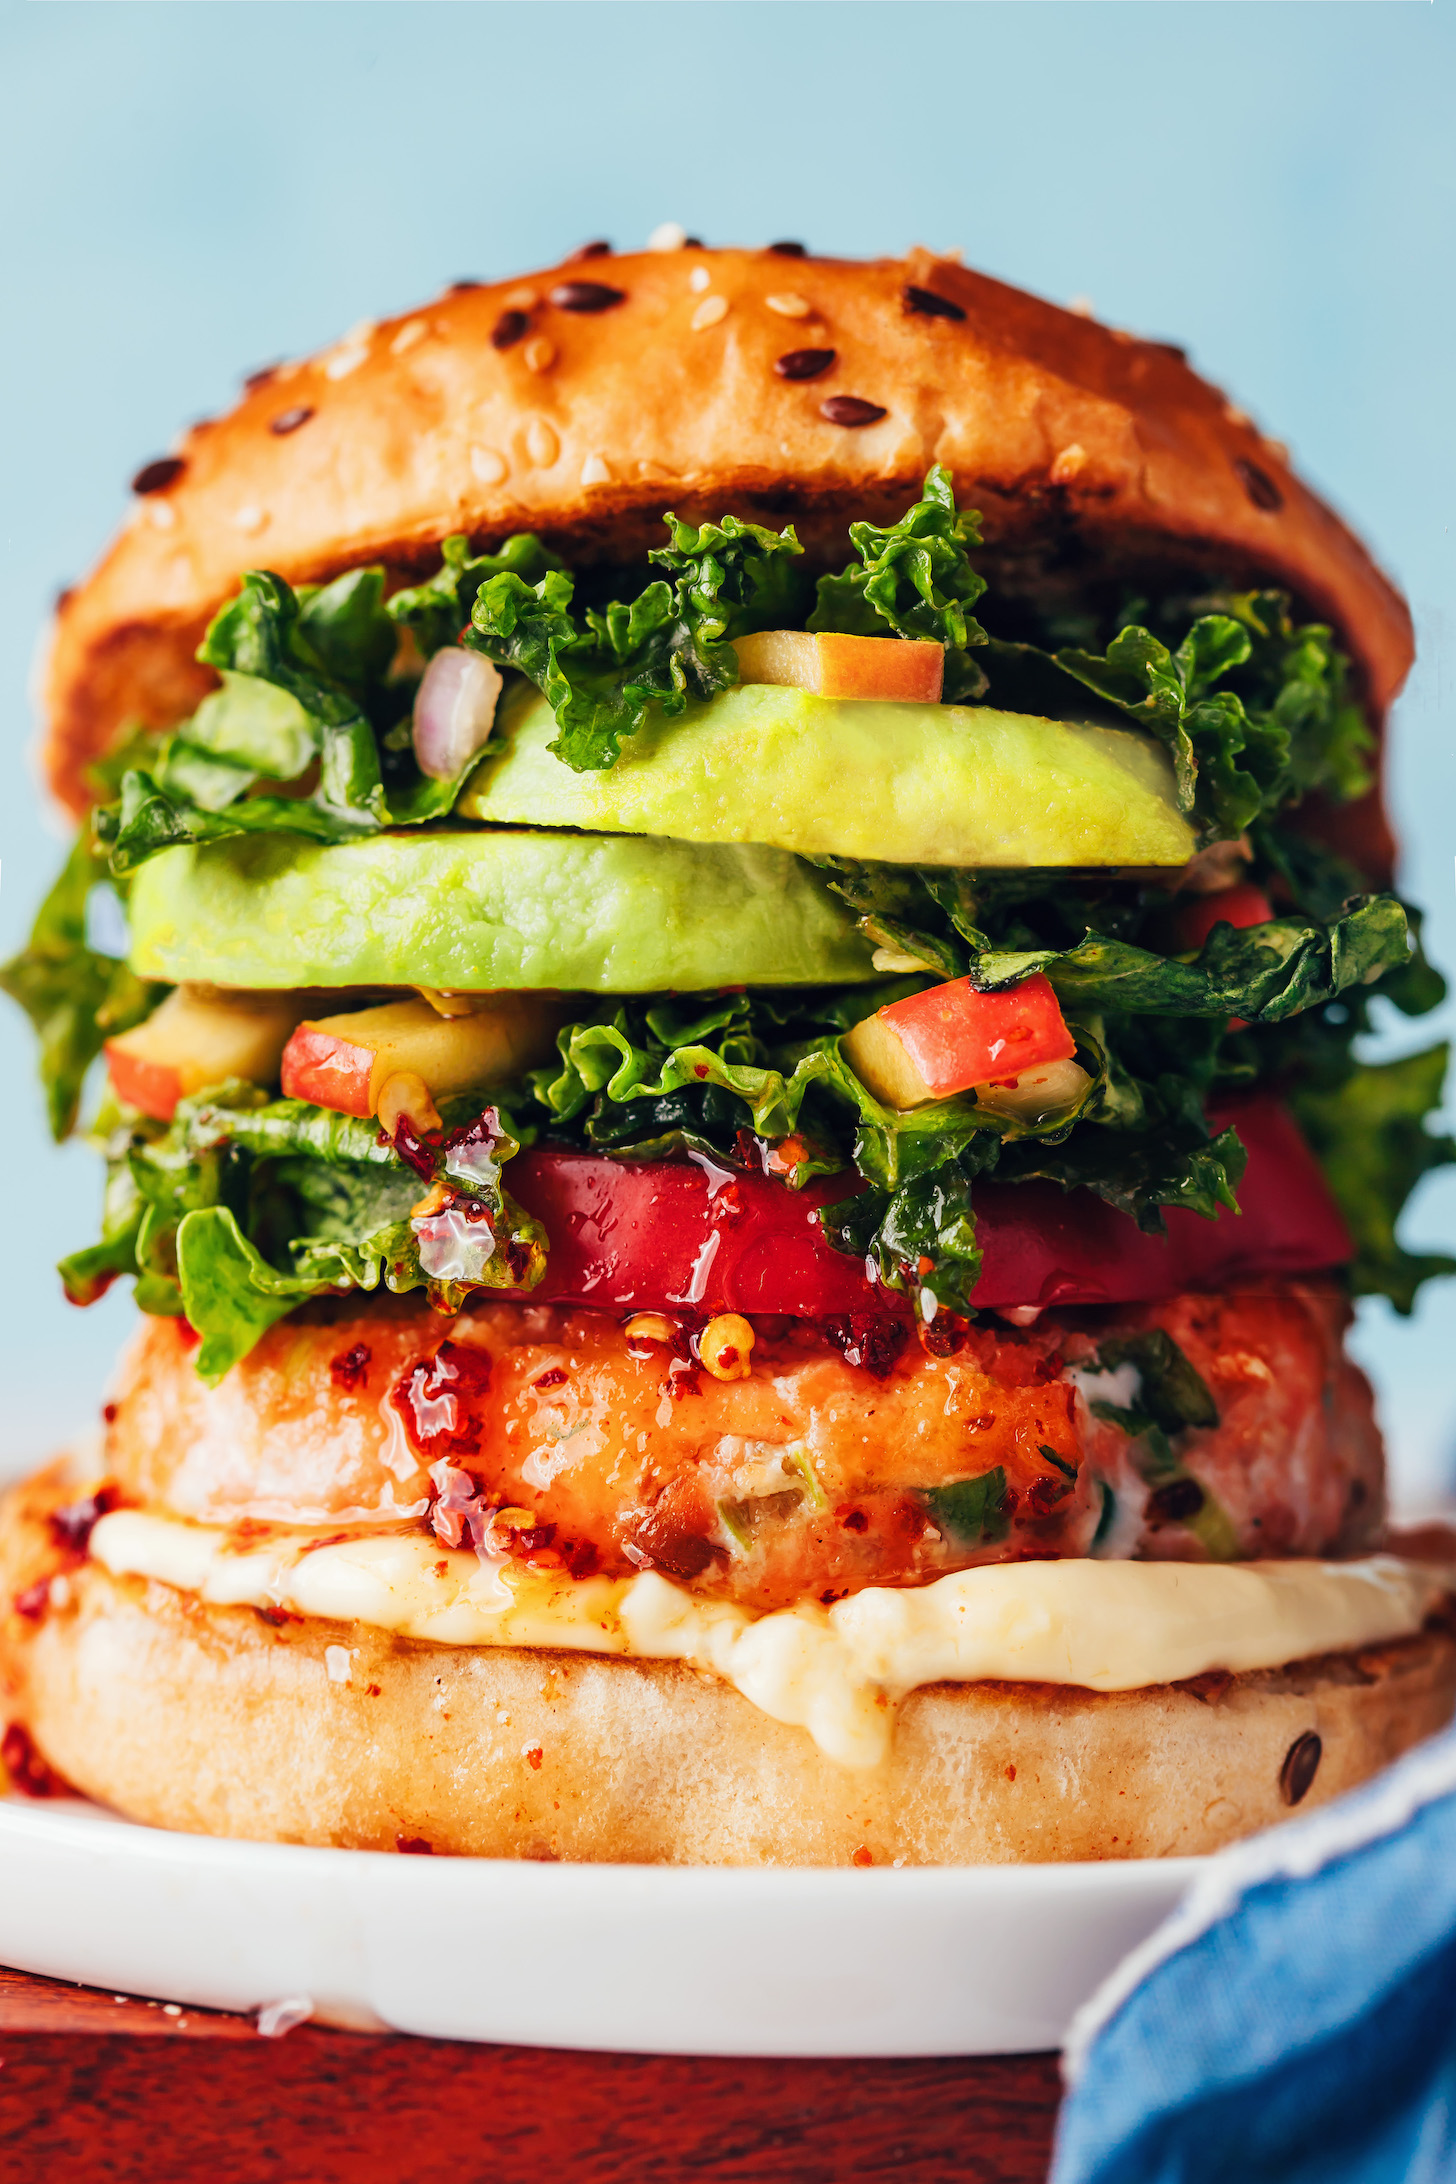
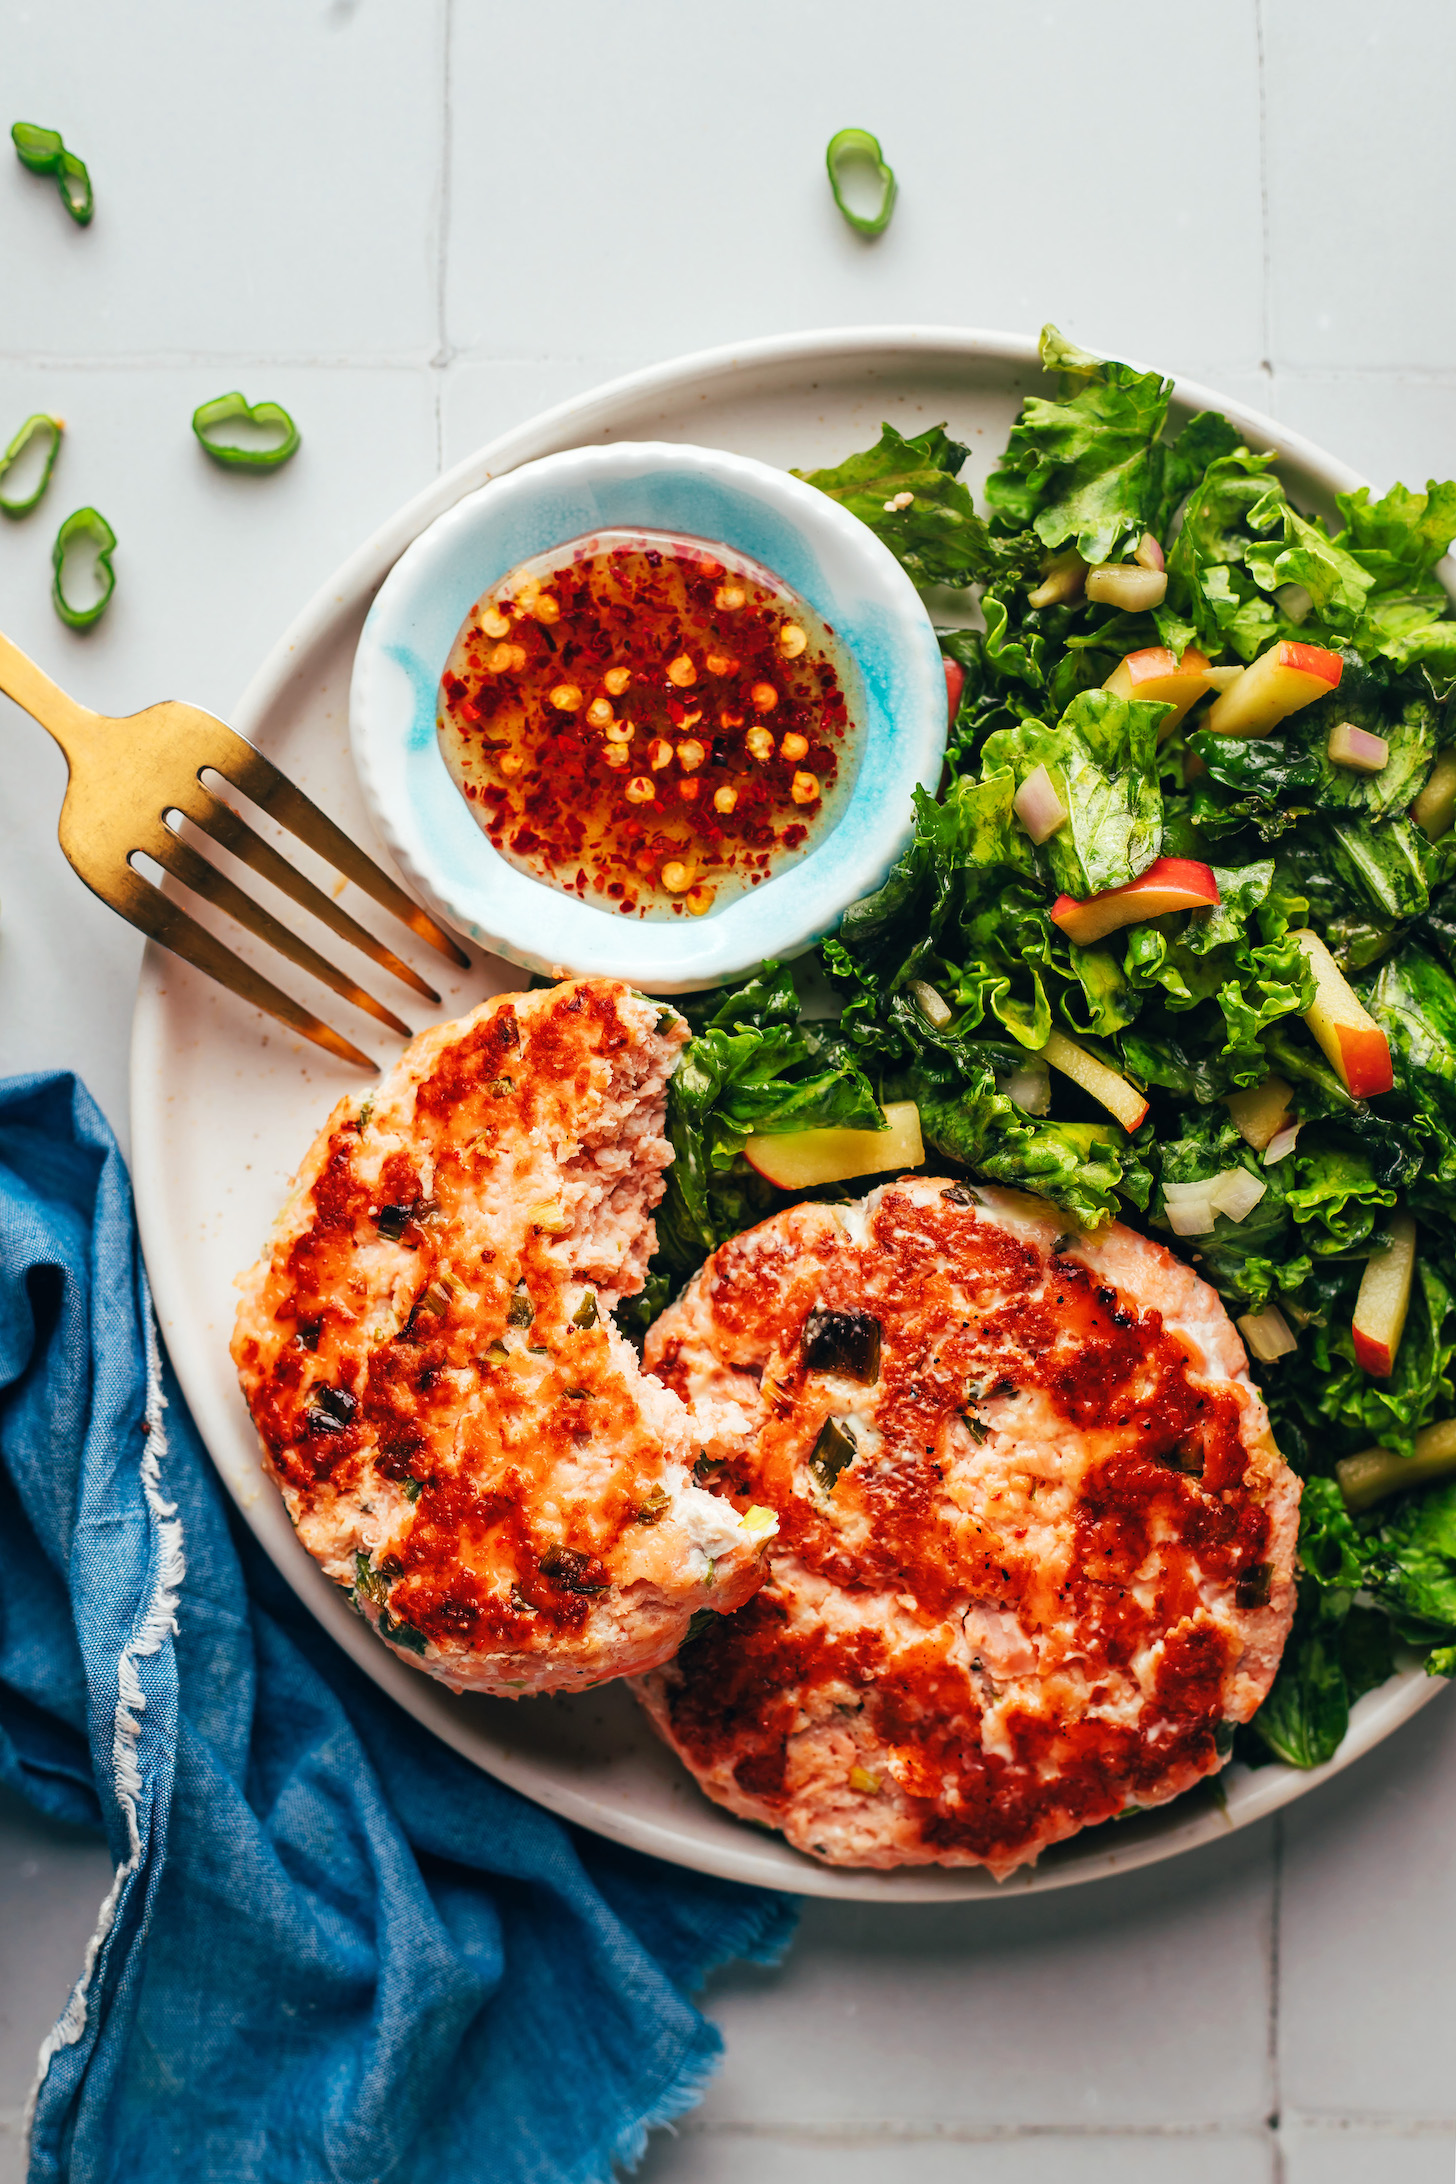
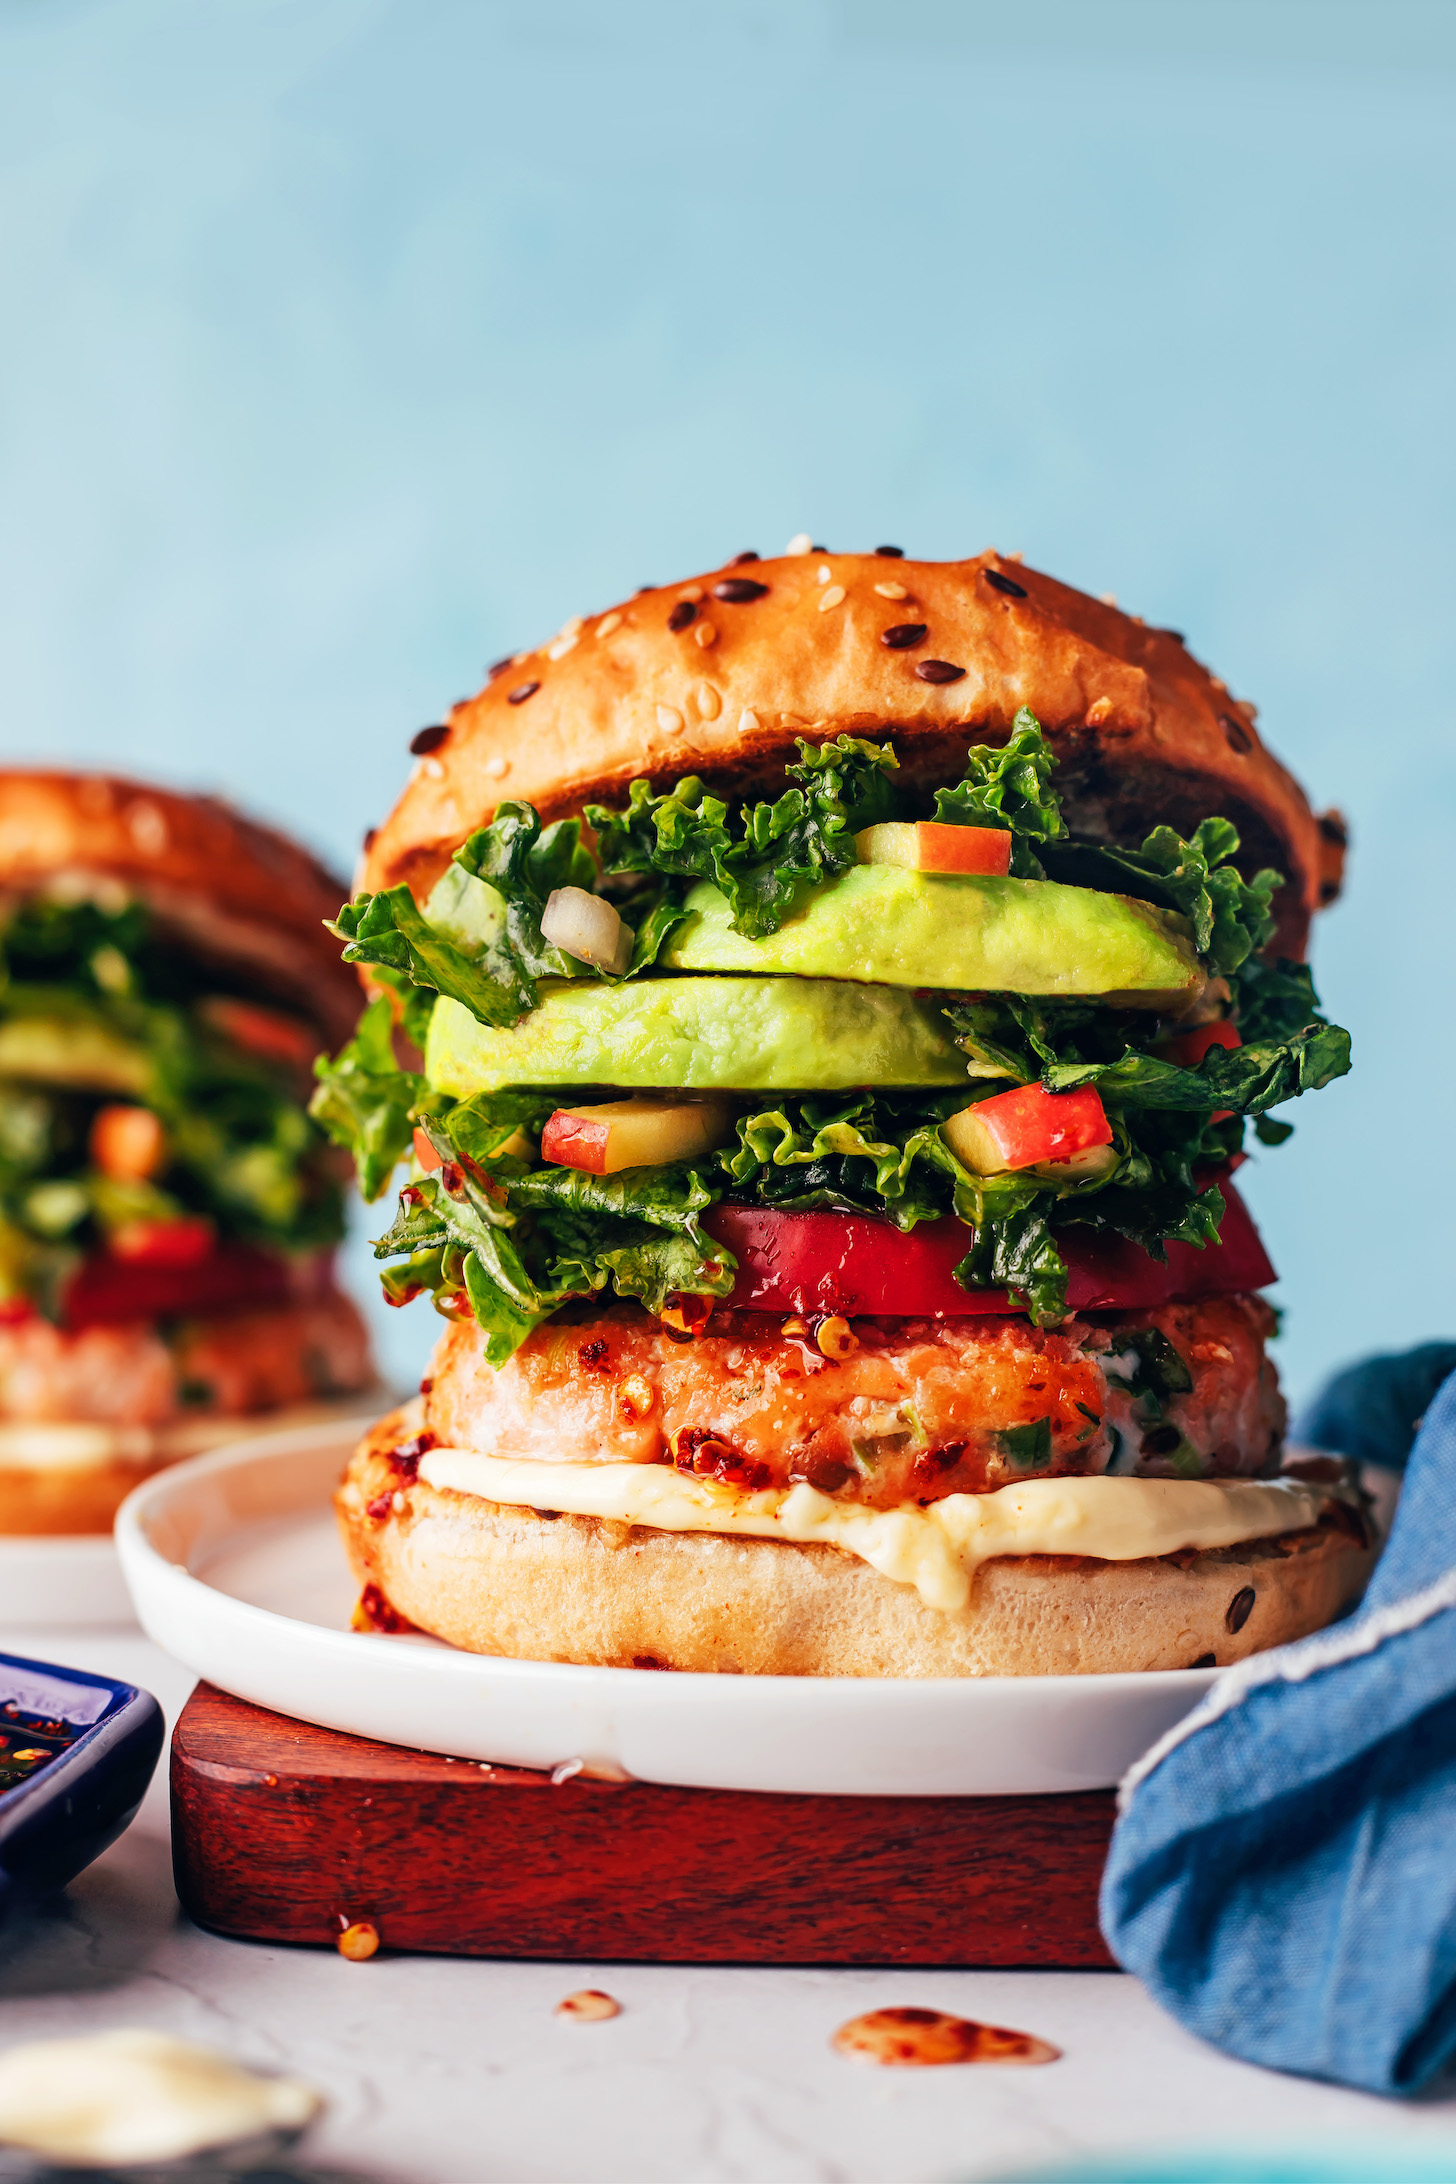
Friends, today we’re sharing the ULTIMATE salmon burger of all salmon burgers! Inspired by our go-to order at Café No Sé, this burger is SO satisfying and full of flavors you wouldn’t expect to go together but are truly meant to be.
Our inspired version is equally hearty and comes together in just 30 minutes! Or, if 10-minute dinners are more your style, you can prep and freeze the patties in advance. Let’s make salmon burgers!
How to Make Salmon Burgers with Fresh Salmon
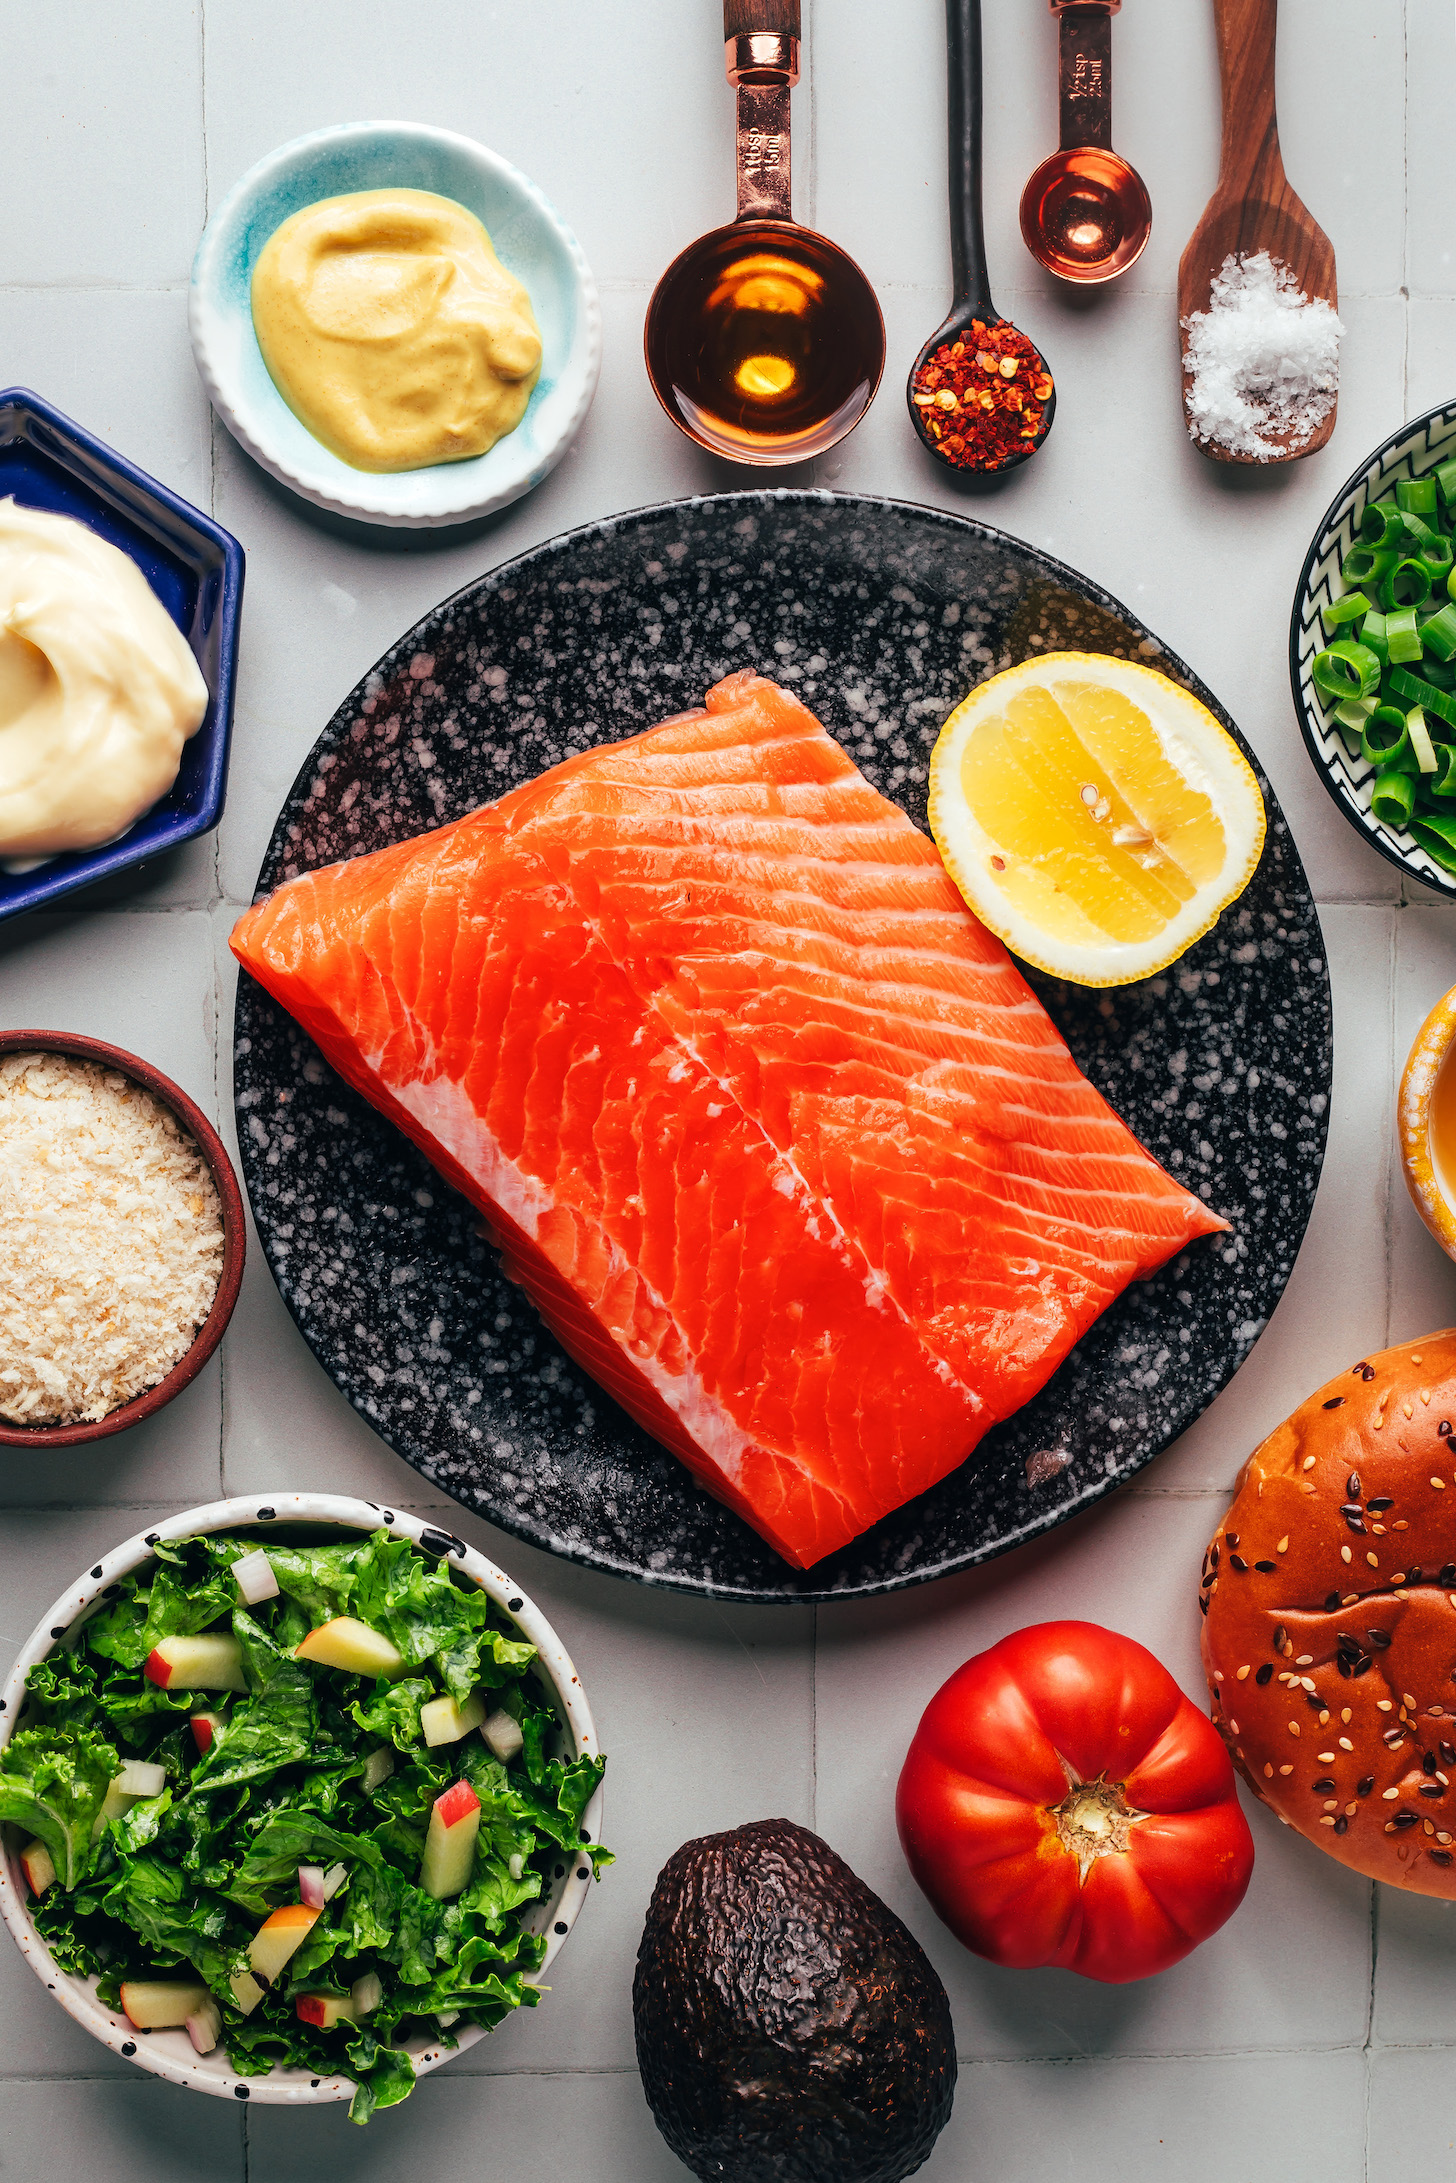
These burgers are made with fresh (or frozen) salmon for the best texture and flavor. We tried making them with canned salmon, but it was a night-and-day difference in quality!
To make salmon burgers with fresh salmon, you’ll remove the skin and cut the fish into cubes. You’ll add a small amount of it to a food processor and blend into a paste, which will help the mixture hold together.
Next, you’ll add the rest of the cubed salmon along with green onions, fresh basil, breadcrumbs, lemon juice, mayonnaise, Dijon mustard, and salt. This combination ensures a beautiful balance of herbiness, brightness, and zing!
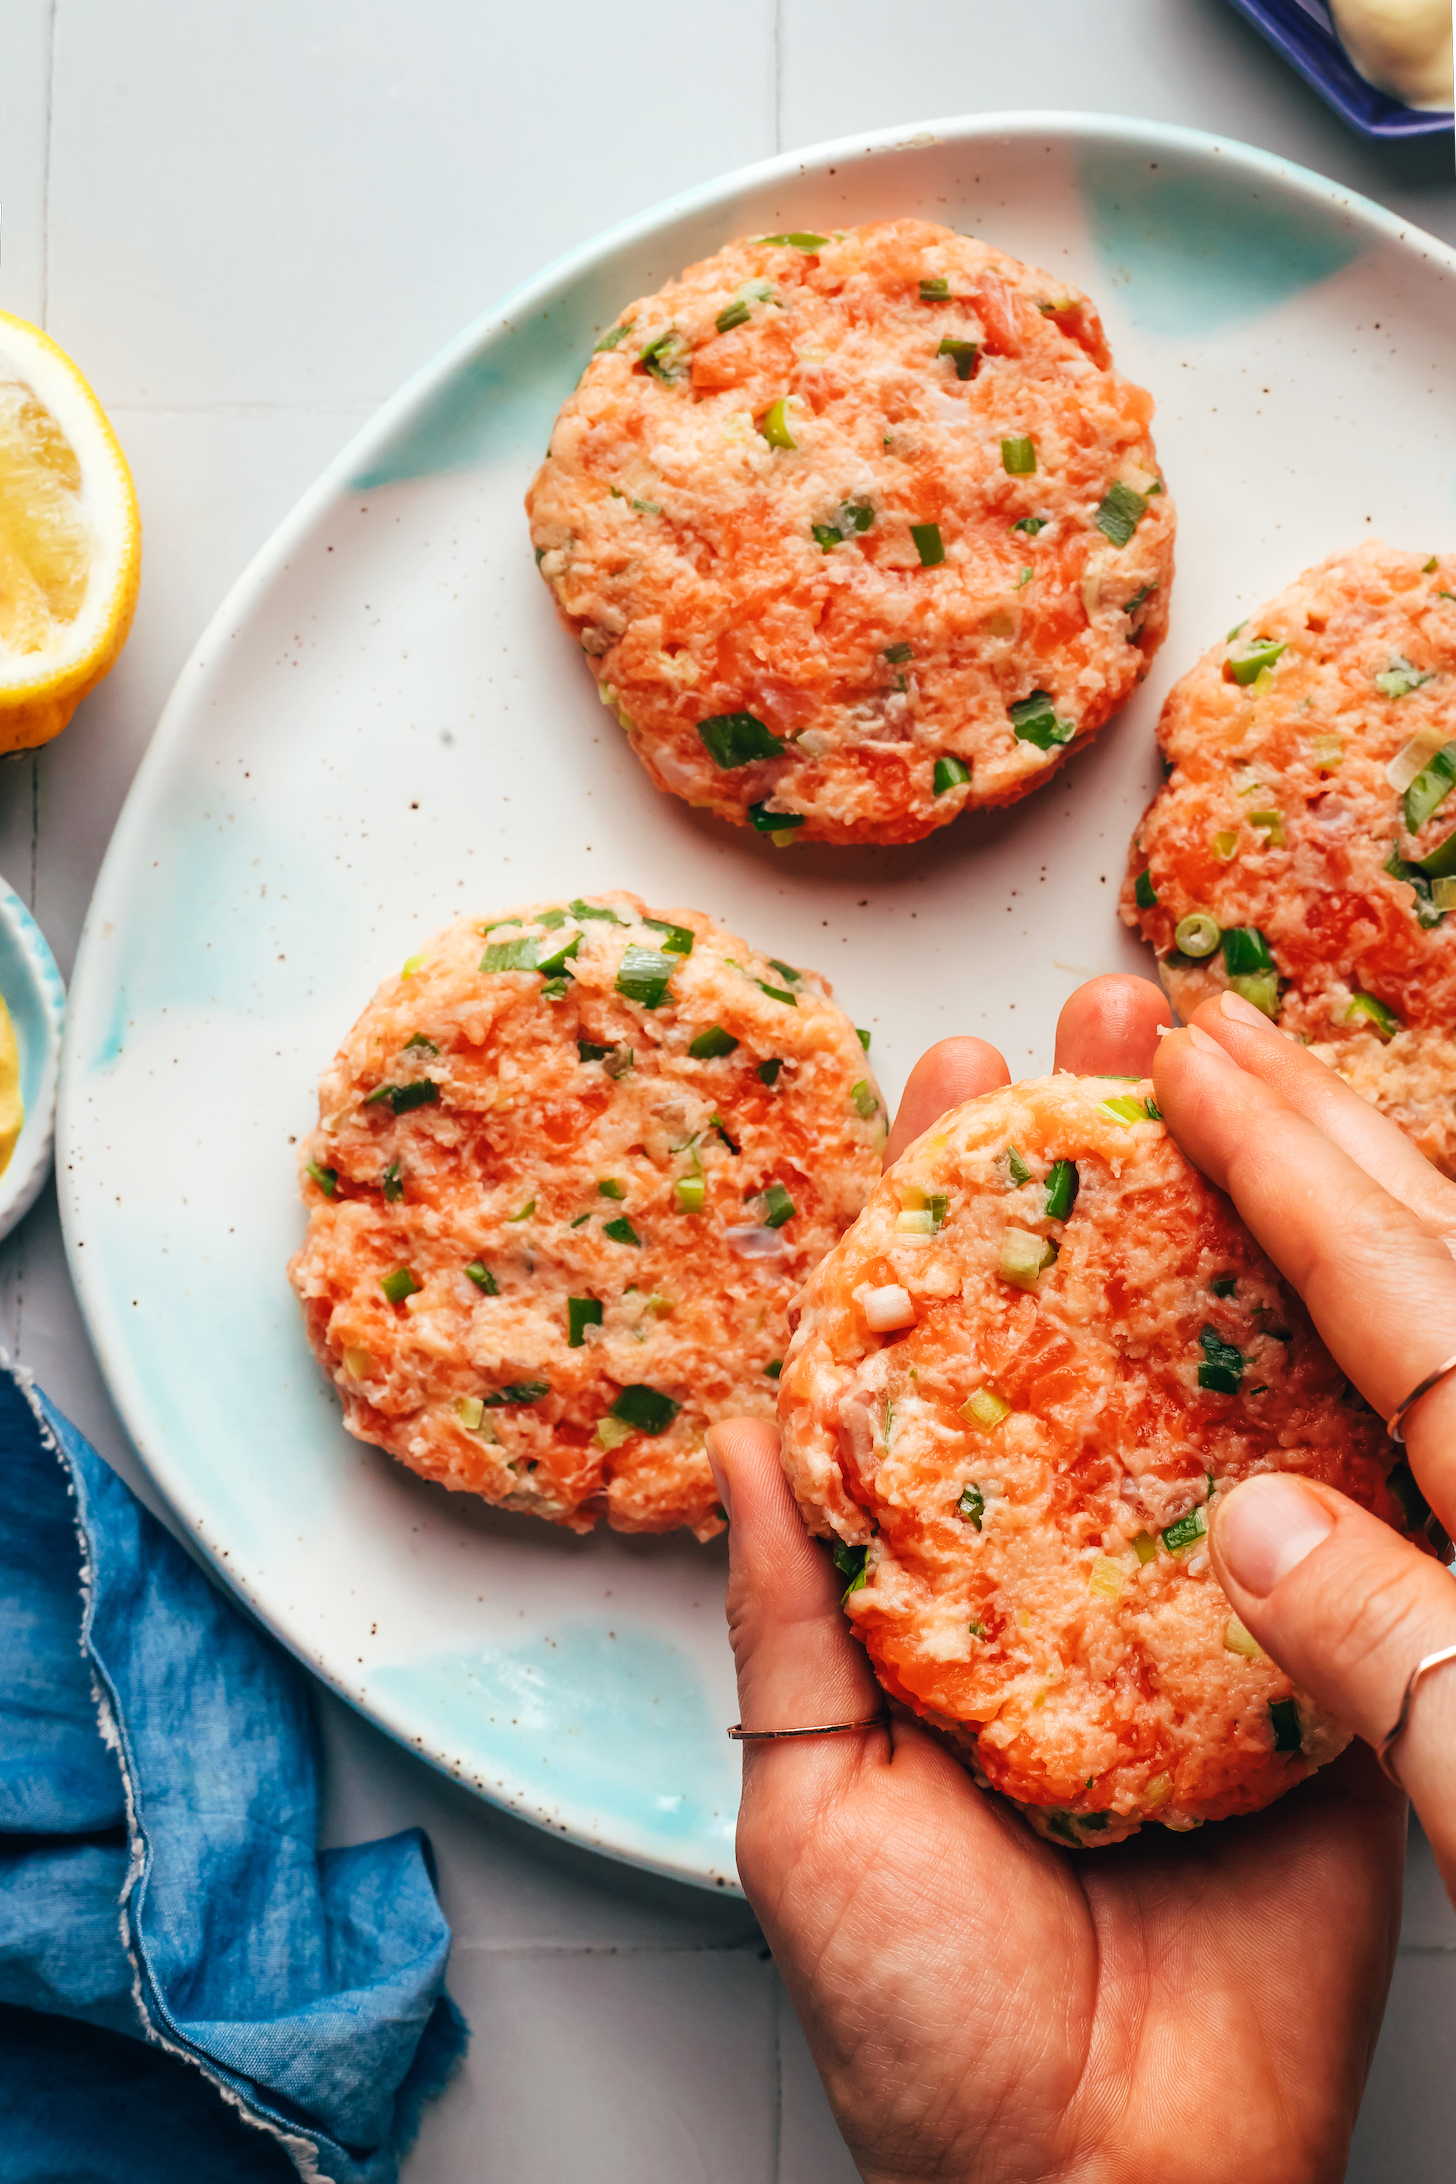
After pulsing the mixture, it will break down to the perfect salmon burger texture and be ready to form into patties.
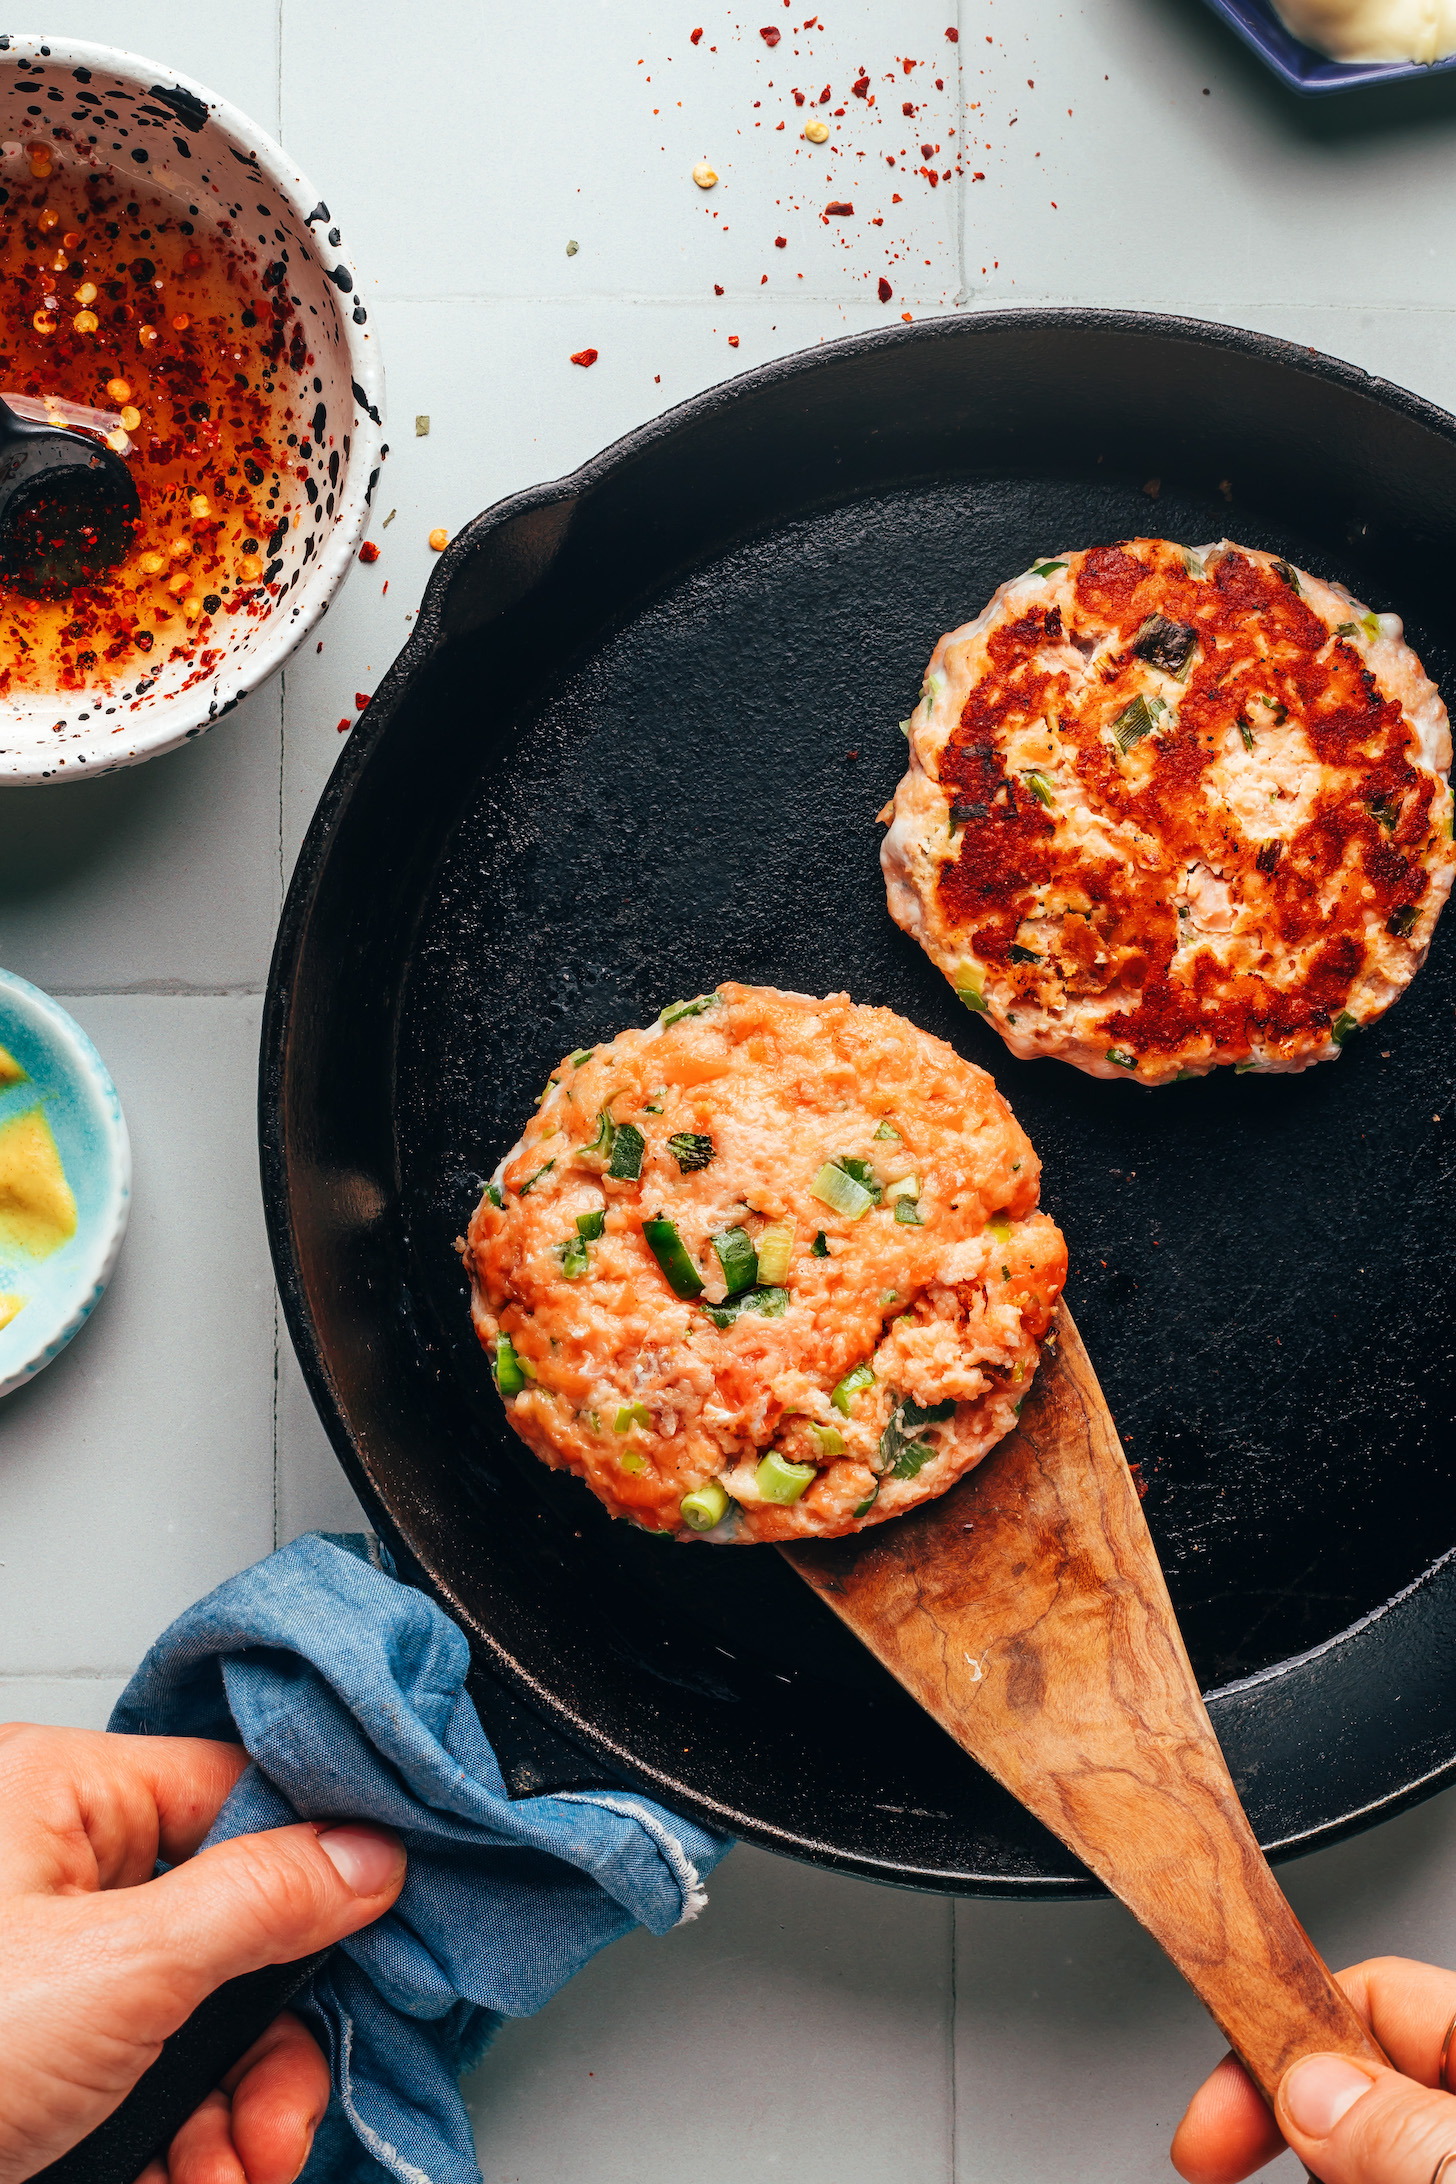
We cooked the salmon patties in a cast iron skillet to achieve a golden exterior. You could also cook them in a non-stick skillet or on a well-oiled grill or grill pan.
Now, let’s get to the really good stuff — what goes ON these salmon burgers:
A quick homemade sweet chili-style sauce made with just 3 ingredients: honey, red pepper flakes, and rice vinegar. It’s spicy-sweet-tangy perfection!
This combination might sound odd, but you’ll feel otherwise after the first bite!
We have a feeling you’ll LOVE these salmon burgers! They’re:
Herby Sweet + savory Full of flavor Satisfying Protein-packed (30+ g/serving!) & SO delicious!
What to Serve with Salmon Burgers
These hearty burgers go well with your classic burger sides like fries, sweet potato fries, and onion rings. They also pair well with salads, including our Quick Kale Apple Slaw, which doubles as a burger topping and a side!
More Salmon Recipes
If you try this recipe, let us know! Leave a comment, rate it, and don’t forget to tag a photo @minimalistbaker on Instagram. Cheers, friends!
SALMON PATTIES: In a food processor, blend 1/3 cup (67 g) of the salmon into a smooth paste, scraping down the sides a few times.
Add the remaining salmon pieces, sliced green onions, basil, breadcrumbs, lemon juice, mayonnaise, mustard, and salt. Pulse until the salmon breaks down a bit and the mixture is cohesive, mixing it with a rubber spatula every 2-3 pulses. It took us about 20 pulses total to achieve the consistency we were after.
Divide the mixture into 4 equal patties (~1/2-3/4 cup mixture per patty) and place on a plate. If they’re too wet/have trouble forming, you can add more breadcrumbs a little at a time until they’re easy to form. Optional: Chill for 10 minutes (or as long as overnight) — this can help the burgers hold their shape, but we didn’t find it necessary.
KALE APPLE SLAW: prepare the kale apple slaw (if using). Or for a shortcut, you can sub baby arugula, lettuce, or other greens — just wash and pat dry.
When ready to cook the burgers, heat a thin layer of oil in a large cast iron or non-stick skillet over medium heat. Once hot, add the salmon burgers and cook until browned and cooked through, 3-4 minutes per side. Alternatively, cook them on a well oiled grill or grill pan.
QUICK SWEET CHILI SAUCE: To a small bowl, add honey, red pepper flakes, and rice vinegar and stir to combine. Set aside.
Serve the burgers on toasted buns. Our recommended layering technique: Bottom of bun dressed with mayonnaise, a salmon burger, tomato, sweet chili sauce, kale apple slaw (or greens), avocado, top of the bun. The extra kale apple slaw is great as a side. Enjoy!
Store any leftover components separately. Salmon burgers will keep well in the refrigerator for 1-2 days or in the freezer for 1 month. Reheat covered in the microwave or a lightly oiled skillet over low-medium heat until warmed through. Kale apple slaw is best when fresh but keeps for 1-2 days in the refrigerator.
*CANNED SALMON: We tested with canned salmon but strongly preferred the flavor and texture of fresh salmon. If using canned salmon, we recommend three 5-oz. cans or two 7.5-oz cans, drained. Also, omit the salt and add an egg and more breadcrumbs (as needed) to help hold the burgers together and absorb excess moisture. Finely chop the green onion and basil, mash the salmon with a fork or potato masher, and combine all ingredients in a bowl. No food processor required. *Prep time does not include making the optional Kale Apple Slaw. *Inspired by the Salmon Burger at Café No Sé and adapted from the NY Times. *Nutrition information is a rough estimate calculated with 2 tsp avocado oil for cooking, 1 Tbsp mayo per burger, 1 slice tomato per burger, and without optional ingredients.
Bjork is still rocking the protein guy life, and, okay, I’m trying to eat more protein too, so we make chicken A LOT right now. And as much as I love the absolute all-star air fryer chicken (which is to the maximum), lately I’ve been mixing it up with these honey chipotle chicken skewers.
First of all, these chicken skewers have been approved 10x by my family – every time I make these, I get the thumbs up from my husband AND my girls. The flavor mix is so easy: smoky chipotle, honey and orange, a good amount of taco seasoning, and a bit of fresh garlic. The flavor is sticky, sweet, and smoky all in one. FINGER LICKING DELICIOUS! We have been coming back to them again and again.
Secondly, it’s not complicated at all, but look how pretty!
You don’t have to use the skewers. But come on – they are SO lovely and so fun! If you are looking for something to just shake up the very repetitive daily grind of dinners (it me!), it’s worth the 5 minutes for a little fun skewer showcase moment at dinnertime.
Plus, skewers make these extremely grill-friendly! I have been air frying them, but they are just begging to be grilled. I can feel it.
We like this with corn dip, pickled onions, and green rice. WOW – it is a power combo. I crave those leftovers like nobody’s business. But these chicken skewers also play well with black beans and avocado corn salsa, or thrown on a southwestern-style salad, or tucked into a tortilla for a taco moment!
The Americano cocktail is a fizzy, bittersweet drink with Italian origins. It’s the perfect aperitivo before dinner or a refreshing weekend afternoon sipper. The Americano is a unique spritz that strikes the elusive balance between bitter and sweet. This cold, bubbly drink is lovely on a hot day, yet the complex, warming flavors are equally welcome before Thanksgiving supper.
Americano cocktails are made with Campari, sweet vermouth and club soda. If you love a Negroni, this drink is right up your alley. The Americano is served in a taller glass with club soda instead of gin, and the Negroni is actually a derivative of the Americano. Don’t write off this cocktail if you don’t like Negronis, though (I don’t!). It’s like a Negroni light, and you can adjust it to suit your preferences.
Americano cocktails have nothing in common with Americano coffee, except that they were both popularized by Americans visiting Italy. Apparently, the Americano is based on another drink, the Milano-Torino, which is made with just Campari and Vermouth di Torino. There are several origin stories, and I’m not sure which one is true. All I know is that this is a nice cocktail! I hope you enjoy it.
Americano Cocktail Ingredients
These cocktails require four basic ingredients plus ice.
1) Campari
Campari is a vibrant red amaro. The brand describes the flavors as “Pleasantly bitter with a velvety aftertaste. Intense notes of orange, herbs and wood.” Look for Campari near the liqueurs or other amaros at the liquor store.
2) Sweet vermouth, like Dolin
Sweet vermouth is dark red or brown, not clear. Dolin is my favorite brand for Americanos. It’s not as sweet as others like Carpano Antico.
Vermouth storage tip: Vermouth is wine, so it will go bad with time like all wines do (but will keep longer than a regular bottle, thanks to the brandy). Opened bottles of vermouth will keep well in the refrigerator for one to two months.
3) Club soda
Club soda provides some fizzy dilution. Any unflavored sparkling water will work, though I love Fever Tree or Topo Chico for their plentiful small bubbles.
4) Slice of fresh orange
A slice of orange offers a burst of fresh, familiar orange flavor and aroma. Don’t skip it. To maximize the orange flavor, you can gently run the peel of the orange around the edge of your glass before dropping it in.
How to Make an Americano Cocktail
Americanos are such an easy cocktail to make. You don’t need a cocktail shaker or any bartending experience.
To make one, fill a tall glass with ice. Pour in equal parts of Campari and sweet vermouth, then add a big splash of club soda. Gently stir with a spoon, then add a slice of orange. Enjoy.
Watch How to Make an Americano Cocktail
How to Adjust Your Americano Cocktail
The standard ratio is equal parts Campari and sweet vermouth. But who’s to say that you can’t tweak the recipe to your liking?
Make it less bitter
Campari’s bitter notes can take some getting used to. You can reduce the bitterness by using less Campari or balance it with extra sweet vermouth.
Make it less boozy
As written in the recipe below, the Americano cocktail is equally strong as a 1 1/2-ounce drink made with 80-proof liquor like vodka, gin, or tequila. To lower its alcohol content, use more club soda and less Campari and vermouth. Try just 1/2-ounce or 1-ounce each of the Campari and vermouth for a low-alcohol drink.
What to Serve with Your Americano
The Americano is commonly served as an aperitivo. Italian aperitivos are designed to stimulate the appetite before a meal. These cocktails are typically somewhat bitter, carbonated and more dry than sweet.
Serve your Americano cocktails with Italian or generally Mediterranean-flavored appetizers. Campari is bitter, and salty, sweet, creamy or fatty foods will take the edge off. You can’t go wrong with a cheese board.
Here are simple options that pair well:
More Fizzy Cocktails to Enjoy
Love the Americano? Here are a few more cocktail recipes I think you’ll appreciate.
Please let me know how you like your Americano cocktail in the comments! I’m always eager for your feedback.
The Americano cocktail is a fizzy, bittersweet drink with Italian origins. It’s the perfect aperitivo before dinner or a refreshing sipper on a warm day. Recipe yields 1 drink.
Scale
Ingredients
1 ½ ounces Campari
1 ½ ounces sweet vermouth, like Dolin
2 ounces club soda*
1 slice of orange, for garnish
Instructions
Fill a tall glass with ice. Pour in the Campari and sweet vermouth, then gently pour the club soda into the glass at a 45-degree angle to preserve the bubbles.
Gently stir with a spoon, and garnish with a slice of orange. Serve at once.
Notes
Make it lighter: For a lower-alcohol drink with a lighter flavor, use 1 ounce or less each of the Campari and vermouth.
Club soda recommendations: James Bond insists on Perrier, but I prefer Fever Tree or Topo Chico for the plentiful bubbles.
▸ Nutrition Information
The information shown is an estimate provided by an online nutrition calculator. It should not be considered a substitute for a professional nutritionist’s advice. See our full nutrition disclosure here.
Stuck in a breakfast rut? Find over 60 healthy breakfast ideas below! With sweet, savory, easy & make-ahead options, we have something for everyone.
And just like that, it’s back-to-school time! I’m lining up the fall recipe calendar, getting ready to test, shoot, and share a slew of new ideas. For us, this season will be busy, and I know that it will be for many of you too. Today, I’m sharing my favorite healthy breakfast ideas to get these jam-packed days off to a great start. You’ll find ones that are perfect for making ahead and taking on the go, ones that are quick and easy to whip up in the morning, and even a few for days when you have a bit more time to linger over breakfast.
Below, I share over 60 healthy breakfast recipes, divided into 11 (yes, 11!) categories: oats, eggs, smoothies, bowls, quick breads, pancakes & waffles, breakfast tacos, breakfast cookies, toast, muffins & scones, and bars & balls. Whether you’re someone who craves something savory or sweet first thing in the morning, or whether you like to enjoy breakfast at home or grab it and go, you’re sure to find some healthy breakfast ideas you love.
Healthy Breakfast Oats
Oats are loaded with fiber, so they’re a great healthy breakfast!
If you’re like me, though, you might run the risk of getting stuck in an oat rut. In college, I ate plain instant oatmeal every day. After four years, I couldn’t stand the stuff. To avoid oat burnout, make sure to vary your toppings! Any nut butter, fresh fruit, dried fruit, yogurt, nut, seed, or jam is fair game. Savory oatmeal is delicious too.
You can also change up how you prepare your oats. Make baked oatmeal or homemade granola, or prep a big batch of overnight oats for quick breakfasts throughout the week. Find these and more oat recipes below:
Egg Breakfast Recipes
If you’re someone who wants to prioritize protein in your breakfast, egg recipes are a great choice. Make a quick omelet, scrambled eggs, or fried eggs in the morning, or try one of the recipes below to change things up. Make egg bites for a portable breakfast option, for example. On days when you have more time, start the day with a big breakfast casserole or shakshuka.
Healthy Breakfast Smoothies
Smoothies are some of the best breakfast recipes, as they pack a big serving of fruits and veggies into your first meal of the day. Through years of making smoothies, I’ve found that a handful of spinach is almost undetectable, so toss some into a fruit smoothie for extra nutrients! Alternatively, blend in a superfood like hemp seeds, nut butter, matcha, or maca powder for an extra healthy kick.
Make your smoothie the night before and store it in the fridge for a grab & go breakfast, or prep individual smoothie packs. Portion out the fruit, veggie, and superfood ingredients for a single smoothie into a container, prepping for as many days as you like at once. Store containers in the freezer, and in the morning, blend a frozen pack with almond milk or juice. Enjoy!
Healthy Breakfast Bowls
If you’re looking for some new, out-of-the-box breakfast ideas, a breakfast bowl might be the thing for you. In this category, almost anything goes. When I’m making a savory bowl, I top rice or farro with a soft-boiled egg, vegetables (leftover roasted Brussels sprouts,butternut squash, cauliflower, etc.) and a flavorful sauce like pesto or tzatziki. My sweet bowls vary. Sometimes I’m in the mood for chia pudding. On other days, I’ll top quinoa with almond milk, cinnamon, and fresh fruit and call it a meal.
Quick Bread Breakfast Recipes
Moist, comforting, and lightly sweet, quick bread is a delectable breakfast option. In the summer, I almost always have individual slices of zucchini bread in my freezer. In the fall and winter, pumpkin bread and banana bread take its place. Enjoy a thick slice of your favorite quick bread on its own, or top it with a dollop of Greek yogurt and seasonal fruit for extra staying power.
Pancake & Waffle Breakfast Ideas
Pancakes and waffles may not be something you can whip up every morning of the week, but unlike their cousin French toast, these breakfast recipes keep well if you make them ahead and freeze them. So double your weekend batch of pancakes or waffles, and freeze the leftovers for busy mornings! When you’re ready to eat, pop them in the toaster or microwave to thaw. Enjoy with maple syrup!
Healthy Breakfast Tacos and Burritos
After years of living in Austin, breakfast tacos are my favorite healthy breakfast. Most often, I scramble eggs with spinach and top them with avocado, hot sauce, and pico de gallo. But all sorts of variations are fair game here! Add vegetables like roasted sweet potatoes or vegan shiitake bacon, or use a different salsa. Have fun making your breakfast tacos your own!
I also love a breakfast burrito first thing in the morning. Instead of making these from scratch on a weekday, I prep them on the weekend and freeze them so that I can quickly thaw them during the week.
Healthy Breakfast Cookies
Breakfast cookies are the perfect on-the-go morning treat. Ingredients like flax, oats, nuts, seeds, and even quinoa fill them with protein, healthy fats, and fiber. In addition to the fruit and veggie variations listed below, I love the Banana Bread Breakfast Cookies on page 35 of Love and Lemons Every Day. These breakfast recipes are great ones to make ahead of time and freeze for busy mornings. To thaw, pop them in the microwave for 8 to 10 seconds, and head out the door!
Sandwich & Toast Breakfast Ideas
If you’re looking for tried and true easy breakfast ideas, toast is the thing for you! Pop a slice of whole grain bread in the toaster, and load it up with your favorite seasonal toppings. I like to start with a creamy spread and then add a layer of roasted or raw veggies, fruit, and/or fresh herbs. I’m a diehard fan of avocado toast, but hummus, ricotta, and nut butter are good starting points for making delicious toast too.
Or, swap the bread for an English muffin or bagel, and make a breakfast sandwich! The recipe below freezes well, so it’s a great healthy breakfast for meal prep.
Healthy Breakfast Muffins and Scones
When I was growing up, chocolate chip muffins were a breakfast staple in our house. Muffins are still one of my favorite ways to start the day, but I don’t just limit myself to chocolate chip. I love all the recipes below!
Like other healthy breakfast baked goods, muffins and scones freeze well. I like to keep a frozen stash on hand at all times.
Bars & Balls Breakfast Ideas
If you’re someone who loves to start your day with a granola bar, try swapping out the packaged kind for ones you make at home. All of these recipes are simple, made with good-for-you ingredients that combine to make delicious, nutritious morning treats. Like baked goods, these bars and balls keep well in the freezer, so prep a batch to have on hand for easy healthy breakfasts and snacks!
Make the Salsa: In a small bowl, combine the tomato, onion, cilantro, serrano, garlic, lime juice and salt. Chill until ready to use.
In a small nonstick skillet, heat a drizzle of olive oil over medium heat. Add the green pepper, scallions and a pinch of salt and pepper and sauté until lightly browned, about 5 minutes. Scoop a large spoonful of the salsa into the pepper mixture and stir. Remove from the heat and set aside.
Brush a large nonstick stick skillet lightly with olive oil and bring to medium heat. Add the eggs, let them cook for a few seconds and then stir. Add the green pepper mixture to the eggs. Continue to stir and scramble the eggs until just set. Remove from the pan from the heat while the eggs are slightly runny and stir in the arugula and half of the extra cilantro.
Assemble the tacos with the egg mixture, a scoop of salsa, the remaining cilantro and a few slices of avocado. Finish with a squeeze of lime and a pinch of salt and pepper, if desired. Garnish with cilantro and serve with lime wedges.
This Asian Grilled Chicken recipe is the perfect excuse to grill or use your indoor grill pan, an easy high-proteindinner idea!
Asian Grilled Chicken
I love to make this tasty Asian-inspired grilled chicken recipe when the weather is warm, as it’s excellent for outdoor gatherings and family dinners. Letting it marinate overnight gives you the best results for the most flavorful chicken. You can also make this year round on a grill pan. If you enjoy this dish, you may also want to try my Korean chicken and this classic grilled chicken breast recipe.
Why You’ll Love Asian Grilled Chicken This Recipe
I first shared this recipe back in 2008, which is crazy when I think how long I’ve been doing this! I’m always trying to find ways to make chicken breast tasty, since I am more of a dark meat girl. This is what I make when I am craving Asian flavors, I usually double it and keep the extra for quick lean protein to throw in bowls or salads.
Versatile and Easy: The meat pairs well with many side dishes like rice and broccoli, and is simple to prepare.
Juicy and Delicious: The marinade leaves the chicken tender and flavorful.
If you make this simple grilled Asian chicken recipe, I would love to see it. Tag me in your photos or videos on Instagram, TikTok, or Facebook!
Grilled Asian Chicken Ingredients
The Asian grilled chicken marinade has 9 ingredients combined to create a delicious flavor that infuses the chicken with sweet, savory, and tangy flavors. (See recipe card below for the exact measurements.)
Chicken Breast: I bought the thin-sliced, boneless, skinless chicken breasts and cut them into thin cutlets. However, you can buy regular chicken breasts and pound them until they’re even and thin before cutting them into smaller pieces. Boneless skinless chicken thighs are also great.
Lemon Juice adds a bright acidity which tenderizes the chicken.
Toasted Sesame Seeds taste better than un-toasted ones. You can buy them toasted or toast them in a skillet until golden brown. Keep an eye on them because they can burn quickly.
Aromatics: Minced garlic and green onions provide a fragrant, savory note to the marinade.
Ginger: Peel and mince fresh ginger for a warm, spicy undertone.
Low-Sodium Soy Sauce provides an umami base while keeping the sodium content low.
Honey for a hint of sweetness that balances soy sauce’s saltiness
Sesame Oil gives the marinade a rich, nutty aroma and prevents lean chicken breasts from drying out.
What is the secret to grilling chicken?
An amazing marinade is essential for grilling chicken. It tenderizes the meat and prevents it from drying out.
You also want to ensure you don’t overcook it. Since we’re using thin cutlets, they will cook quickly. Use a meat thermometer to confirm it’s ready (It should read 165°F).
How to Make Asian Grilled Chicken
This grilled Asian chicken recipe guarantees tender, juicy chicken every time. See the recipe card for the complete instructions.
Make the Asian chicken marinade.Marinade at least 3 hours or overnight.
Asian Grilled Chicken Marinade: Combine all the marinade ingredients in a bowl.
Marinate the Chicken: Pour the sauce over the chicken. Cover and refrigerate for at least 3 hours, but marinating the meat overnight will deliver better results.
Grill Chicken on a grill or grill pan sprayed with oil, set to medium-low heat a few minutes on each side.
Garnish with sesame seeds and scallions.
Variations
Chicken: This marinade is also great on boneless, skinless thighs.
Seafood: Use the marinade on shrimp or salmon.
Citrus: Substitute lime juice.
Ginger: If you don’t have fresh ginger, use ¾ teaspoon dried ginger.
Onions: Swap green onions with diced red onion.
Sweetener: Sub maple syrup or agave for honey.
Gluten-Free: Substitute tamari or coconut aminos for soy sauce and use a gluten-free teriyaki sauce.
Sesame Allergy: Replace sesame oil with avocado or peanut oil.
Spicy Asian Marinade: Add sriracha.
Herbs: Add cilantro to the marinade or garnish the chicken with it.
No Grill? Cook the chicken breasts on a grill pan or cast iron skillet on the stove.
What to Serve with Grilled Asian Chicken
Asian Grilled Chicken Salad: Make a salad with mixed greens, carrots, scallions, and mandarin oranges, and top it with chicken and this sesame soy vinaigrette.
Rice: Pair this dish with white rice or edamame fried rice and one of the veggie options above.
Chicken Skewers: Cut the breasts into bite-size pieces and thread them on a skewer with chopped vegetables, such as onions and bell peppers.
Storage
These Asian grilled chicken breasts are fantastic as leftovers.
Refrigerator: It’ll last 4 days in the fridge, so it makes great lunches.
Freeze it for 3 months in an airtight container.
Leftovers: Eat the chicken cold (I love it on a salad!), or reheat it until warm in the microwave.
More Grilled Chicken Recipes You’ll Love
You can see all my chicken breast recipes here, but here’s some grilled one’s you will love.
Prep: 15 minutesmins
Cook: 8 minutesmins
marinade time: 3 hourshrs
Total: 3 hourshrs23 minutesmins
Yield: 4servings
Serving Size: 2cutlets
Combine all marinade ingredients in a small bowl.
Pour the mixture over the chicken, turn the pieces to coat evenly, cover and place in refrigerator a minimum of 3 hours, but preferably overnight.
Preheat grill or grill pan set to medium-low heat and oil the grates so it doesn’t stick.
Grill chicken top side down first until well browned charred, about 2 to 3 minutes, turn and cook on the second side about 2 to 3 more minutes, careful not to burn.
Transfer to a serving platter and garnish with sesame seeds and scallions.
Last Step:
Please leave a rating and comment letting us know how you liked this recipe! This helps our business to thrive and continue providing free, high-quality recipes for you.
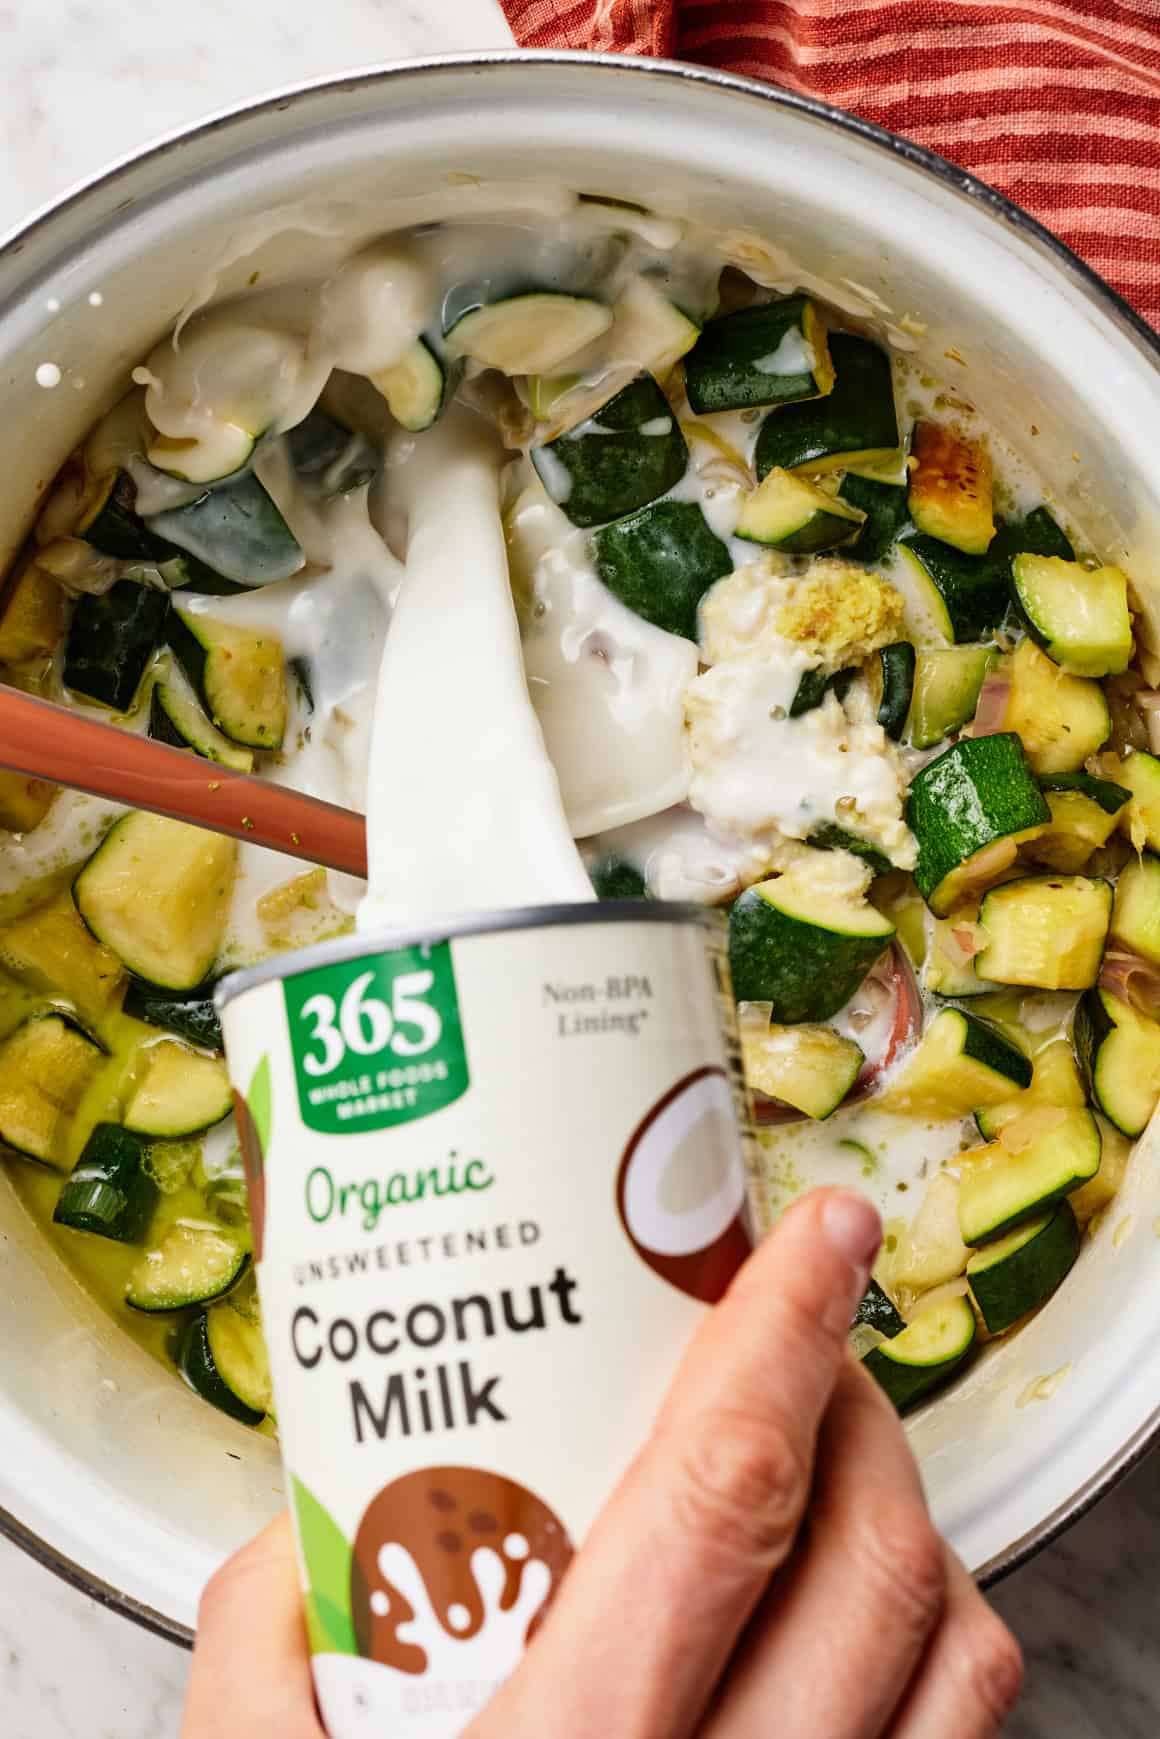
Fresh herbs, ginger, and lime fill this creamy zucchini soup with bright, refreshing flavor. It’s a delicious, healthy meal that’s ready in 30 minutes!
This zucchini soup is creamy and comforting, but still bright and fresh. Blended zucchini and coconut milk create its luxe, silky base, while ginger, herbs, and lime fill it with bold, refreshing flavor. I also toss in a serrano chile for heat, though if you’re sensitive to spice, you could skip it.
This zucchini soup recipe is perfect for late summer and early fall. As the temps cool off from their summer peaks, I start craving warmer, heartier fare. At the same time, I want to keep cooking with fresh garden zucchini while it’s abundant (I’m not ready for all things pumpkin just yet).
So right now, this zucchini soup is hitting the spot. If you’re in the mood for a light, cozy meal in the next couple of weeks, give it a try. I hope you love it as much as I do!
How to Make Zucchini Soup
You can find the complete recipe with measurements at the bottom of this post, but for now, here’s an overview of how it goes:
Ingredients
This zucchini soup recipe starts with simple, fresh ingredients:
Zucchini, of course! Sautéed and blended, it gives the soup a smooth and creamy texture. No need to peel zucchini for soup! The skin adds nutrients and gives the soup a nice green color.
Coconut milk – Along with the zucchini, it makes this soup creamy without any cream. It adds rich flavor too.
Coconut oil – For sautéing the aromatics and zucchini. If you don’t keep coconut oil on hand, a neutral oil or extra-virgin olive oil would work well too.
Shallots and garlic – They add savory depth of flavor. In a pinch, diced yellow or white onion would be a good substitute for the shallot.
Serrano pepper – For heat! Feel free to skip it if you’re sensitive to spice.
Lime juice and zest – For bright, zesty flavor. For a fun variation, try using lemon juice and zest instead.
A pinch of sugar – It balances the lime’s tang and brings out the floral coconut flavor.
Fresh ginger, basil, and cilantro – They make this soup fragrant and refreshing.
And sea salt – To make all the flavors pop!
Find the complete recipe with measurements below.
Method
This easy zucchini soup recipe comes together in under 30 minutes. Here’s how it goes:
Start by sautéing the zucchini and aromatic vegetables. Heat the oil in a large pot over medium heat. Add the shallot, zucchini, garlic, serrano, and salt and cook until the squash is tender but not mushy, about 8 minutes.
Next, simmer. Stir in the coconut milk, lime zest, ginger, and sugar and simmer for 15 minutes.
Then, blend. Transfer the soup to a blender and add the fresh herbs and lime juice. Blend until smooth and creamy.
Tip: To make this recipe even quicker and easier, use an immersion blender to blend the soup directly in the pot.
Finally, serve the soup in bowls garnished with more basil, cilantro, and a drizzle of coconut milk, if desired.
Enjoy!
What to Serve with Zucchini Soup
Like most soup recipes, this zucchini soup pairs perfectly with crusty bread. A bowl of the soup + a slice of bread is pretty much my ideal lunch!
But this soup’s floral, curry-adjacent flavors open it up to other pairings too. Try it with any of these recipes:
How do you like serve zucchini soup? Let me know in the comments!
How to Store
Store leftover soup in an airtight container in the refrigerator for up to 3 days. It reheats nicely on the stovetop or in the microwave.
This soup freezes well too. Allow it to cool completely, and then transfer it to freezer-safe containers or jars. Leave an inch of empty space at the top of each jar for expansion. Freeze for up to 3 months.
Allow frozen soup to thaw overnight in the fridge before reheating, or defrost it in the microwave.
More Zucchini Recipes
If you love this creamy zucchini soup, try one of these fresh zucchini recipes next:
Zucchini Soup
Prep Time: 10 minutesmins
Cook Time: 20 minutesmins
Total Time: 30 minutesmins
Serves 4
This zucchini soup is creamy, bright, and refreshing, filled with coconut milk, fresh herbs, ginger, and lime. I love to make it for a healthy weeknight dinner or light lunch. This recipe is gluten-free, dairy-free, and vegan.
3tablespoonsfresh lime juice, plus wedges for serving
Prevent your screen from going dark
Heat the coconut oil in a large pot or Dutch oven over medium heat. Add the shallot, zucchini, garlic, serrano, and salt and cook, stirring occasionally, for 8 minutes, or until the zucchini is soft but not mushy. Add the coconut milk, lime zest, ginger, and sugar and simmer for 15 minutes. Turn off the heat and allow to cool slightly.
Transfer the soup to a blender and add the basil, cilantro, and lime juice. Blend until smooth and season to taste.
Pour the soup into bowls and drizzle with more coconut milk, if desired. Garnish with basil and cilantro and serve with lime wedges for squeezing.
My sister Kristin has been making these fudgy, sprinkly, crowd-favorite brownies all summer, and I’ve sent her 100 texts to get all the info on this recipe over the last few weeks because I am obsessed with these babies.
Kids love them, adults love them, they’re easy, they’re fun, and they disappear alarmingly fast. They’re PARTY BROWNIES!
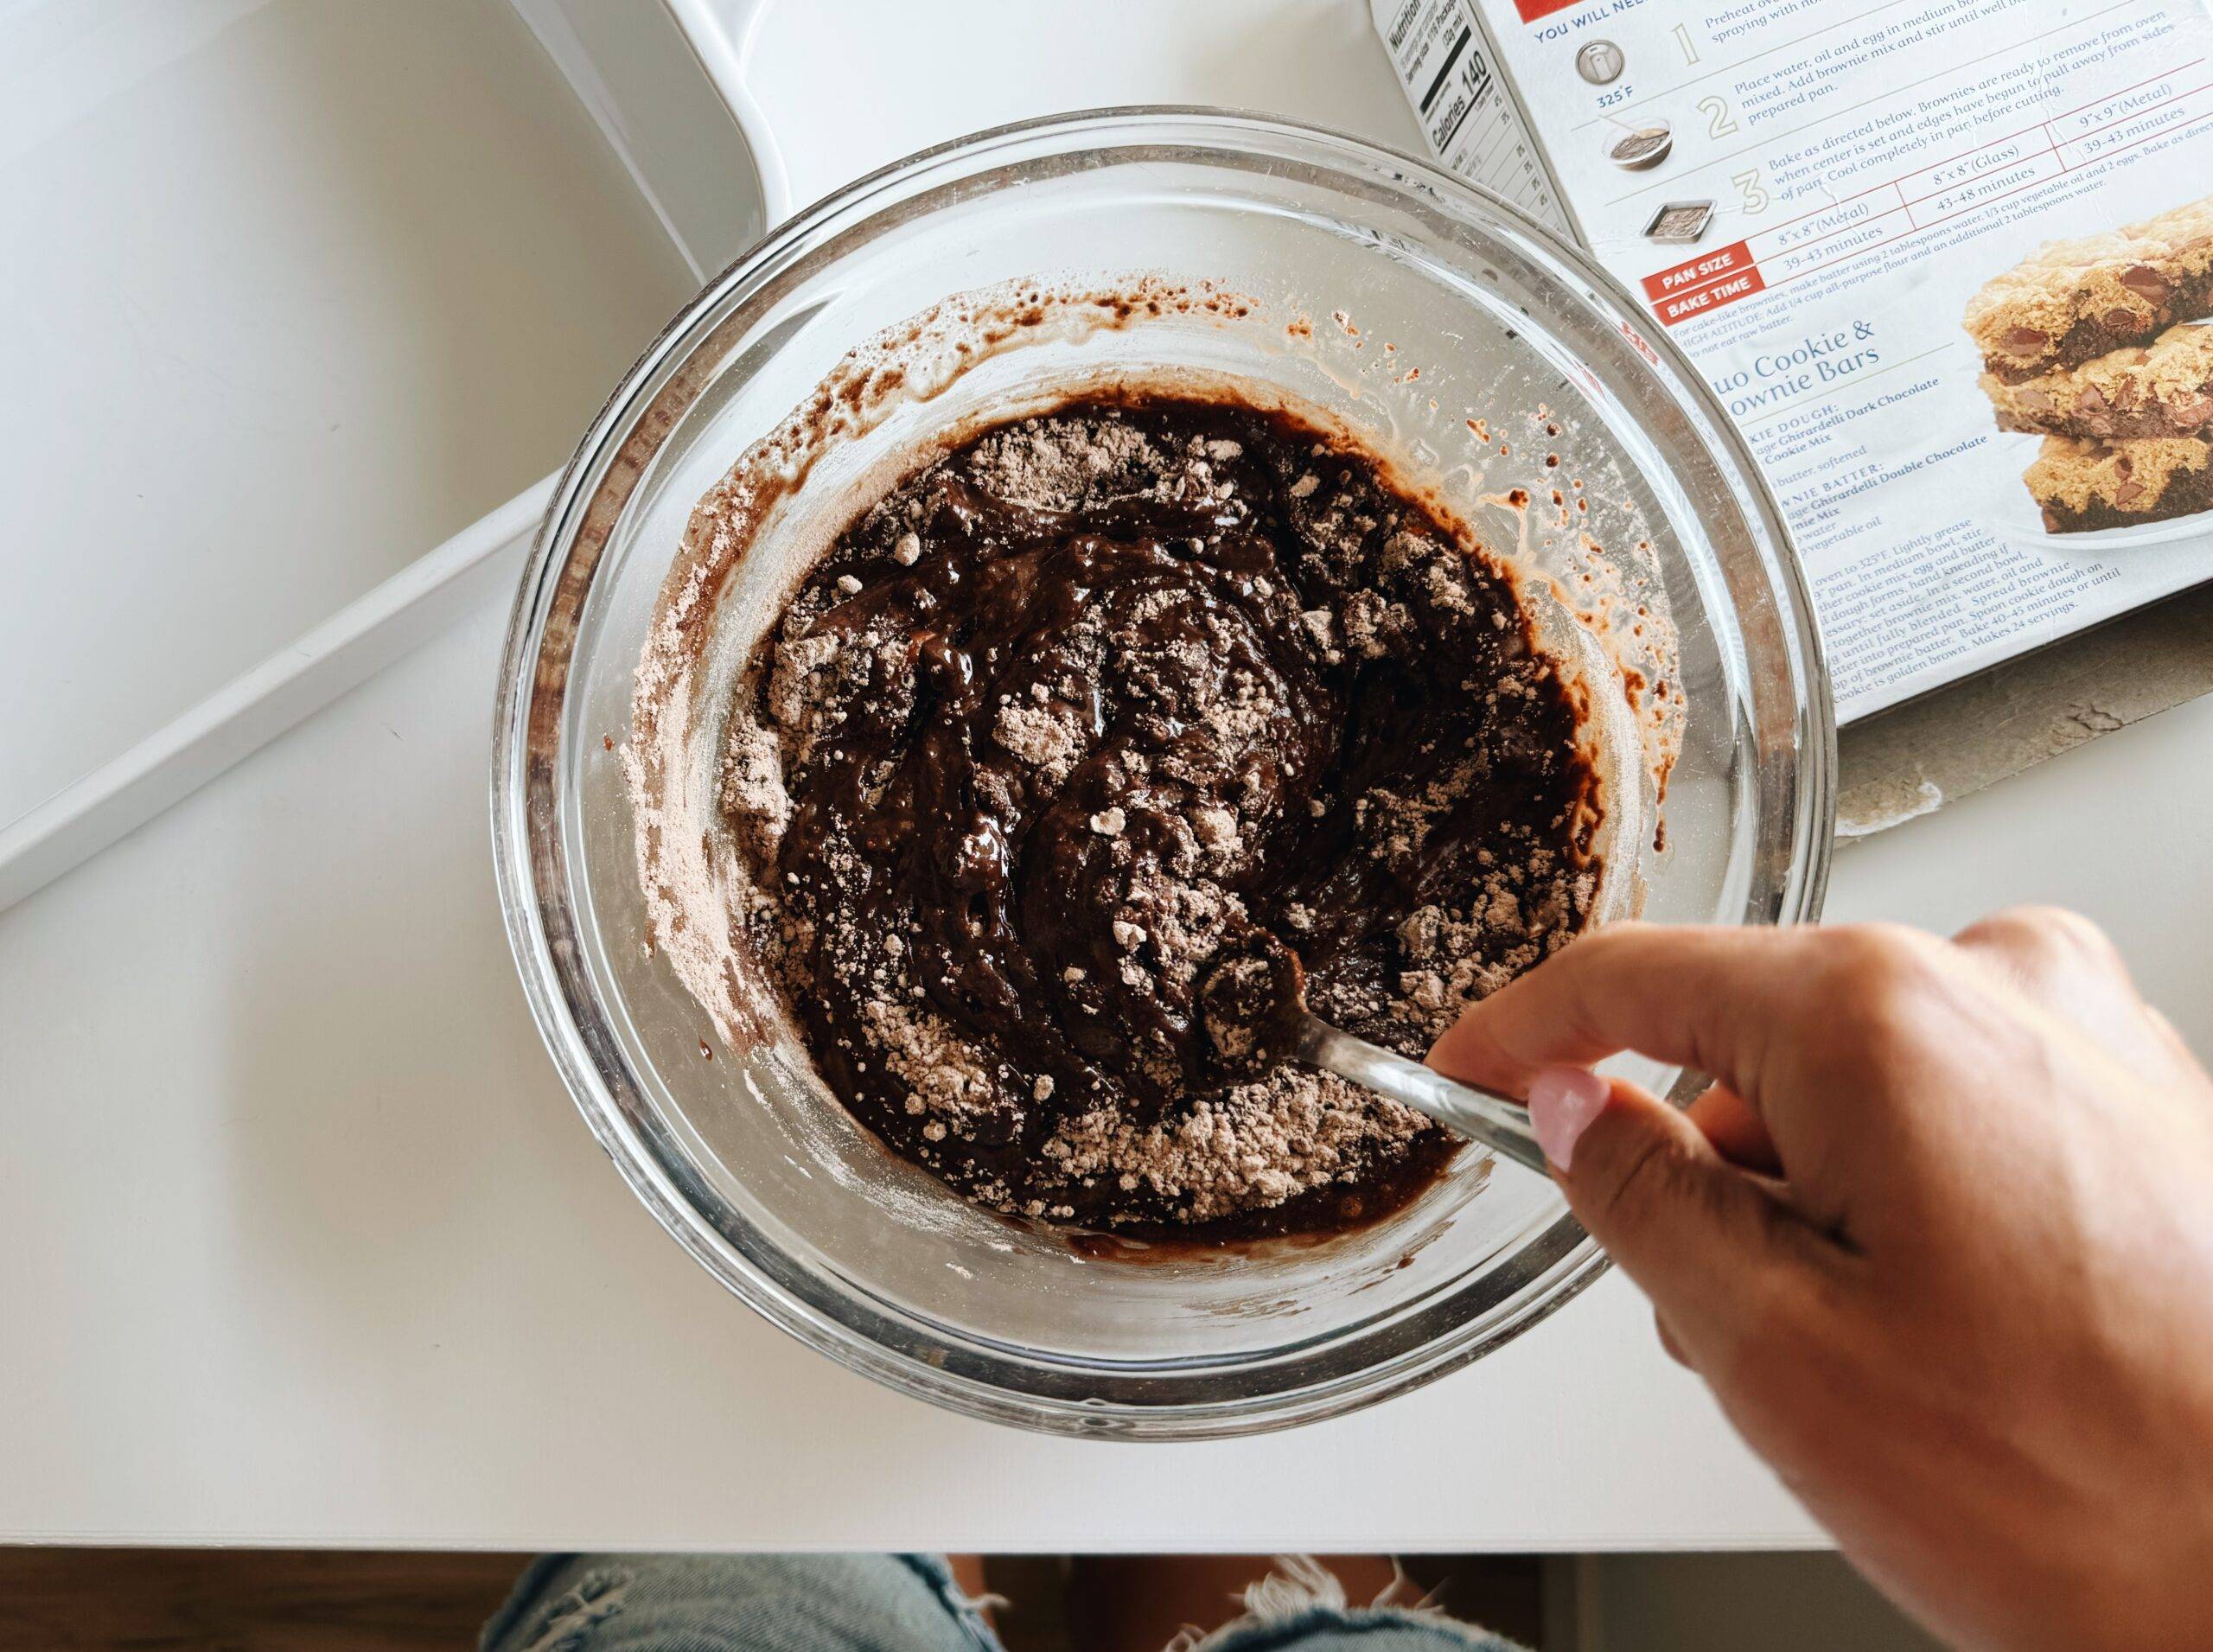
The base: a box of brownie mix. I don’t feel bad about this in the slightest. It makes these perfect “party brownies” because you can throw them together at a moment’s notice with minimal effort.
The top layer: an old-fashioned-style chocolate fudge frosting. The kind with the dry, crackly exterior, the kind my mom puts on my dad’s birthday cake every year, the kind that everybody’s grandma has a recipe for somewhere in an old stained church cookbook. It’s so good and it’s the exact top layer I never knew my brownies needed.
I call these party brownies because there is an event to bring them to nearly every weekend.
A pool party at my parents’ house, Bjork’s extended family reunion, an impromptu hangout with friends – the answer to all scenarios is a pan of Party Brownies. ♡
How To Make This Recipe
1
Make Brownie Mix.
I give you permission to use a box of brownie mix. Ghirardelli Double Chocolate is our house favorite. (affiliate link)
2
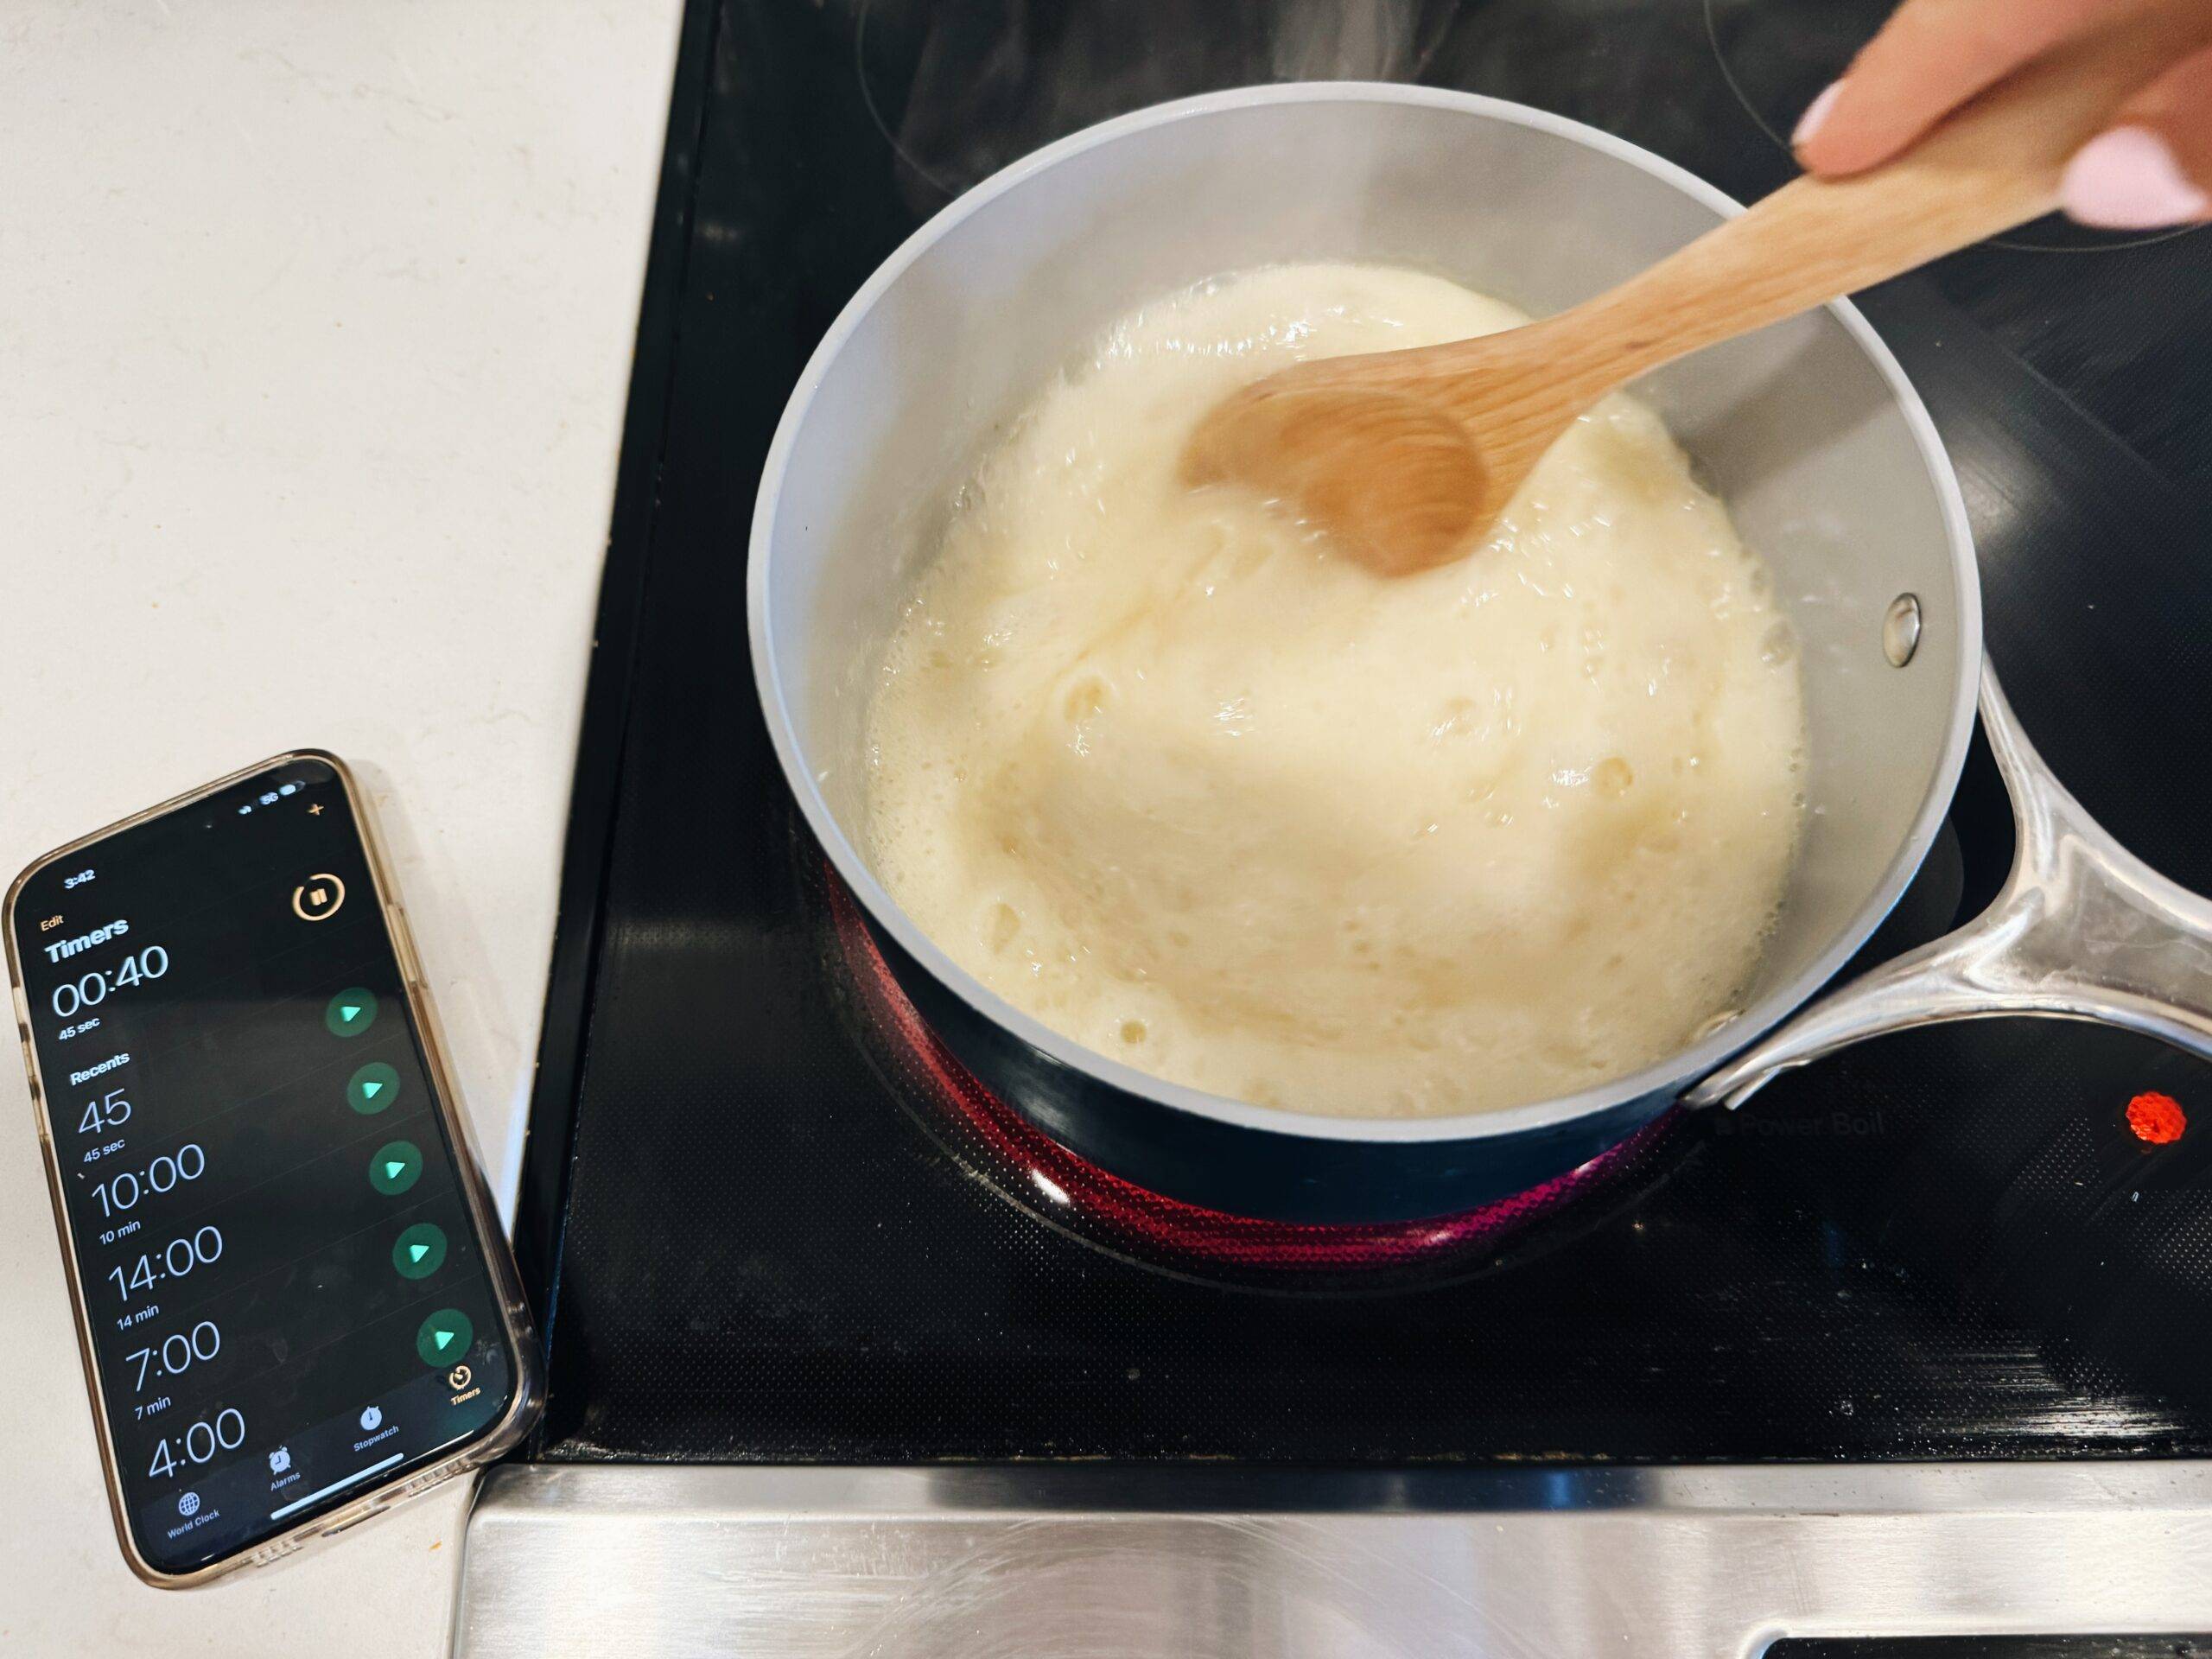
Make The Frosting / Icing / Fudge Top Layer.
Boil your butter, milk, and sugar for a good 45 seconds. SET A TIMER! We don’t want to over (or under) cook this.
3
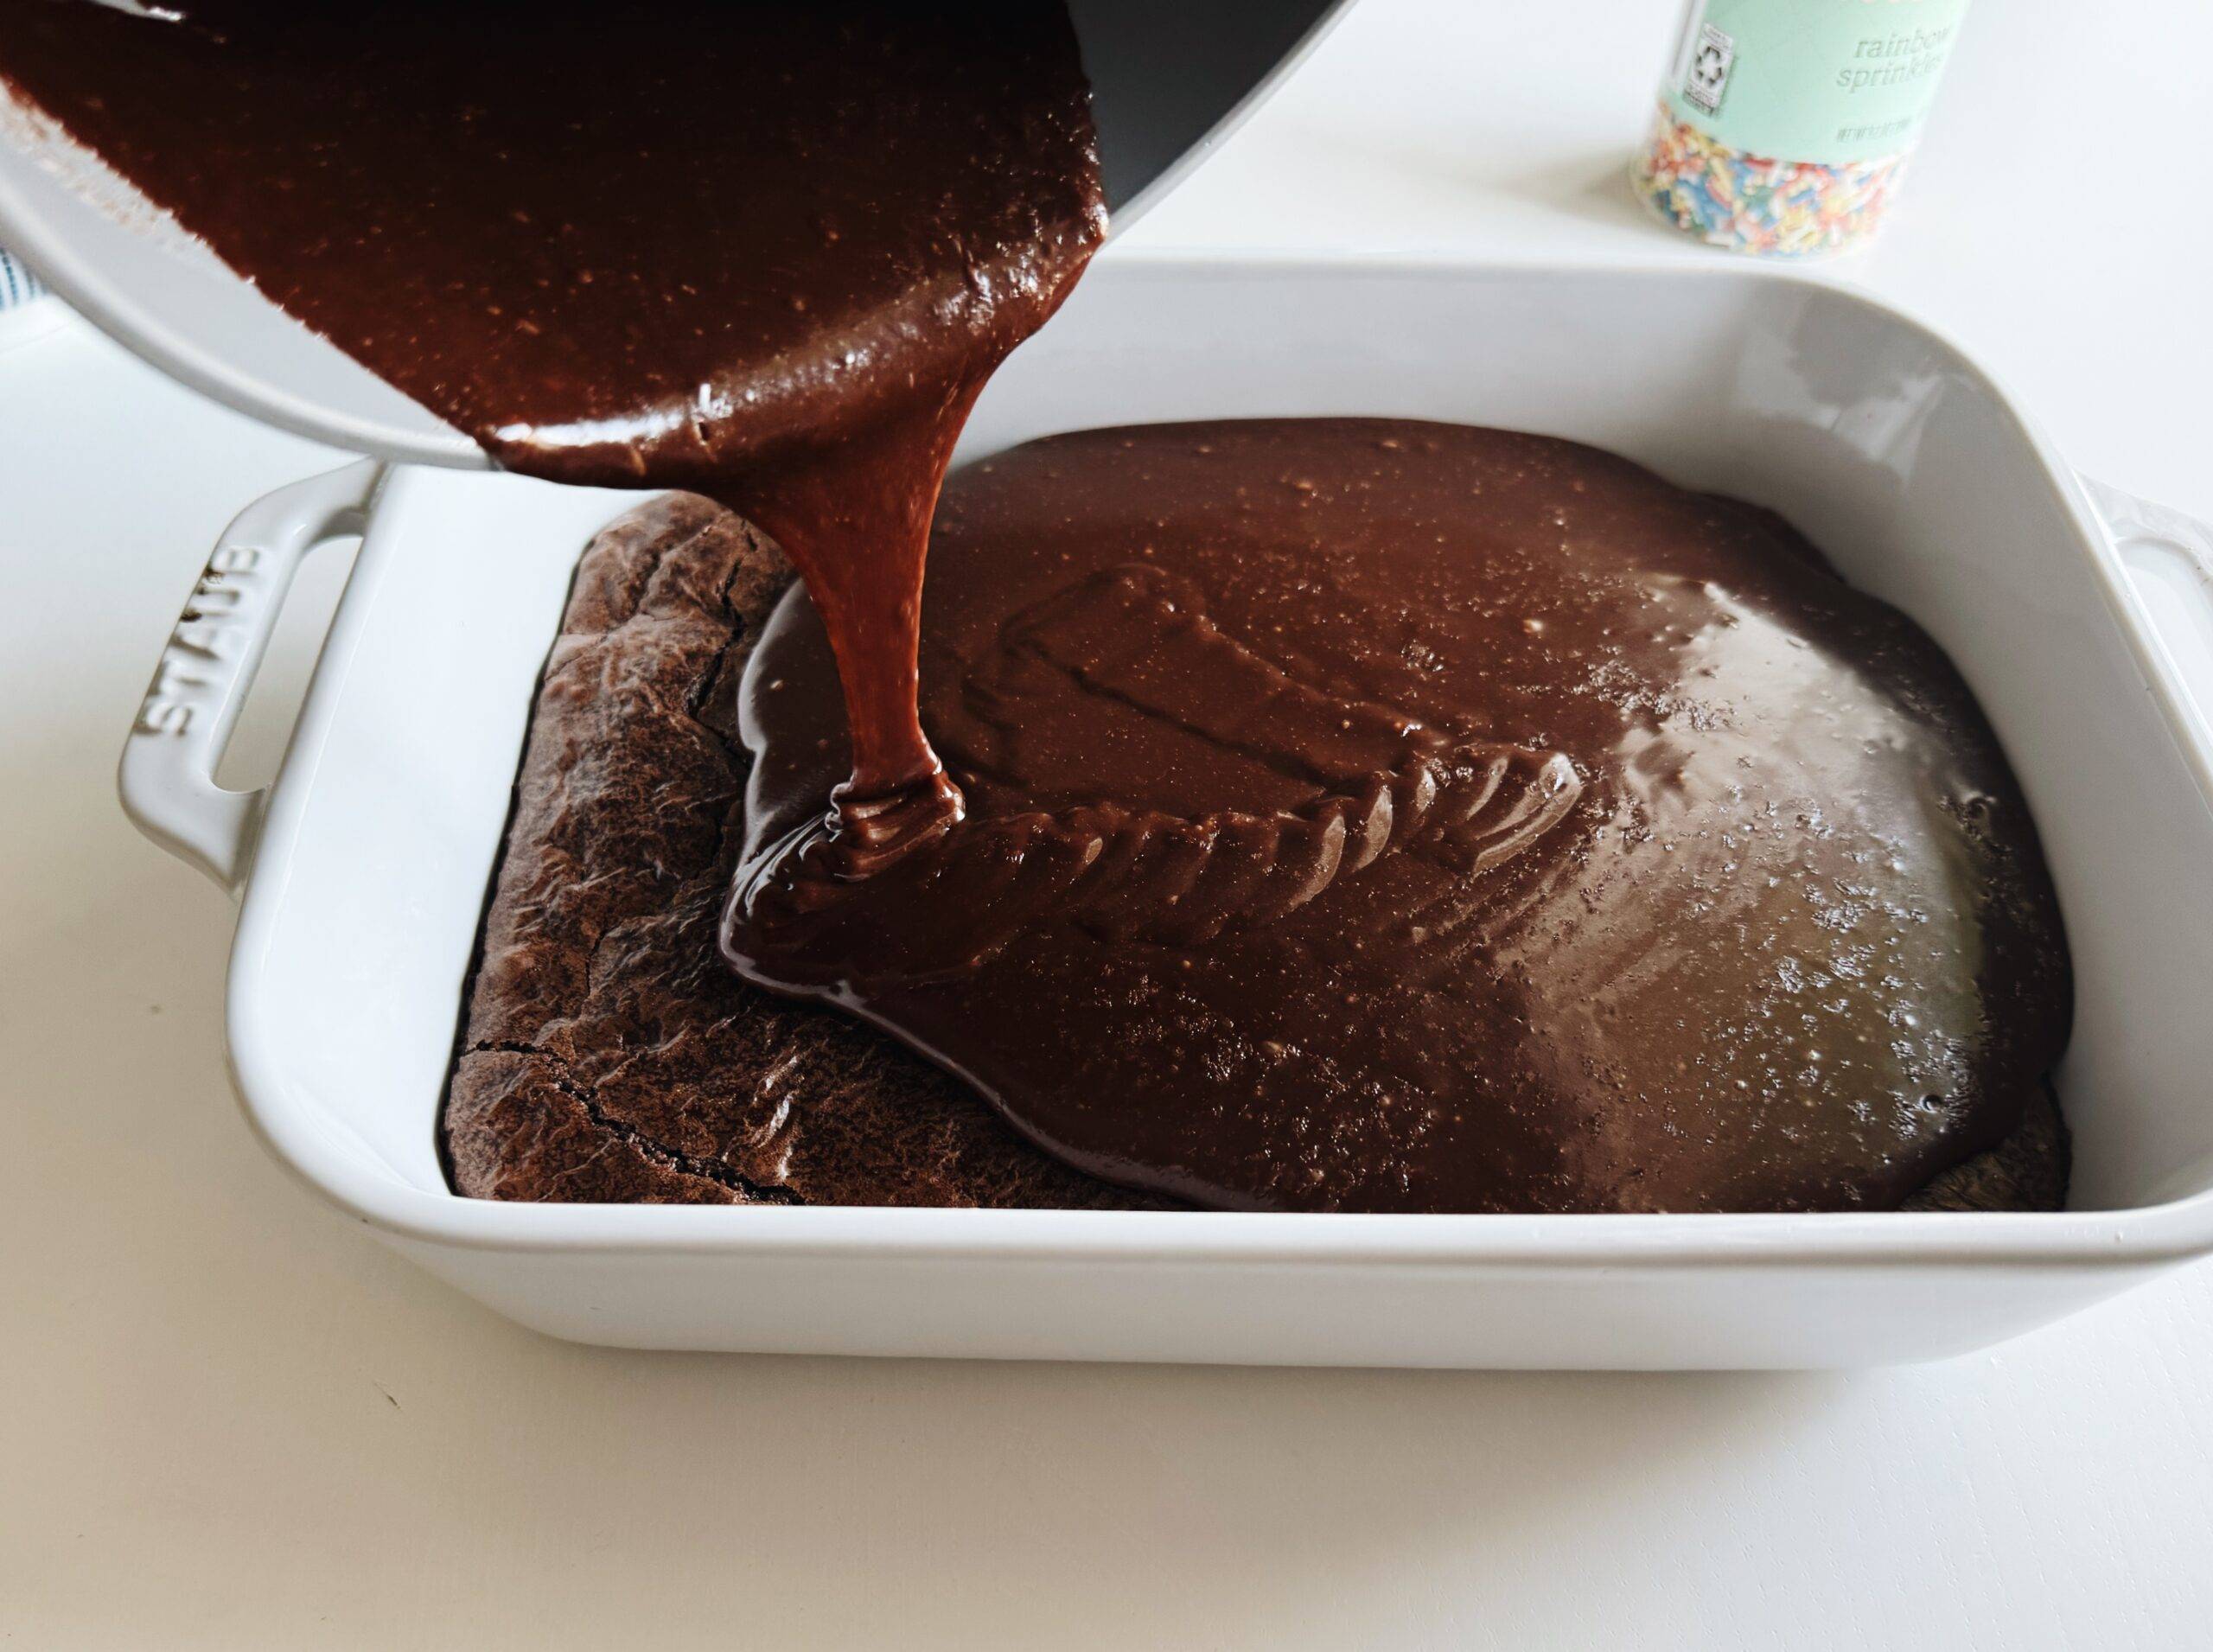
Pour Frosting On Brownies.
Add chocolate chips to the boiled frosting and pour immediately over the brownies. It’s going to want to set fast, so let’s go, chop chop, no checking Instagram right now!
4
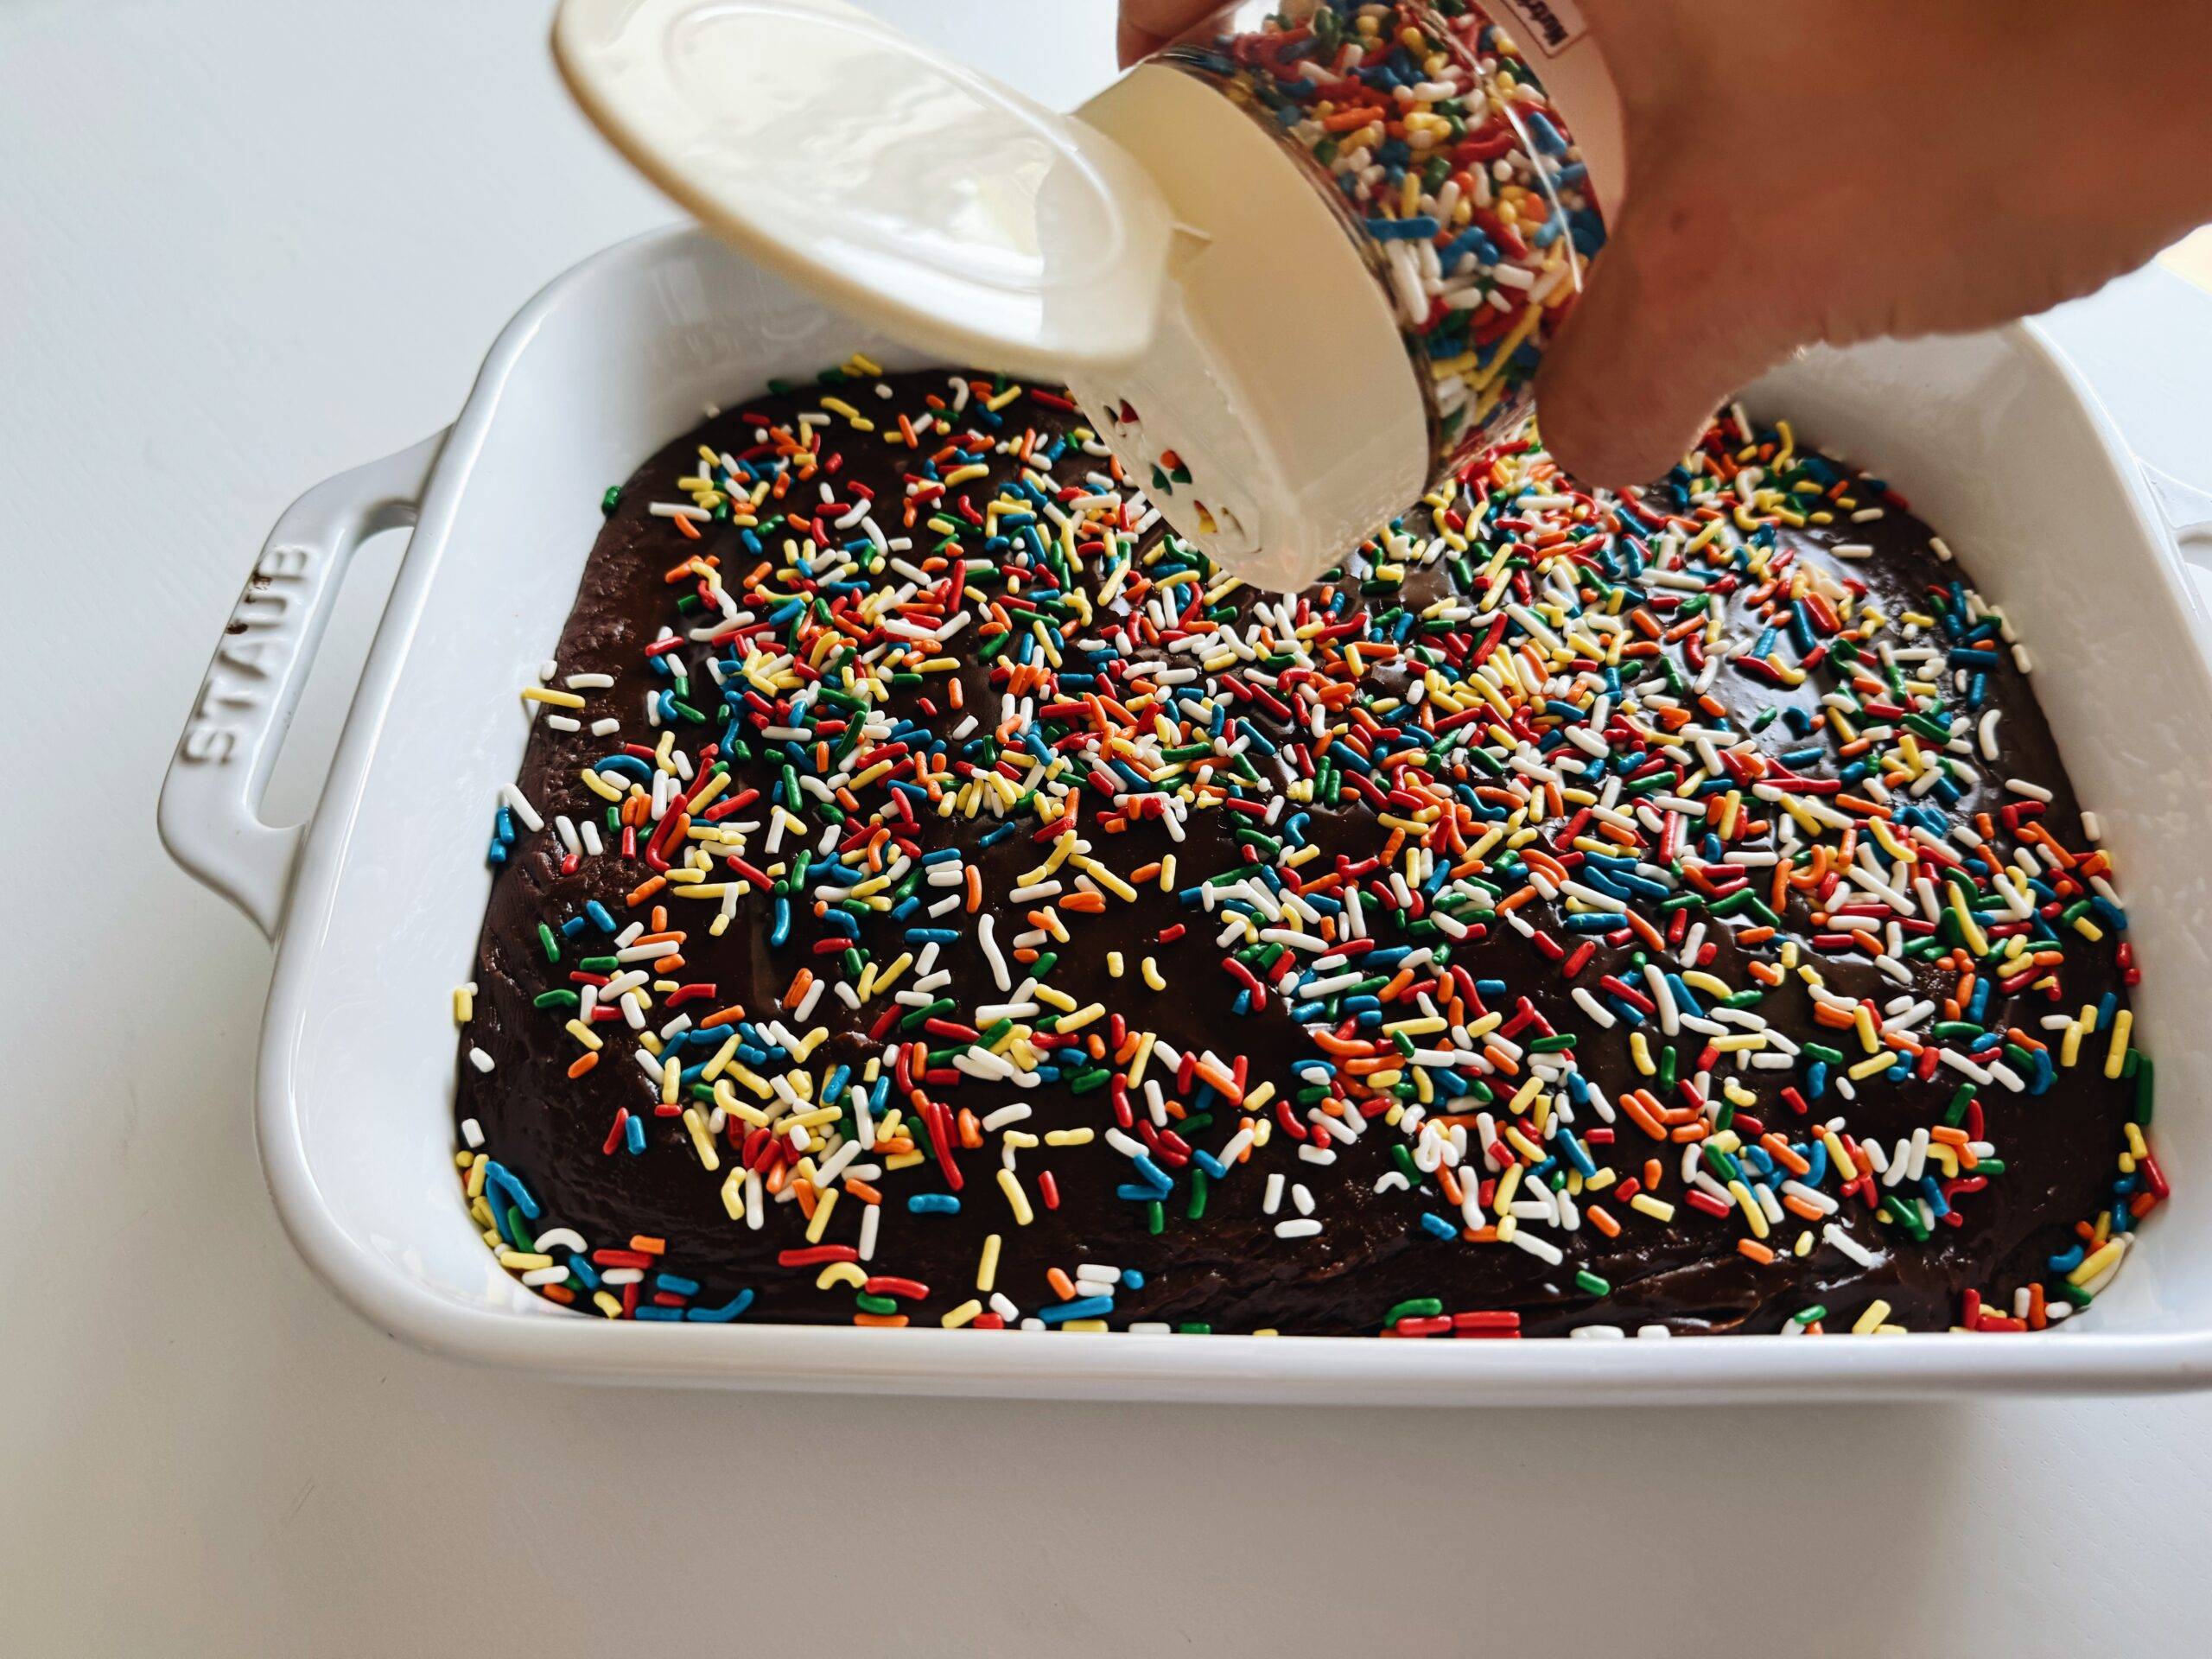
Add Sprinkles!
Add them to the frosting immediately before it sets!
const share_pin_buttons = document.getElementsByClassName( ‘share-pin button’ );
if ( share_pin_buttons ) {
for ( let share_key = 0; share_key {
e.stopPropagation();
window.open(e.target.dataset.href,’targetWindow’,’toolbar=no,location=no,status=no,menubar=no,scrollbars=yes,resizable=yes,width=500,height=500′);
return false;
} );
}
}
Description
Brownies covered with a thick layer of fudge frosting and rainbow sprinkles. The best way to jazz up a box of brownie mix!
Ingredients
Units
1 box brownie mix(usually 16–18 ounces)
6 tablespoonsbutter
1/3cupmilk
1 1/4cupsgranulated sugar
1 teaspoonvanilla extract
1/2 teaspooncoarse kosher salt
1cupsemi-sweet chocolate chips
rainbow sprinkles
Instructions
Make the brownies: Bake the brownies according to package directions in a 9×13 pan or slightly smaller rectangular pan (see note 1). I usually try to let them cool for an hour before frosting them.
Make the frosting: Melt the butter in a small saucepan over medium heat. Add the milk, sugar, vanilla, and salt; bring to a consistent boil over medium heat and cook for 45 seconds (it should be at a rolling boil for the full 45 seconds). Set a timer so you don’t overcook it!
Mix in the chocolate: Turn off the heat and add chocolate chips and stir to combine (if there are stubborn lumps, just whisk it for a minute).
Frost the brownies: Working quickly, pour the frosting over the brownies and spread evenly and add sprinkles. The frosting will start to set immediately, so don’t be a slow poke with this part (see note 2)!
Rest and serve: Let the frosting rest for 15-30 minutes, depending on how clean you want your slices to be! Cut, serve, PARTY TIME!
Notes
1. A 9×13 is what my sister always uses – but I also love to use a smaller rectangular pan if you have one (mine is 10.5 x 7.5) to make the whole thing just slightly thicker. A square pan will make the frosting too thick, so I would not recommend that.
2 – If you are scrambling to find your sprinkles when the frosting starts to set on top (been there), just add the sprinkles to the dry-ish top and use the back of a spoon to gently tap them into the frosting a bit so they will hold in place.
if ( unit && ( ‘metric’ === unit || ‘usc’ === unit ) ) {
document.querySelector( ‘.tasty-recipes-convert-button[data-unit-type=”‘ + unit + ‘”]’ ).click();
}


")


")