Cherry Compote – David Lebovitz

0


I think I have something wrong with me. I seem to be afflicted with a particular malady that forces me to buy way too many summer fruits when they’re in season. It gets particularly dire when faced with apricots and cherries, two fruits whose seasons are much shorter than the others. The first fresh apricots I saw were back in upstate New York, around the 1980s, and I’d never seen them before. Someone brought us a basket of the tender, squishy little orange fruits to the restaurant that I worked at, and I remember being completely taken off guard, as the only apricots I’d ever seen were the dried ones. And while I loved the crinkly dried specimens, those fresh beauties with a red blush were a whole other taste entirely.

Fresh Cherry Compote recipe

Then, when I moved to California, I discovered how abundant fresh apricots are (or can be), as they are in France. But no matter how abundant – or not – cherries are when the season is in full swing, I always consider them extra-special fruits and give a prominent place in my kitchen. At the beginning of the season, they’re incredibly expensive and rarely good. Then, as the season moves along, they start showing up in larger mounds at the market, and the prices get gentler, coaxing me to buy as many as I can heft.

Fresh Cherry Compote recipeFresh Cherry Compote recipe

Fresh Cherry Compote recipe-3Fresh Cherry Compote recipe-3

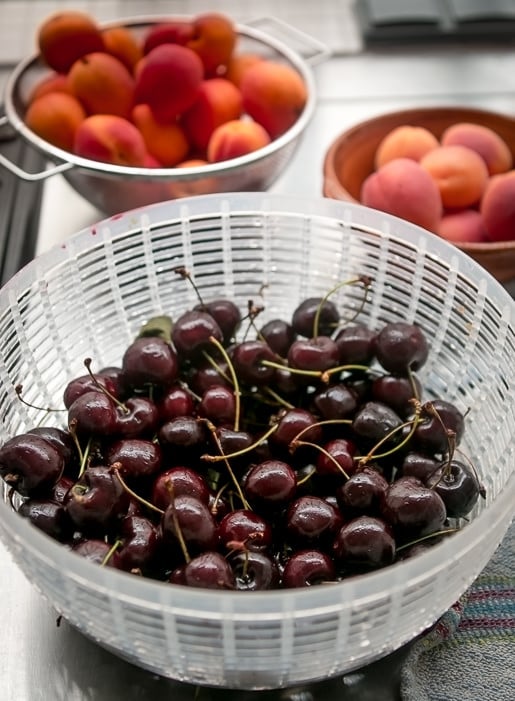
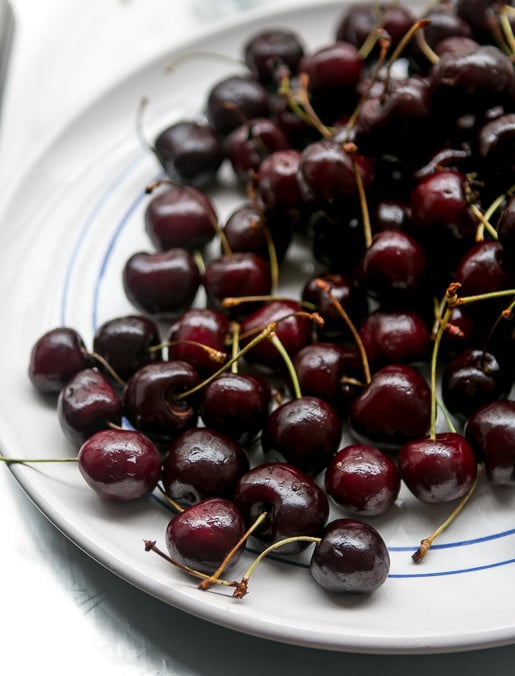
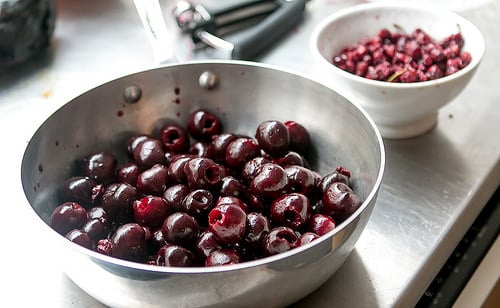
This week, I was helpless when faced with an overload of summer fruits at the market. And in addition to a giant bag of apricots, two bulging sacks of tomatoes, and eight white nectarines, I bought 2 kilos (about 4 1/2 pounds, give or take a few cherries) of fresh cherries — and from the looks of the other shoppers, it was more than any normal person would buy. (Although I think I made the vendor’s day.) But I couldn’t help it. They were Burlat cherries and I’d bought a small bag from the same vendor last week at the market, and there he was again, tempting me with more. Once I got home, I got my cherry pitter out, and pitted half of them, saving the others to eat fresh. (Except I almost polished off the fresh ones I was reserving as I was pitting these!)

Fresh cherries are, of course, great fresh. But cooking them can deepen, and even improve their flavor, especially nice if you get home and find yourself with a bag of rather wan ones. Or ones that you might snag at the end of the market, when the vendors are trying to get rid of any extras that might not keep until the next market day.

Fresh Cherry Compote recipe-4Fresh Cherry Compote recipe-4

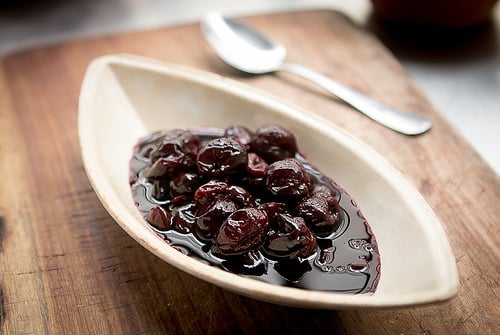
In addition to being the answer to what the heck you (or I) are going to do with all those cherries, this recipe also deftly answers that age-old question: Can I freeze that? And the answer is a big, resounding, “Heck, yeah!” Once the compote has cooled, it freezes perfectly in zip-top freezer bags or other containers that you prefer to use, and will last up to a year. (You can also freeze pitted fresh cherries on their own as well.)

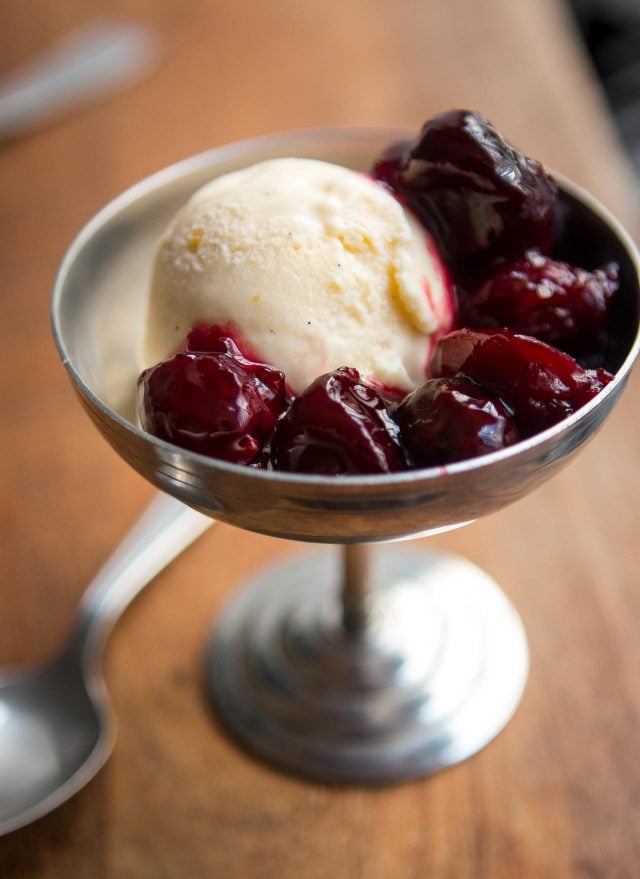
And let me tell you, it’s great to stumble upon a bag of cherry compote that may have moved to an unfavorable position in your freezer as summer shifted into fall – or winter, when they can become quickly forgotten. Once defrosted, and perhaps rewarmed, they’re terrific served with vanilla ice cream, plain yogurt, or alongside a cake, such as almond cake, gâteau de savoie, or angel food cake.

Fresh Cherry Compote recipe-5Fresh Cherry Compote recipe-5

I like to boost their flavor with a handful of dried sour cherries, added midway during cooking, so they plump up and absorb the cherry juices, which add another dimension of cherry flavor. A shot of kirsch also dials up the flavor nicely.

Cherry Compote

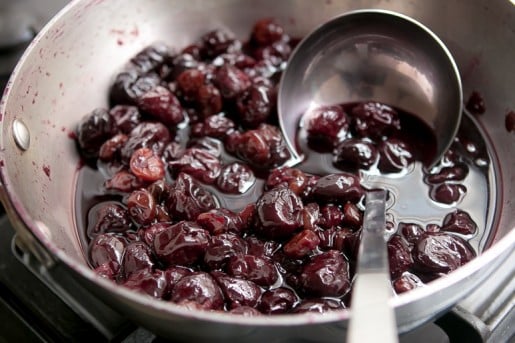
Be sure to use a larger pot that you think. For 2 pounds (1kg) of cherries, I used a 6-quart (6l) pan. Since the cherry juices will foam up as they cook, using a larger pot – and removing the lid from time-to-time – will keep your from having to clean up a sticky mess.

I’ve didn’t use much sugar here, so you can add more to taste, if your cherries aren’t as sweet as mine were. If you can get sour cherries, feel free to add some in place of the sweet cherries. If so, you may need to increase the sugar a little, to taste as well.

  • 2 pounds (1kg) fresh cherries
  • 1/4 cup (50g) sugar
  • cup (40g) optional: 1/3 dried sour cherries
  • 2 teaspoons kirsch, (or another fruit-based liqueur, or eau-de-vie)
  • 1-2 drops pure almond extract

Prevent your screen from going dark

  • Stem and pit the cherries. Put them in a large, nonreactive pot or saucepan and stir in sugar. Turn the heat to medium, cover, and cook for 10 minutes, lifting the lid and stirring them frequently, to encourage juicing and to make sure the liquid the cherries exude doesn’t foam up and overflow.

  • After 10 minutes of cooking, add the sour cherries, if using, and cook for 5 to 10 more minutes, until the cherries are wilted and completely cooked through.

  • Remove from heat and stir in the kirsch and almond extract. Let cool before storing or serving. The juices will thicken as the compote sits.

Storage: The cherry compote can be stored in the refrigerator for up to 5 days. It can be frozen for up to one year.

Related Recipes

No-Recipe Cherry Jam

Cherry Mess

Quick-Candied Cherries

Cherries in Red Wine Syrup

Lemon Yogurt Cake with Apricot-Cherry Compote


Weekly Wrap-up & Senior Salon Pit Cease #325

0


Welcome to Senior Salon Pit Stop #325

Welcome to this week’s Weekly Wrap-up and Blog Link-up.

It’s great to see you again this week! Please scroll through to see this week’s features, my weekly wrap-up and other important and exciting announcements from the Pit Crew!

Have you had a chance to check out the new Facebook group Yum Hungry Hangout & Giggles? It is a place to share your foodie finds, funny facts and in general hangout and get to know each other more through out shared love of food. Please feel free to check it out and maybe join in the fun!

https://www.facebook.com/groups/yumyumhungryhangoutandgiggles/

What’s been going on at Homemade on a Weeknight?

This week was all about the wild blackberries and elderberry harvest! We were able to harvest, pull, clean and freeze just over 30 pounds of elderberries this year. And roughly 8 pounds of blackberries. I have already made some delicious Wild Blackberry muffins from sourdough discard. And I’ll be turning a few pounds of the elderberries into elderberry jelly soon. What’s your favorite berry to forage?

What have you been up to this past week?

One of this last week’s most popular recipe was: Italian Beef Pizza

Italian Beef Pizza
Italian Beef Pizza

In case you missed it, here are the recipes that I shared to the blog this week:

By joining the Senior Salon Pit Stop, you signify permission (EsmeSalon privacy policy) to share your posts and images here and receive an email reminder when our next Senior Salon Pit Stop is LIVE. 

Show off your feature by adding the “I was featured at the Senior Salon Pit Stop” image to your post. Use this code:

<img src=”https://esmesalon.com/wp-content/uploads/2023/12/I-was-Featured-at-the-Senior-Salon-Pit-Stop.jpg” alt=”I was featured at the senior salon pit stop” width=”250″ height=”250″>

You may also be featured on EsmeSalon as part of the Top featured posts.

These posts caught my eye last week! Please check back each week to see if your post is one of the ones that got a feature!

Apple Dapple Cake – from The Cincy Shopper

Confetti Cookies – from Fat Dad Foodie

Grilled Peaches & Cream – from Comfort Spring Station

Boston Cream Pie Cookies – from Ann’s Entitled Life

Come and meet your Senior Salon Pit Stop Crew.

Senior Salon Pit Stop Crew

Meet your SSPS Crew:

SSPS Is Hiring – are you interested in joining the Senior Salon Pit Stop Host Team? Please send an email to Esme – esmesalonblog@gmail.com

A few simple rules for the Senior Salon Pit Stop Link Party:

  • For every post that you share – make one comment on someone else’s post.  Help make their day a bit brighter.
  • Unlimited sharing limit BUT we ask that you visit one other blog post for each link you share.
  • Posts can be on any subject that is family-friendly.
  • Posts with direct sales, shops, or affiliates must contain relevant post content.

That’s it! Come and join the fun and let’s make it worthwhile!

If you are looking for more fun places to link up your posts – check out our Ultimate Handy Linky Party List – check back often as it’s always growing. And if we have missed your Linky Party – please send me a message and we will get it added in!

If you leave me a comment with the numbers of your links, I will be sure to pin your posts!

Don’t miss new recipes from Homemade on a Weeknight – subscribe and get an email with every new post!

Creamy Dijon Rooster – Price range Bytes

0


Get ready friends, because Dijon is having a moment! This Creamy Dijon Chicken starts with quick pan-seared chicken breasts that get covered with a creamy, luscious, Dijon mustard sauce. It’s one of those recipes that feels luxurious and expensive, but is really made with simple inexpensive ingredients. And my secret ingredient to making it extra special…just a hint of Worcestershire sauce. This Dijon chicken recipe is so delicious and guaranteed to be one the whole family enjoys!

Overhead view of creamy dijon chicken in a skillet.Overhead view of creamy dijon chicken in a skillet.

This recipe uses one of my favorite ingredient combinations: Dijon mustard and Worcestershire sauce. And when they’re combined with a little bit of heavy cream and parmesan cheese, it creates the most delicious sauce! So here’s everything that you’ll need:

  • Chicken Breasts: Chicken breasts are my usual go-to for recipes like these, but you can certainly use boneless, skinless chicken thighs instead.
  • Garlic: Just a couple of garlic cloves infuses the sauce with lots of flavor. 
  • Olive Oil and Butter: Olive oil is used to cook the chicken breasts and a little butter is used to sauté the garlic.
  • Dijon Mustard and Worcestershire: Dijon mustard is of course the star of the show. Both Dijon mustard and Worcestershire sauce give the sauce the bulk of its flavor. The tanginess from the Dijon mixed with the savory umami flavor of the Worcestershire is a match made in heaven!
  • Chicken Broth: Chicken broth is used to help deglaze the pan, scrape up all of those flavorful brown bits, and is the base for the sauce.
  • Heavy Cream and Parmesan Cheese: Just a little bit of heavy cream and parmesan cheese thickens the sauce and adds a luscious, creamy, rich flavor.
  • Spinach: I added some spinach for extra greens and a little bit of color.
  • Seasoning: The chicken breasts are seasoned with a blend of salt, pepper, Italian seasoning, garlic powder and onion powder. This way every component of this dish is packed with flavor!

Can I Substitute Yellow Mustard For Dijon Mustard?

I don’t recommend substituting Dijon mustard with yellow mustard. Dijon mustard has a more intense, sharp flavor that goes well with sauces compared to yellow mustard that has a milder, less complex flavor.

Not A Mustard Fan?

I get it. But trust me this recipe is not super mustard-y and the flavors are balanced nicely. I tested this recipe a few times with different amounts of Dijon mustard. And I ended up with what I feel is the perfect combination. It’s just enough to taste the tangy, warm flavors of the Dijon, but not too much to where it overpowers the dish. You can always taste the sauce and add a little more mustard if you want a stronger Dijon taste.

Serving Suggestions

We served this creamy dijon chicken over some fluffy mashed potatoes to soak up all of that delicious sauce. But you can also serve it with some buttered noodles, pasta, or over rice. A simple side salad or Caesar salad would also taste great. And you can never go wrong with a side of quick sautéed vegetables like this easy sautéed asparagus recipe.

Side close up view of creamy dijon chicken in a skillet.Side close up view of creamy dijon chicken in a skillet.


Creamy Dijon Chicken

Take dinner to the next level with this Creamy Dijon Chicken recipe! Made with an insanely delicious sauce and simple ingredients!

Overhead close up view of creamy dijon chicken in a skillet.Overhead close up view of creamy dijon chicken in a skillet.

Prevent your screen from going dark

  • 1 tsp Italian seasoning ($0.10)
  • 1/2 tsp garlic powder ($0.05)
  • 1/2 tsp onion powder ($0.05)
  • 1/2 tsp salt ($0.02)
  • 1/2 tsp freshly cracked black pepper ($0.02)
  • 2 boneless, skinless chicken breast (about 1.3 lb.) ($6.49)
  • 2 Tbsp olive oil ($0.32)
  • 2 Tbsp butter ($0.27)
  • 2 cloves of garlic, minced ($0.16)
  • 1 cup chicken broth ($0.17)
  • 1 Tbsp Dijon mustard ($0.04)
  • 1 tsp Worcestershire sauce ($0.05)
  • 1/3 cup heavy cream ($0.65)
  • 2 Tbsp grated parmesan cheese ($0.20)
  • 2 cups spinach ($0.76)
  • In a small bowl mix together the seasoning for the chicken: Italian seasoning, garlic powder, onion powder, salt and freshly cracked black pepper.

  • Using a sharp knife, carefully fillet each chicken breast into two thinner cutlets. Season each breast with the seasoning mix on both sides.

  • Heat a large skillet over medium heat and add the olive oil. Once the skillet is hot, add the chicken and cook on each side until golden brown and cooked through (about 4 minutes per side). Remove the cooked chicken to a clean plate and cover to keep warm.

  • To the same skillet add the butter and minced garlic cloves. Turn the heat down to medium-low and sauté the garlic for one minute until fragrant.

  • Next pour the chicken broth into the skillet and add the Dijon mustard and worcestershire sauce. Stir together and scrape up any brown bits that may be stuck to the bottom of the pan.

  • Now add in the heavy cream and parmesan cheese and stir well. Allow the sauce to simmer in the skillet for 5 minutes. Taste the sauce at this point and add salt and pepper if desired.

  • Add in the fresh spinach and stir it into the sauce allowing the heat to wilt the spinach.

  • Finally, return the cooked chicken breasts to the skillet and spoon the Dijon sauce over top. Allow the chicken to heat through. Serve hot with your favorite side and enjoy!

See how we calculate recipe costs here.


Serving: 1servingCalories: 271kcalCarbohydrates: 4gProtein: 15gFat: 22gSodium: 742mgFiber: 1g

Read our full nutrition disclaimer here.

Creamy dijon chicken on a plate with mashed potatoes.Creamy dijon chicken on a plate with mashed potatoes.

How to Make Creamy Dijon Chicken – Step by Step Photos

Seasoning mix in a bowl.Seasoning mix in a bowl.

In a small bowl mix together 1 tsp Italian seasoning, 1/2 tsp garlic powder, 1/2 tsp onion powder, 1/2 tsp salt and 1/2 tsp freshly cracked black pepper.

Seasoned chicken breasts on a cutting board.Seasoned chicken breasts on a cutting board.

Using a sharp knife, carefully fillet each chicken breast into two thinner cutlets. Season each breast with the seasoning mix on both sides.

Cooked chicken breasts in a large skillet.Cooked chicken breasts in a large skillet.

Heat a large skillet over medium heat and add 2 Tbsp olive oil. Once the skillet is hot, add the chicken and cook on each side until golden brown and cooked through (about 4 minutes per side). Remove the cooked chicken to a clean plate and cover to keep warm.

Butter and garlic added to large skillet.Butter and garlic added to large skillet.

To the same skillet add 2 Tbsp butter and 2 minced garlic cloves. Turn the heat down to medium-low and sauté the garlic for one minute until fragrant.

Chicken broth, dijon mustard and Worcestershire sauce added to skillet. Chicken broth, dijon mustard and Worcestershire sauce added to skillet.

Next pour 1 cup chicken broth into the skillet and add 1 Tbsp Dijon mustard and 1 tsp Worcestershire sauce. Stir together and scrape up any brown bits that may be stuck to the bottom of the pan.

Cream and parmesan cheese added to skillet.Cream and parmesan cheese added to skillet.

Now add in 1/3 cup heavy cream and 2 Tbsp parmesan cheese and stir well. Allow the sauce to simmer in the skillet for 5 minutes. Taste the sauce at this point and add a pinch of salt and pepper if desired.

Spinach added to skillet.Spinach added to skillet.

Add in 2 cups of fresh spinach and stir it into the sauce allowing the heat to wilt the spinach.

Finished creamy dijon chicken in skillet.Finished creamy dijon chicken in skillet.

Finally, return the cooked chicken breasts to the skillet and spoon the Dijon sauce over top. Allow the chicken to heat through.

Creamy dijon chicken on a plate with mashed potatoes and a fork lifting some chicken off the plate.Creamy dijon chicken on a plate with mashed potatoes and a fork lifting some chicken off the plate.

Now all that’s left to do is serve this delicious Dijon chicken with some creamy mashed potatoes, pasta, or your favorite side. And don’t forget to spoon some of that yummy sauce over the top! 😉

Melty Baked Brie with Walnuts, Honey and Figs

0


Disclosure: This post may contain affiliate links, which means I may earn a commission if you click on the link and make a purchase.

Melty Baked Brie with Walnuts, Honey and Figs is an impressive appetizer that is super easy to throw together. It’s takes 5 minutes to prep and 10 minutes to bake and you just need a couple of ingredients. The warm melty cheese combined with crunchy nuts and warm figs is so delicious served with crackers or toasted bread for the best holiday appetizer while you’re waiting for your Spatchcock Turkey to roast.

Melty Baked Brie with Walnuts, Honey and Figs on a serving platter with bread.

I’ll never say no to a dish of melty dish and breadsticks. This Baked Brie Dip with Delicata Squash is similar to this recipe but it’s more savory with the addition of caramelized onions and tender squash. This Acorn Squash Pasilla Chile Queso Fundido and Summer Squash Queso Fundido are just as incredible and perfect for game days or the holidays!

Side view of Melty Baked Brie with Walnuts, Honey and Figs on a serving plate.Side view of Melty Baked Brie with Walnuts, Honey and Figs on a serving plate.

Ingredients You’ll Need for Melty Baked Brie with Walnuts, Honey and Figs

Side view of ingredients for baked brie on a counter.Side view of ingredients for baked brie on a counter.
  1. Wheel of brie – It’s a soft creamy cheese that complements the flavors of honey, nuts, and figs really well.
  2. Nuts – Chopped walnuts and pistachios adds nice texture.
  3. Figs – Quartered and served with the brie. Fresh figs are sweet and fruity. Look for ones that are plump and soft without any bruising.

For the rest of the ingredients, please refer to the recipe index card below!

How To Make Melty Baked Brie with Walnuts, Honey and Figs

  1. Place a wheel of brie in a baking dish then pour over chopped nuts, salted honey, sliced figs and thyme.
  2. Bake for 8 – 10 minutes.
  3. Serve with crackers or slices of toasted bread.

Tips and Tricks

  • Score the top of the Brie in a crisscross pattern before baking; it makes for a lovely presentation and easier dipping.
  • Let the Brie sit for a few minutes after baking; it’ll be easier to spread (and won’t scald anyone).
  • This appetizer isn’t overly sweet. If you want to amp it up, toss the figs in a teaspoon of brown sugar or drizzle a bit of honey over the Brie after it’s baked for an extra kiss of sweetness.
  • For an added crunch, sprinkle chopped nuts on top just before serving.
  • Don’t shy away from fig jam if fresh figs aren’t available.
Close up image of Melty Baked Brie with Walnuts, Honey and Figs on a plate with fresh figs arranged on a counter.Close up image of Melty Baked Brie with Walnuts, Honey and Figs on a plate with fresh figs arranged on a counter.

Recipe FAQs

Can I bake the Brie with the rind on?

You bet! The rind is totally edible and helps keep the cheese from turning into a gooey runaway.

What kind of honey works best with Brie and figs?

A floral honey like orange blossom sings with Brie and figs, but honestly, any honey you love will be divine.

Is it possible to over bake Brie?

Yep, it can happen. Keep an eye on it; you want it melty, not oil-spilled-over-the-sides melty.

Can this dish be prepped ahead of time?

For sure! Assemble it all, pop it in the fridge, and then bake when you’re ready to wow your guests.

Any tips for serving?

A mix of crackers and sliced baguette lets everyone choose their own adventure. And a little fresh thyme wouldn’t hurt.

Melty baked cheese on a platter with toast slices.Melty baked cheese on a platter with toast slices.

More Fall Recipes

If you tried this Melty Baked Brie with Walnuts, Honey and Figs Recipe or any other recipe on my website, please leave a 🌟 star rating and let me know how it went in the 📝 comments below. Thanks for visiting!

  • 1 baking dish

  • 1 small bowl

  • Preheat oven to 350 degrees F.

  • In a small bowl, add a few pinches of salt to the honey and mix until combined.

  • Place the wheel of brie in the center of the baking dish. Pour the nuts on top of the brie. Drizzle with the honey and top with the sliced figs and thyme sprigs.

  • Transfer to the oven to bake for 8 to 10 minutes. Remove from the oven and serve with crackers or slices of bread.

Tips and Tricks

  • Score the top of the Brie in a crisscross pattern before baking; it makes for a lovely presentation and easier dipping.
  • Let the Brie sit for a few minutes after baking; it’ll be easier to spread (and won’t scald anyone).
  • This appetizer isn’t overly sweet. If you want to amp it up, toss the figs in a teaspoon of brown sugar or drizzle a bit of honey over the Brie after it’s baked for an extra kiss of sweetness.
  • For an added crunch, sprinkle chopped nuts on top just before serving.
  • Don’t shy away from fig jam if fresh figs aren’t available.

Serving: 4g | Calories: 195kcal | Carbohydrates: 16g | Protein: 7g | Fat: 12g | Saturated Fat: 5g | Polyunsaturated Fat: 3g | Monounsaturated Fat: 4g | Cholesterol: 28mg | Sodium: 179mg | Potassium: 178mg | Fiber: 2g | Sugar: 14g | Vitamin A: 240IU | Vitamin C: 1mg | Calcium: 72mg | Iron: 1mg

Nutrition information is automatically calculated, so should only be used as an approximation.

Bikaji Meals confirms deal to purchase management of Indian peer Ariba Meals

0


Bikaji Meals confirms deal to purchase management of Indian peer Ariba Meals

Bikaji Foods International has completed a deal to buy a majority stake in Indian peer Ariba Foods.

The deal, which sees Bikaji Foods snap up a 55% equity stake in Ujjain-based Ariba Foods, was completed for a fee of Rs604.9m ($7.2m).

Bikaji Foods said in a filing with the National Stock Exchange of India (NSE) today (23 August) the investment will allow it “to enhance its frozen food production capabilities and expand its market presence”.

The company revealed its intentions to buy Ariba Foods earlier this month.

Based in Indore, Madhya Pradesh, Ariba Foods’ frozen portfolio includes mixed vegetables, vegetarian and non-vegetarian burgers, paratha, samosa and roti.

Like Bikaji Foods, Ariba Foods also produces Indian snacks and sweets. It supplies the retail and foodservice channels.

Access the most comprehensive Company Profiles
on the market, powered by GlobalData. Save hours of research. Gain competitive edge.

Company Profile – free
sample

Your download email will arrive shortly

We are confident about the
unique
quality of our Company Profiles. However, we want you to make the most
beneficial
decision for your business, so we offer a free sample that you can download by
submitting the below form

By GlobalData


Visit our Privacy Policy for more information about our services, how we may use, process and share your personal data, including information of your rights in respect of your personal data and how you can unsubscribe from future marketing communications. Our services are intended for corporate subscribers and you warrant that the email address submitted is your corporate email address.

Bikaji Foods, which claims to be the third-largest Indian snacks maker in the country, said the acquisition comes at a “pivotal moment as the frozen food sector experiences rapid growth driven by technological advancements”.

It added: “With a positive growth perspective, the industry is set to leverage these innovations to meet increasing consumer demand and expand its market presence.”

Jaipur, Rajasthan-based Bikaji Foods is primarily focused on products such as bhujia spicy snacks, namkeen savoury snacks, potato chips and papads.

Set up in 1987, it supplies 23 of the 28 Indian states and four of the so-called union territories out of the eight across the country.

“This strategic move not only strengthens our capacity for export growth but also supports our entry into the QSR segment. By integrating Ariba’s state-of-the-art production capabilities, we aim to enhance our frozen snacks and savouries manufacturing,” Deepak Agarwal, managing director of Bikaji Foods, said.

Last year, Bikaji Foods took a 49% stake in fellow Indian snacks maker and start-up Bhujialalji.

Set up in 2021, Bhujialalji supplies branded products such as bhujia, a fried and spiced snack originating from Bikaner in Rajasthan. It serves the e-commerce channel and so-called quick commerce, a delivery service common in India, and also select retail.

In 2019, Bikaji Foods attracted interest from new investors.

A fund under the umbrella of Indian financial services group Avendus Asset Management took a minority stake in Bikaji Foods from private-equity firm Lighthouse and another investor, Intensive Softshare.


salted caramel peach crisp – smitten kitchen

0


Heat your oven: to 400°F (205°C).

Prepare the peaches: Halve and pit the peaches, then cut the halves into 1/2-to-3/4-inch-thick wedges. Toss them in a large bowl with the lemon juice, and set aside while you make the salted caramel.

Make the caramel: In a 4-quart ovenproof deep skillet (I’m using my braiser)* stir together the sugar and water. Turn the heat to medium-high and cook, without stirring, until the surface is evenly bubbling all over and you begin to see golden and medium-brown spots in the bubbling sugar, about 5 minutes. Carefully (it’s going to sizzle dramatically) whisk in the butter and continue to cook until the sauce takes on an even medium-brown or copper color, about 2 to 4 minutes. Add the cream a splash at a time, whisking constantly, until it’s evenly mixed, and cook for another 3 to 4 minutes. Add flaky salt and stir to combine.

Remove from the heat just long enough to carefully ladle 2/3 cup of the sauce carefully into a spouted dish or bowl for later, and set that portion aside.

Parcook the peaches: Return the pan to the stove over medium heat, and add the peaches to the remaining caramel in the pan. The coolness of the peaches will cause the caramel sauce to seize up a little, but do not fret. Just let the peaches and caramel warm up and the sauce will loosen. Cook peaches and caramel together, stirring frequently, until the peaches have softened slightly, about 5 minutes. Stir in the cornstarch or tapioca flour until it disappears.

Make the crisp topping: Mix all of the topping ingredients in a large bowl until the butter is evenly dispersed and the mixture is rubbly. Sprinkle the topping over the peaches, then transfer pan to the oven and bake until the peaches are tender, their juices visibly bubbling around the crisp topping, and the topping is a light, nutty brown, about 20 minutes. Let it cool for 10 minutes, if you can bear it, before serving.

To serve: Scoop the crisp into bowls and top with ice cream and a drizzle of the reserved caramel sauce. If your caramel sauce has cooled and firmed up, you can warm it up quickly in the microwave — check every 10 seconds, as it warms and bubbles up quickly — or in a small saucepan on the stove.

Do ahead: Leftover crisp should keep in the fridge for 5-6 days, but it would be unprecedented. Leftover caramel sauce will keep for two weeks.

* If you don’t have a pan that goes from stove to oven, simply use a large, deep skillet for the caramel and parcooking the peaches, and transfer the peaches and sauce to a 4-quart or 9×13-inch baking dish pan for the baking portion, sprinkling the topping on just before it goes in the oven.

Right here’s the Secret to Juicy, Completely Cooked Rooster – Gourmand Dad, Don’t Let The Title Idiot You

0


Secret to Juicy, Perfectly Cooked Chicken from Food and Wine mag

I thought everyone could use a reminder or hint, could be may age showing but I’m constantly looking this up, only to say Geesh I knew that.

Nailing a perfectly cooked, juicy chicken breast can often feel like a fluke and a reason to celebrate. However, achieving chef-level chicken every time is easier than you think and it all comes down to temperatures. A meat thermometer is your best friend when it comes to cooking chicken. An accurate measure of the internal temperature of the meat is the only surefire way to judge doneness. 

The USDA recommends cooking chicken to a minimum internal temperature of 165°F. However, a single target temperature doesn’t reign supreme — white meat and dark meat should actually be cooked to different temperatures. Plus, home cooks often don’t take into account carryover cooking, which is likely the culprit of many dry chicken breasts. Here’s how to cook juicy chicken every time. 

What is carryover cooking?

Carryover cooking takes place when a meat is resting before cutting or serving it. In addition to allowing the juices time to redistribute, resting the meat also plays a part in doneness. Even though the meat has been removed from the heat source, the internal temperature continues to climb. This occurs because as the exterior of the meat cools, it releases heat in two directions — both externally and internally. As heat is released internally, the center of the meat gets warmer. It’s important to take carryover cooking into account since it can cause 5 to 10 degree increase in temperature which could be the difference between juicy and dry chicken. 

Our 50 Best Chicken Recipes

What temperature should white meat chicken be cooked to?

Cook lean white meat, such as breasts and wings, to an internal temperature of 155°F. Let the meat rest for 5 to 10 minutes to allow carryover cooking to bring the internal temperature to 165°F. While bone-in chicken takes longer to cook than boneless chicken, it’s more forgiving and less likely to dry out if you accidentally overcook it by a few degrees. 

The Chicken Recipe That Changed My Life

What temperature should dark meat chicken be cooked to?

Dark meat, such as legs and thighs, contains more connective tissue and fat than white meat and can withstand, actually benefit from, cooking to a higher internal temperature. Connective tissue starts to break down around 150°F and continues to soften and melt as long as the temperature stays above this point. While it’s completely safe to eat dark meat chicken that’s been cooked to 165°F, the meat is actually more tender and juicy if it’s cooked to 170°F and allowed to rise to 180°F with carryover cooking. 

What temperature should a whole chicken be cooked to?

Cooking a whole chicken, whether on the grill or in the oven, can be a little more tricky because it contains both white and dark meat. Position the chicken with the legs pointed towards the hottest part of the grill or the back of the oven. Cook the chicken until a meat thermometer inserted in the thickest part of the thigh registers 155°F. Thighs typically take the longest to come up to temperature, so by this time, the breast will be above 160°F. Let the chicken rest for about 10 minutes and carryover cooking will bring the thigh temperature to 165°F. Cooking a whole chicken requires compromise — in order for the dark meat to be cooked through, the white meat will have to cook a little longer than necessary.

How to use a meat thermometer?

When measuring the internal temperature of chicken, insert an instant read meat thermometer into the thickest portion of meat. Be sure the thermometer probe is not touching a bone which can cause an inaccurate reading.

Le Ache Quotidien Redefines AI Integration with AI Clone of Chef-Founder Alain Coumont

0


AI integrationLe Ache Quotidien Redefines AI Integration with AI Clone of Chef-Founder Alain Coumont

Image Source: Le Pain Quotidien on LinkedIn

What was once the stuff of sci-fi legends has slowly made its way into the food and beverage industry, as more and more restaurants are beginning to harness generative artificial intelligence tools to streamline operations and create efficiencies. However, Le Pain Quotidien (LPQ) is taking AI integration to a whole new level.

An AI-Generated Chef Is Born

In partnership with the software company November Five, the bakery-restaurant chain has immortalized its chef-founder Alain Coumont, along with much of his intellectual property, in Alain.AI, a cutting-edge AI integration tool affectionately dubbed his “digital twin.” It was initially designed to manage the LPQ recipe database, modernize processes, and standardize protocol across 214 locations.

The AI tool has become a savvy digital assistant that supports staff at every step – from ideation and recipe creation to preparation.

“With Alain.AI, we combine tradition with cutting-edge technology to keep our offers fresh and exciting for our customers, now and in the years to come,” said the living, breathing human version of Coumont in a recent announcement.

A Full-Service Menu of AI Integration

While the tool’s ability to seamlessly navigate the brand’s catalog of 10,000+ recipes – many of which Coumont created himself over the course of his 30-year career – is impressive on its own, it barely scratches the surface of its full capabilities.

Alain.AI can also modify existing recipes to:

  • Feature popular local flavors
  • Capitalize on industry trends
  • Incorporate seasonal ingredients
  • Cater to dietary preferences
  • Support guests with food allergies

The tool can also tailor the language, units of measurement, and kitchen equipment mentioned in recipes to the local market, which is especially useful since the chain’s locations span 19 countries.

These functions are grouped within three primary categories:

  • The Menu Maker creates seasonal menus from the recipe catalog, including ingredient lists for sourcing and step-by-step guides that model proper preparation and plating techniques.
  • The Experimental Kitchen brings to life new recipes and revives older recipes that were either never finished or never published.
  • The Recipe Creation Tool generates new recipes from existing data or from scratch with an instructional approach and user interface similar to ChatGPT.

Future Goals of AI Integration

While the current iteration of Alain.AI is only accessible to Le Pain Quotidien operators, the chain will soon release a consumer-facing version that will be available to an elite, limited audience: members of the Tartine Club, their customer loyalty program – an added incentive to sign up.

In addition, the restaurant-bakery chain plans to integrate research-driven insights into the mix to help LPQ staff accurately predict and address the ever-evolving needs and preferences of their customer base.

For example, if the majority of consumers order tartines with the herb aioli on the side, Alain.AI will take this data into account when developing new recipes.

This feature will also utilize past consumer data to predict how patrons may react to potential pricing and menu updates.

An Appetite for Efficiency and Consistency

Le Pain Quotidien’s AI integration strategy is already enhancing efficiency, organization, and consistency across all 214 LPQ locations. And as an added perk, it’s also simplifying the process of opening new franchise locations.

“We are experiencing major growth from 15 to 19 countries after a difficult period, and five more countries will be added in the coming months,” said CEO Annick Van Overstraeten. These countries include Greece, Morocco, Luxembourg, Uruguay, Kazakhstan, Azerbaijan, Peru, Congo, and, most recently, India.

“Until now, we could only rely on existing commercial software and structured databases to manage our recipes. With Alain.AI, not only do we reduce the time of manually entering and translating everything, but we can also offer our chefs a digital smart assistant that thinks along in the creation process,” Overstraeten added. Not only will the tool’s automated data entry and language translation capabilities save the restaurant-bakery chain countless hours; this innovative AI integration approach will also reduce the likelihood and frequency of errors.

With all of these factors in mind, it’s safe to say that, unless Coumont’s digital twin has an evil side it hasn’t shown yet, the future of Le Pain Quotidien is looking bright – with a competitive edge sharper than their chef-founder’s favorite paring knife.


The Food Institute Podcast

In the fast-paced and highly regulated world of manufacturing, especially within the food and beverage industry, maintaining stringent hygiene standards is not just a best practice—it’s a necessity. Steve Voelzke, president of Robroy Industries’ electrical products division, explored why it’s essential to adopt a holistic approach and how this approach can significantly lower the risks of product recalls.

Seaweed Salad Recipe – Cookie and Kate

0


Seaweed Salad Recipe – Cookie and Kate

This seaweed salad is colorful, delicious, and boldly flavored with sesame dressing. If you enjoy seaweed salads at Japanese restaurants, try this fun twist on the concept. Many prepared seaweed salads are colored with food dyes, but this one obtains its lively color from veggies.

If you’re relatively new to seaweed, like I am, this salad offers a great introduction. It calls for arame, which has a more mild and sweet flavor compared to other seaweed varieties. The crisp textures of cabbage and bell pepper, combined with soy sauce and ginger, contrast beautifully with the seaweed.

seaweed salad ingredients

This salad is the perfect way to incorporate nutritious seaweed into your diet. Seaweed’s nutritional benefits vary depending on the specific variety, but they are often a good source of fiber, iodine, potassium and magnesium, among others. I try to consume a wide variety of whole foods, so seaweed is a welcome addition.

seaweed salad preparation

Seaweed Salad Ingredients

Arame

Arame seaweed, or sea vegetable, is a brown algae. It grows off the shores of the Ise-Shima National Park in Japan, and has been part of Japenese cuisine for centuries. I ordered EDEN brand arame online through Amazon, which seems to be sold out at the moment. Look for it in well-stocked grocery stores or Asian supermarkets.

Cabbage

Crisp strands of cabbage offer lots of colorful texture. I used green and purple varieties to make this recipe as bright as possible for photos, but either option will work well at home.

Bell Pepper

Sweet bell pepper is the perfect addition to this seaweed salad. Choose red, orange or yellow for this salad.

Cilantro and Green Onion

These herbs offer more fresh flavor. If you don’t like cilantro, you can skip it.

Avocado

Creamy avocado is the perfect counterpoint to the crisp textures. Wait to add avocado until you’re ready to serve each bowl.

Sesame Dressing

This homemade sesame dressing brings it all together! It’s made with tamari (soy sauce), toasted sesame oil, and fresh lime juice.

how to make seaweed salad

How to Make Seaweed Salad

Seaweed salad is surprisingly easy to make, and you’ll find the full recipe below. Arame requires a 5-to-10-minute soak in cool water. During that time, you can whisk together the dressing and chop the vegetables.

Drain the arame, then squeeze out any excess water. Return it to the bowl, add the prepared vegetables, pour in the full batch of dressing, and stir it all together. How’s that for easy?

Reserve the avocado until just before serving since it browns over time. The recipe keeps well in the refrigerator for up to four days.

Watch How to Make Seaweed Salad

seaweed salad with sesame dressing

How to Serve Seaweed Salad

This seaweed salad is a fun and nutritious side salad. Serve it with Japanese cuisine and beyond at any time of year.

You can turn this salad into a complete meal by topping it with Crispy Baked Tofu or prepared fish or shrimp, perhaps on a bed of brown rice. You could even skip the sesame dressing and serve it in place of the kale in my Build-Your-Own Buddha Bowls.

Here are a few more complementary serving options:

Leftover cabbage?

This recipe calls for 1 1/2 cups of cabbage, less than one full head. Leftover cabbage will keep well in the refrigerator, wrapped, for up to one week.

Here are a few ways to use the remaining cabbage

Please let me know how your recipe turns out in the comments! I love hearing from you and hope you enjoy this salad.

seaweed salad in bowls

Print

Seaweed Salad

  • Author: Cookie and Kate
  • Prep Time: 25 minutes
  • Total Time: 25 minutes
  • Yield: 4 servings 1x
  • Category: Salad
  • Method: By hand
  • Cuisine: Japanese-inspired
  • Diet: Gluten Free

5 Stars 4 Stars 3 Stars 2 Stars 1 Star

4 from 1 review

This seaweed salad recipe is colorful, delicious and boldly flavored with sesame dressing. The arame needs to soak for 5 to 10 minutes before using, so you can prepare the vegetables and dressing during that time. Recipe yields 4 servings (1 ½ cups per serving for 6 cups total).


Scale

Ingredients

  • 1 ounce arame sea vegetables (about 1 ½ cups dried) 
  • 1 ½ cups thinly sliced purple or green cabbage, roughly chopped into pieces no longer than 3 inches
  • 1 red or orange bell pepper, chopped
  • ½ cup thinly sliced green onion, sliced on the diagonal
  • ¼ cup finely chopped cilantro
  • 1 batch Sesame Dressing
  • 1 ripe avocado, diced

Instructions

  1. Rinse the arame well in a fine sieve, then place it in a generously sized bowl. Fill the bowl with cool water and let it soak for 5 to 10 minutes, until nicely pliable. Drain the arame in the sieve, and gently squeeze out any excess water. Transfer the arame back to your empty bowl, which we will use as a mixing bowl. 
  2. Add the cabbage, bell pepper, green onion and cilantro. Whisk the dressing once more, and pour it all over the salad. Gently toss until the salad is evenly coated in the dressing. 
  3. When it’s time to serve, divide the seaweed into bowls and top with diced avocado. The salad will keep well in the refrigerator, covered, for up to 4 days (add the avocado just before serving).

▸ Nutrition Information

The information shown is an estimate provided by an online nutrition calculator. It should not be considered a substitute for a professional nutritionist’s advice. See our full nutrition disclosure here.

Did you make this recipe?

Sage Brown Butter Corn Pasta Alfredo.

0


This post may contain affiliate links, please see our privacy policy for details.

Sage Brown Butter Corn Pasta Alfredo is a scrumptious late summer pasta that transitions wonderfully into fall. I took a classic pasta recipe and updated it with a rich and creamy sauce, golden brown butter, corn, and fried sage leaves. The result is delicious late summer and early fall flavors that melt in your mouth. It’s the coziest, creamiest Alfredo pasta and great for busy nights.

Sage Brown Butter Corn Pasta Alfredo.

It’s crazy that this is the last week of August. Sunday marks the 1st of September! I’m so excited and looking forward to a busy fall ahead!

Between fall game nights with friends, busy work/school schedules, back-to-school activities, and holiday planning, it’s that crazy time of year when we’re transitioning from laid-back summer days to active fall schedules.

I love it. Though it can sometimes be overwhelming, I mostly thrive on having too many things to do! This is the time of year when my recipes really start to get cozier. They also get simpler with one-pan dishes and slow cooker recipes. And I think they become even more delish!

September is a great month to start making my dad’s creamy alfredo pasta. His alfredo is luscious, and he makes it perfectly every time with little effort.

His secret? A block of Philadelphia cream and more parmesan than you might usually use. It’s creamy and truly delicious. My addition to his recipe today is brown butter, end-of-summer corn, and fresh sage. It’s the perfect Alfredo for this time of year!

Sage Brown Butter Corn Pasta Alfredo | halfbakedharvest.comSage Brown Butter Corn Pasta Alfredo | halfbakedharvest.com

These are the details

Step 1: brown the butter with the corn and sage

For this pasta alfredo, I start with the butter sauce. Melt a stick of butter in a skillet with fresh sage, then add the corn and garlic. Next, season the corn to taste with salt, black pepper, and chili flakes.

Allow the butter to brown around the corn. This takes around 10 minutes. The butter will smell nutty, the corn will be golden, and the sage should get crispy.

Pull the skillet off the heat and set aside.

Sage Brown Butter Corn Pasta Alfredo | halfbakedharvest.comSage Brown Butter Corn Pasta Alfredo | halfbakedharvest.com

Step 2: cook the pasta

Boil your favorite pasta cut. For this Alfredo sauce, I switched it up from the usual fettuccine and used a short-cut pasta. Either long or short is great, but I do love the short-cut with the corn!

I used organic taccole pasta, which is always fun! 

Step 3: make the sauce

Once you drain the pasta, let it hang in the colander while you make the sauce. Add the cream cheese to the same hot pot and let it melt. Whisk in the milk, then add the Parmesan cheese. And if you enjoy blue cheese like we do, add some blue cheese, too! YUM!

Finish the sauce with salt and black pepper, then mix in the pasta, the corn, brown butter, and sage. It’s going to smell so delicious and look even yummier!

Sage Brown Butter Corn Pasta Alfredo | halfbakedharvest.comSage Brown Butter Corn Pasta Alfredo | halfbakedharvest.com

Step 4: finish

I like to top this dish with freshly grated parmesan and a few of those flavorful, crispy sage leaves.

The sauce is creamy with warming notes of sage, sweetness from the corn, and nuttiness from the golden brown butter. It’s my favorite combo.

Perfect for chillier nights or when you need to throw together a quick dinner.

Sage Brown Butter Corn Pasta Alfredo | halfbakedharvest.comSage Brown Butter Corn Pasta Alfredo | halfbakedharvest.com

Looking for other quick pasta recipes? Here are a few ideas: 

Lemon Pepper Cajun Chicken Fettuccine Alfredo

4 Cheese Roasted Garlic Alfredo Stuffed Spaghetti Squash

Brown Butter Pumpkin Tortellini Alla Vodka

Butternut Squash Pasta Carbonara with Rosemary Bacon

Browned Sage Butter Chicken Piccata with Mushroom Pasta

Slow Cooker Saucy Sunday Bolognese Pasta

Sage Brown Butter Pumpkin Pasta Alfredo

Lastly, if you make this Sage Brown Butter Corn Pasta Alfredo be sure to leave a comment and/or give this recipe a rating! Above all, I love to hear from you guys and always do my best to respond to each and every comment. And, of course, if you do make this recipe, don’t forget to tag me on Instagram! Looking through the photos of recipes you all have made is my favorite!

Brown Butter Corn Pasta Alfredo

Prep Time 10 minutes

Cook Time 15 minutes

Total Time 25 minutes

Servings: 6

Calories Per Serving: 726 kcal

Nutritional information is only an estimate. The accuracy of the nutritional information for any recipe on this site is not guaranteed.

  • 1. Melt the butter with the sage leaves in a large skillet set over medium heat. Cook for 2 minutes, then add the corn, garlic, salt, pepper, and chili flakes. Cook for 5 minutes, until the butter is browned. Remove from the heat. 2. Bring a large pot of salted water to a boil. Cook the pasta according to package directions until al dente. Drain.3. To the hot pot, add the cream cheese, stirring until melted. Slowly whisk in the milk until smooth. Set over medium heat and bring the sauce to a simmer. Cook 5 minutes, until thickened slightly. Stir in the parmesan and blue cheese (if using) and season with salt and lots of pepper.4. Toss in the pasta, stir in the corn and brown butter, then remove from the heat. Divide the pasta between plates. Serve with extra parmesan. Eat and enjoy immediately.