Maple candy potato salad with whipped tahini

0


Channelling my inner Yotam Ottolenghi – maple-roasted sweet potato on a fluffy cloud of whipped tahini, topped with crispy spiced chickpeas and a shower of chopped pistachios. This is the sweet potato version of the roasted carrots recipe I shared last year. Ridiculously good!

Maple sweet potato salad with whipped tahini

Maple roasted sweet potato salad with whipped tahini

I’m a shameless Yotam Ottolenghi tragic. He’s the reason I started seeing vegetables as more than just a nutritional checkbox – he actually made me want to make them and let them take centre stage. I especially love the bold Middle Eastern and Mediterranean flavours in his early cookbooks, Jerusalem and Plenty.

To be honest, I find some of his recipes call for ingredients I struggle to find so I don’t make as many as I want, but I always come away inspired. Today’s dish is my Ottolenghi-esque creation: maple-roasted sweet potato with crispy chickpeas on a cloud of tahini enriched garlic yoghurt sauce, finished with spicy maple drizzle which keeps life interesting and a shower of pistachios.

Yes, it sounds like a lot (Ottolenghi, remember! 😃). But nice and easy to make with a streamlined workflow.
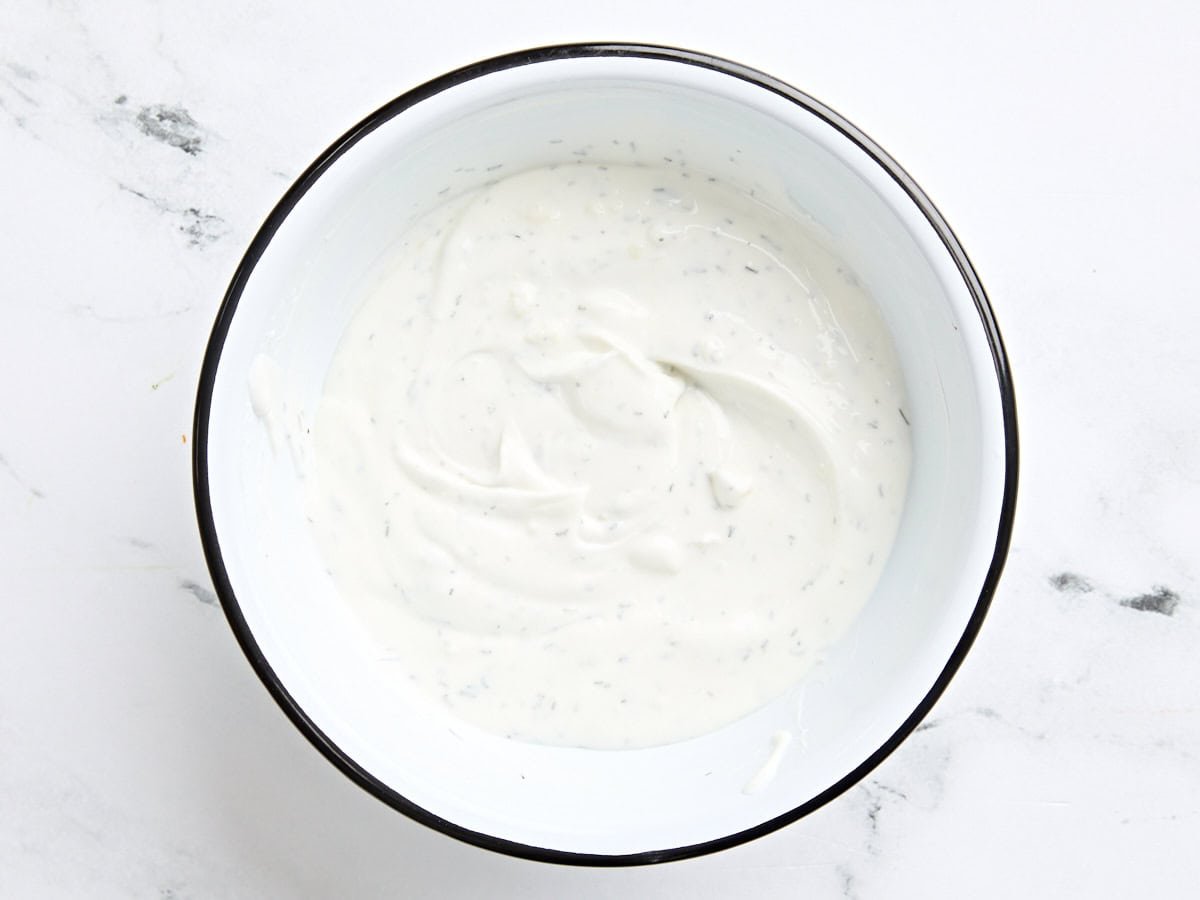
The whipped tahini

Also, rest assured, though I’ve called the sauce a Whipped Tahini which might conjure up visions of having to lug your stand mixer out – rest assured, that’s not the case. Just a handheld whisk is all you need. 🙂 You will be amazed how it transforms from a typical yogurt sauce texture into a billowy, whipped cream-like texture. It’s marvellous, and addictive, and you will understand why I have used this sauce multiple times previously, like in this recipe and this recipe.
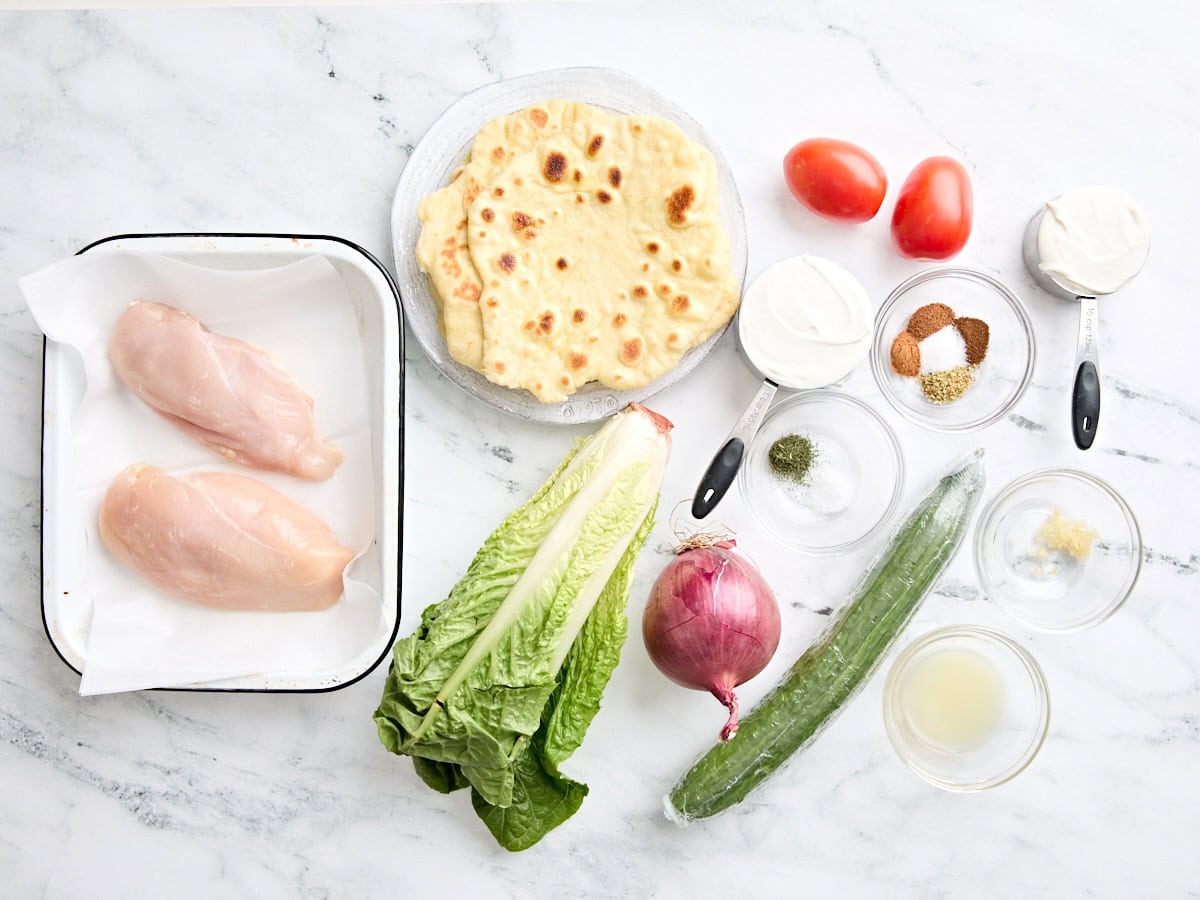
Maple sweet potato salad with whipped tahini

Ingredients

Here’s what you need to make this sweet potato salad.

1. Maple roasted sweet potato

You don’t need much maple syrup to roast sweet potatoes, just a light coating. In fact, if you use too much, it makes the surface soggy.

  • Sweet potato – Try to choose potatoes that are shaped like the above, around 6cm / 2.5″ wide, so you can just cut them into appropriate size wedges, as pictured. However, feel free to unleash the creative demon within and cut other shapes instead – like discs, thick half moons or even cubes (you rebel, you!).

  • Maple syrup – I love the maple flavour in this dish but you can substitute with honey instead. (PS If you use artificial maple syrup rather than the real stuff, the maple flavour is mostly gone once cooked).

2. Whipped tahini

This is a simple yogurt sauce that is enriched with a bit of tahini, with a hint of garlic and balanced with tang from lemon, with a texture like whipped cream – hence the name. It’s the same sauce I use for my Middle Eastern style Sweet Potato Steaks and Green Beans with a Mountain of Panko (you’ll understand the odd name when you see the photos).

  • Plain yoghurt – Not sweetened, and not flavoured. Regular yogurt or Greek yogurt.

  • Tahini – Paste made with sesame seeds. Usually found in the health food aisle at grocery stores. Use hulled tahini (more common), not un-hulled which is darker and more bitter. The jar label will specify which it is. Use Chinese sesame paste as a sub if you have leftovers from other recipes I’ve shared, like this one or this one!

  • Lemon – The tang to balance the flavour.

  • Garlic – Finely grate it using a microplane so you don’t have big lumps in the sauce.

3. CRISPY CHICKPEAS

Not essential – I’d absolutely make this recipe without – but definitely adds fabulous extra textural interest and pops of flavour. Plus, they cook in the oven at the same time as the sweet potato, so why wouldn’t you? 🙂

4. spicy maple sauce

Here’s what you need for the spicy maple sauce that is drizzled over the roasted sweet potatoes:

I know this sauce looks too simple to have enough flavour, but it does! Firstly, this sauce is just an accent rather than primary flavour. Secondly, sriracha is not made with just pureed chilli, it’s got other things in it as well – garlic, vinegar, salt, sugar.

Spice level – low mild. There’s only 1 tablespoon of sriracha across this whole dish, and the sweetness from the maple syrup also dials down the spiciness.

No spice option – Substitute the sriracha with equal parts ketchup and apple cider vinegar plus a small garlic clove finely grated.


How to make this Sweet Potato Salad

This recipe has a nice flow to it because the sweet potatoes and chickpeas cook at the same time in the oven, and while they’re roasting you just make the sauces. Easy!

  1. Toss sweet potato with oil, salt, pepper and maple syrup on a paper lined tray. The paper will stop maple syrup caramelised edges from sticking to the tray and ripping off the sweet potato (it’s so sad when that happens!).

  2. Plain chickpeas – Drain the liquid out of the chickpea can then spread the chickpeas on a tray. No need to pat dry – where going to oven dry them instead. Easier, and more effective – the chickpeas come out crispier.

  1. Oven together – Put the sweet potato on the top rack and chickpeas on the rack underneath set so it’s 20cm / 8″ apart (to allow the hot air to circulate). They will both take around 30 minutes.

    The oven temperature is fairly high – 220°C/450°F (200°C fan) – to encourage some colour on the sweet potato. If the oven temperature is lower, I find they just go from raw to soft and soggy.

  2. Season chickpeas – After 10 minutes, take the chickpeas out. Now they’re nice and dry, which means crispier chickpeas! Push them to one end of the tray, toss with the oil and spices. Then bake for 20 minutes or until they are crispy – you can easily tell because they will clatter on the tray.

    The chickpeas will stay quite crispy for a good 15 to 20 minutes, so you can just leave them on the tray until you’re ready to use them.

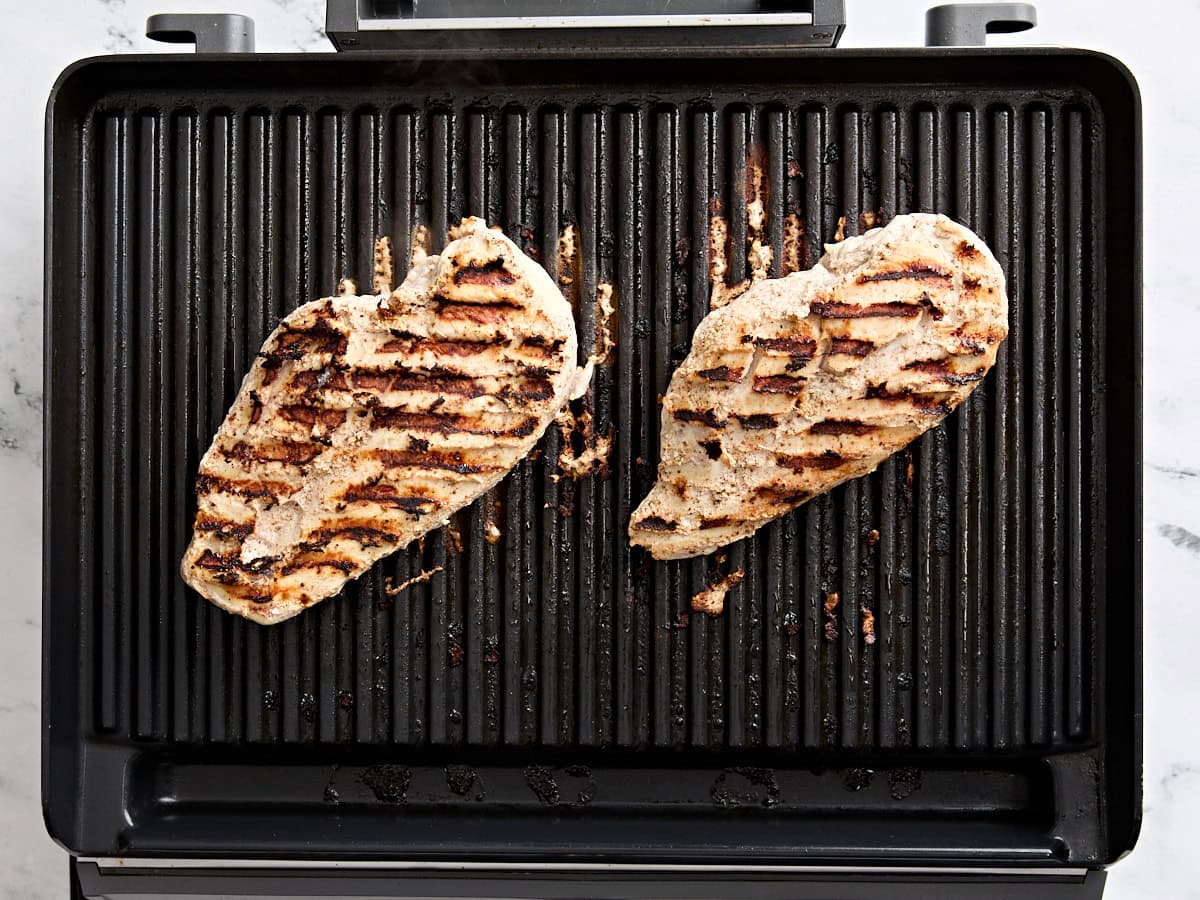
  1. Optional charring under grill/broiler – Roast the sweet potatoes for 30 minutes in total, turning at the halfway mark, until they are soft. By this time they will have a little colour on them, but if you’d like to char them like pictured for a little extra flavour and maple caramelisation, give them 5 minutes under the oven grill/broiler.

  2. Spicy maple sauce – Mix this while the potatoes are in the oven. Literally just put everything in a small bowl and mix.

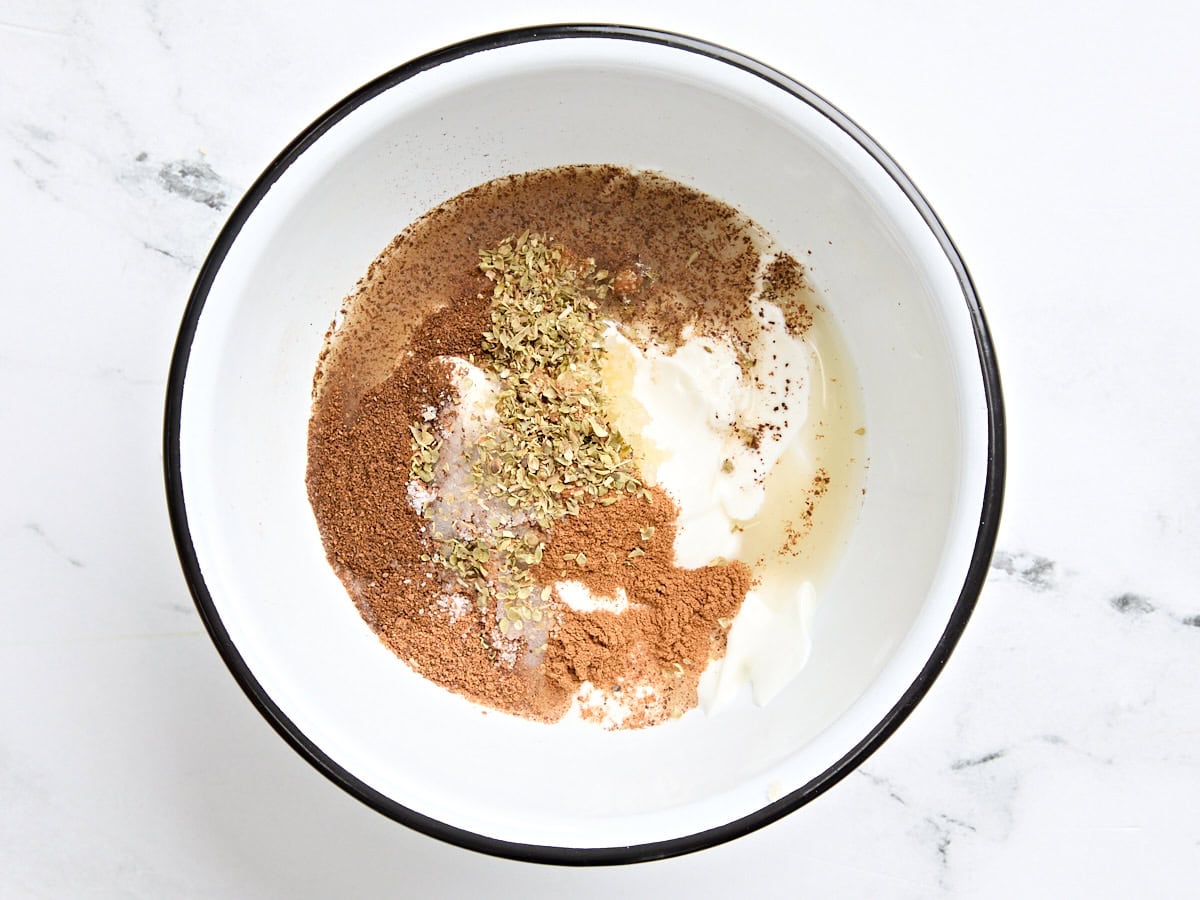
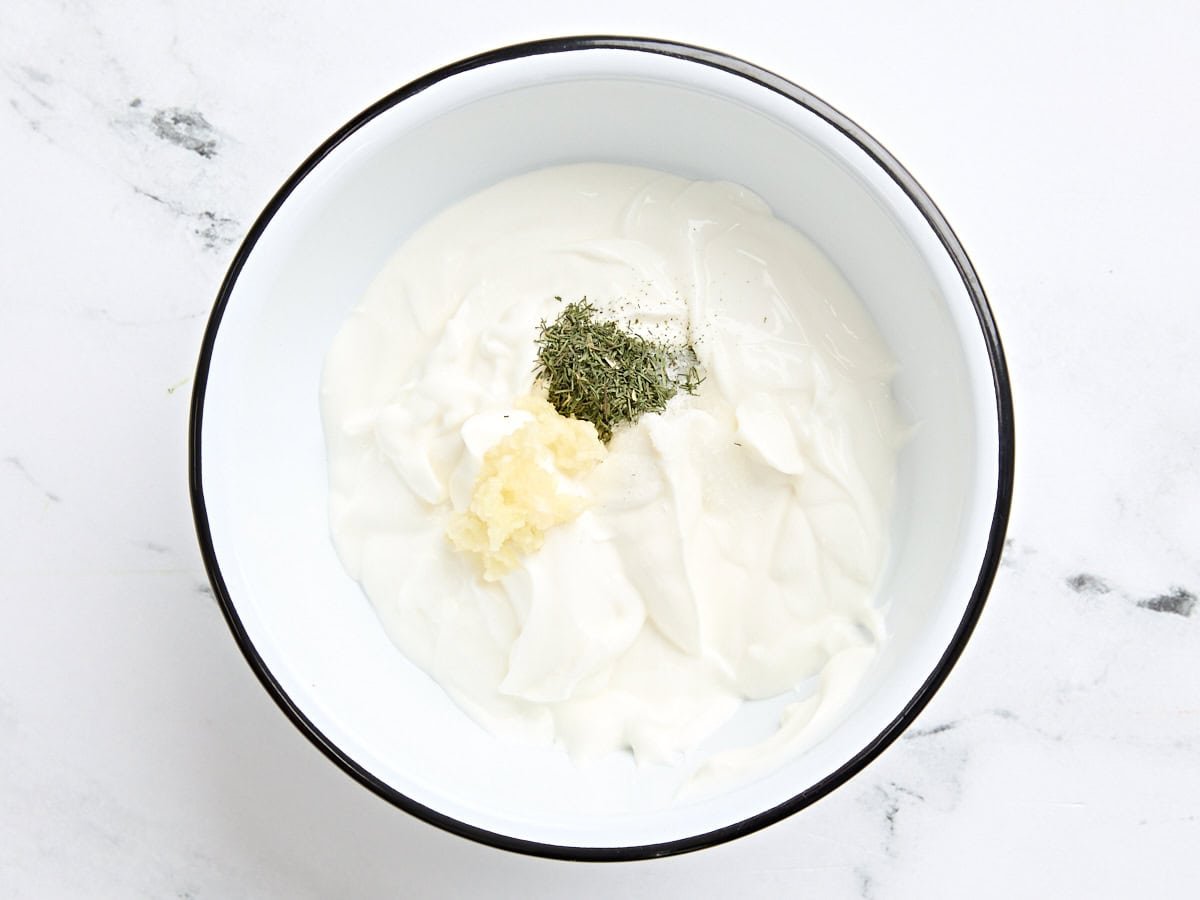
  1. Whipped tahini – This is a two step process – whisk the ingredients together in a microwave proof bowl (do this anytime ahead). Then within 5 minutes of serving, warm the mixture in the microwave for just 30 seconds and give it a vigorous whisk again. The sauce will transform from a typical yogurt sauce into a texture almost like softly whipped cream.

    Optional tahini drizzle sauce – Remove 1/4 cup of the whipped tahini and mix with around 2 tablespoons of water or until it has a drizzle-able consistency. This isn’t essential, it’s mostly for aesthetics.

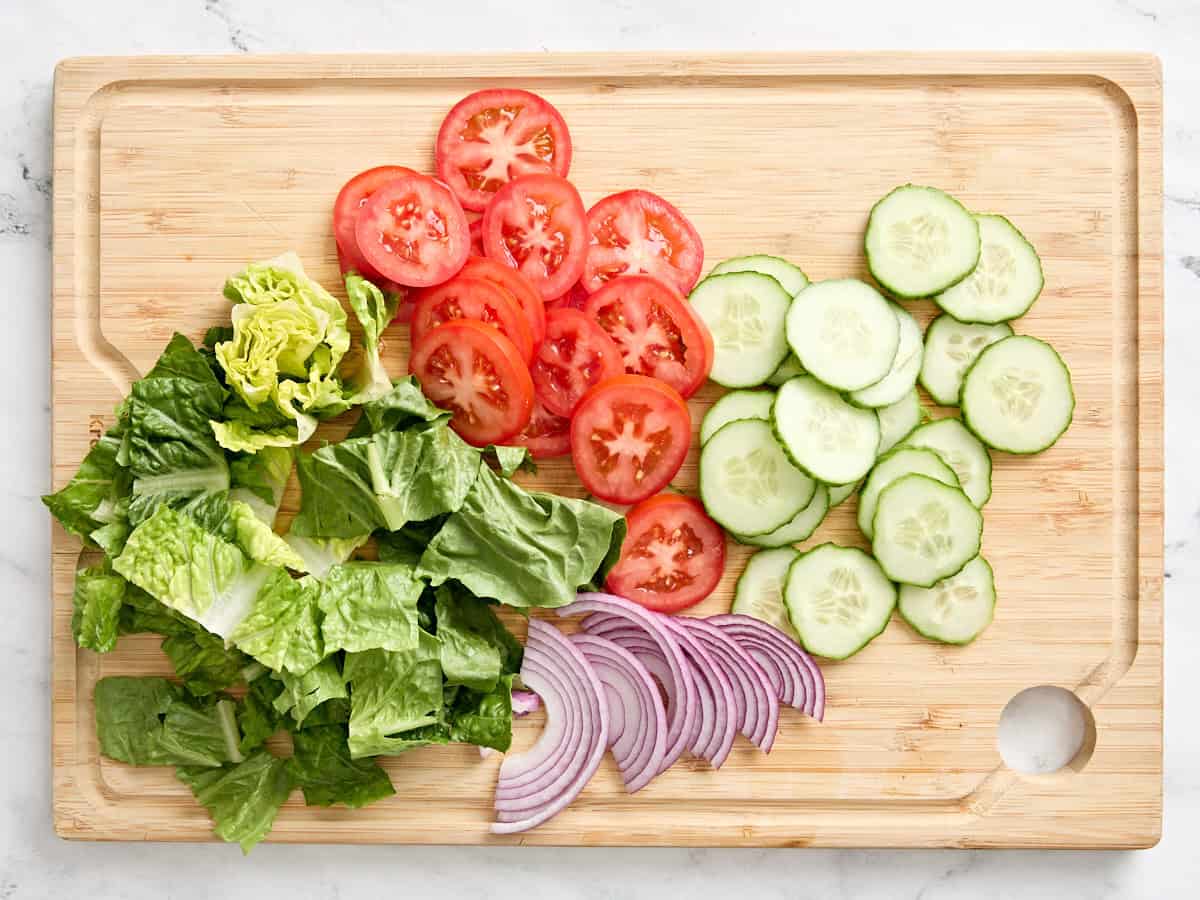
  2. Assemble – Bear with me, this step will seem overly instructive but the intention is to ensure you get a bit of everything with every piece of sweet potato scooped up. Nobody wants to be that person who ends up with a plain piece of sweet potato – how sad!

    So, here’s the order in which I build: spread a large flat plate with the tahini sauce then lay the sweet potato on top, mostly in a single layer. Drizzle with tahini sauce (if using), sprinkle with about 3/4 of the pistachios and coriander. Then pile or scatter the chickpeas on top, and sprinkle with the remaining pistachios and coriander. Then, serve!

Maple sweet potato salad with whipped tahini

How to serve this sweet potato salad

Serve this as a show-off side, a meat-free main, or part of what I call a “salad spread”, my go-to low-stress lunch option. It covers make-ahead ease with room temperature serving and the inevitable “I’m being healthy” friend, plus gluten-free and vegetarians.

To be clear, when I say “salads”, I am not talking about your everyday Garden Salad. I mean things like Pearl Couscous Salad, Farro Salad with Sizzled Dressing, Sexy Lentil Salad (it’s name worthy!), Roast Pumpkin Feta Salad, Wild Rice Salad, Lentil Roasted Eggplant Salad, Yotam Ottolenghi’s Cauliflower Salad and Honey-Cinnamon Pumpkin Salad – to name a few. Here’s a little preview:

Nothing boring there!! 🙂

To find more, have a browse through the Vegetable and Salad index which is grouped by vegetable, a useful way to find substantial salads. Start with legumes, then head to pumpkin, sweet potato, cauliflower and other “meaty” / starchy vegetables.

Let me know if you get a chance to try this sweet potato recipe! Love to know what you think. – Nagi x


Watch how to make it

Hungry for more? Subscribe to my newsletter and follow along on Facebook, Pinterest and Instagram for all of the latest updates.

Maple sweet potato salad with whipped tahini

Maple sweet potato salad – with whipped tahini and crispy chickpeas

Servings5 – 6 as a side, 3 – 4 as a main

Tap or hover to scale

Recipe video above. Channelling my inner Yotam Ottolenghi – maple-roasted sweet potato on a fluffy cloud of whipped tahini, topped with crispy spiced chickpeas and a shower of chopped pistachios. Fabulous statement side or substantial meat-free main – try stuffing into flatbreads. Ridiculously good!

Ingredients

Maple roasted sweet potato wedges:

Crispy seasoned chickpeas:

Prevent screen from sleeping

Instructions

  • Preheat the oven to 220°C/450°F (200°C fan). Arrange the oven racks so they are 20 cm/8″ apart (for air circulation).

  • Spicy maple sauce – Mix until combined. Set aside.

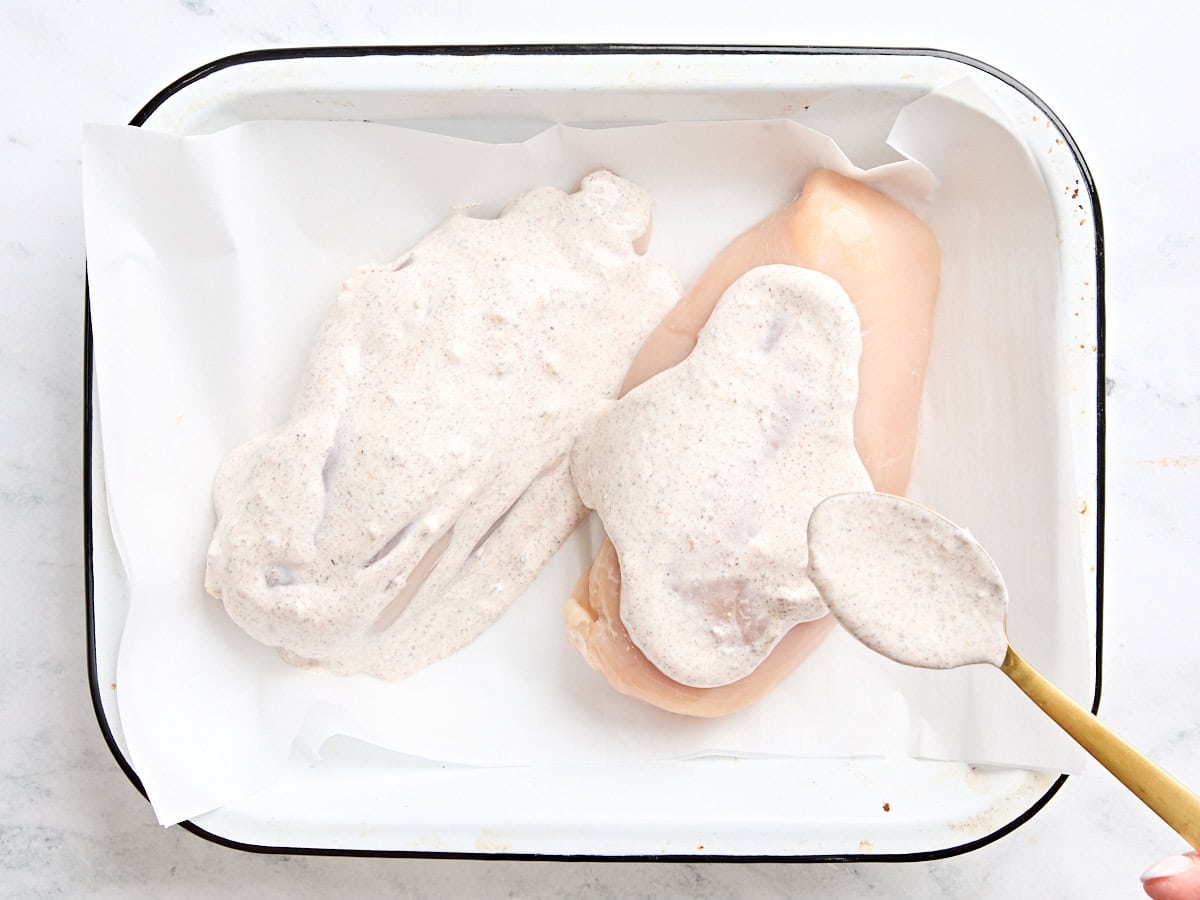
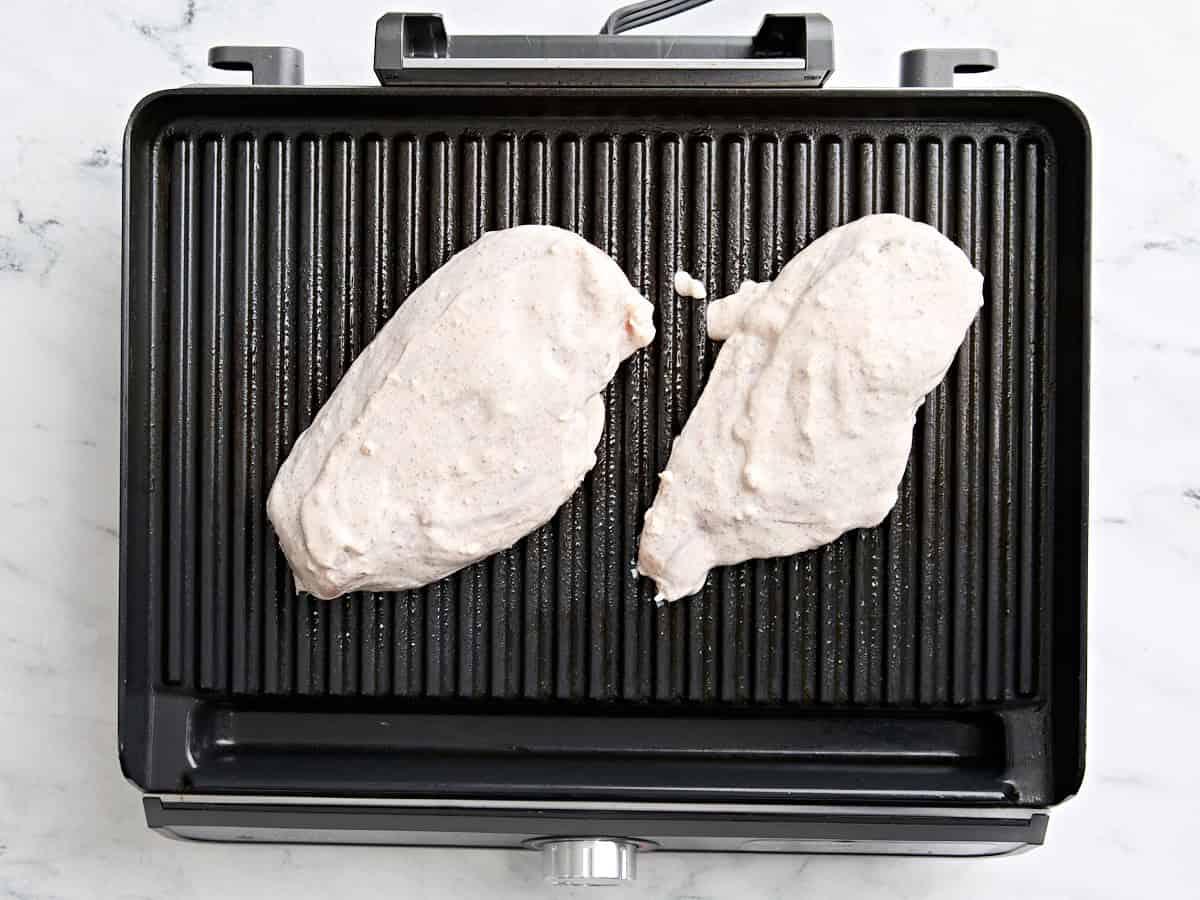
  • Sweet potato – Cut each sweet potato lengthways into 6 wedges (or 8, if they are thicker potatoes). Put on a paper lined tray, then toss with the maple syrup, olive oil, salt and pepper. Lay sweet potato wedges on their side.

  • Chickpeas – Drain the chickpeas then spread on a tray (still wet).

  • Baking – Put both trays in the oven (sweet potato on the top shelf). Roast the potatoes for 30 minutes, turning them at the halfway mark. Take the chickpeas out after 10 minutes to flavour them.

  • Crispy seasoned chickpeas – Remove the oven dried chickpeas from the oven after 10 minutes (Note 4). Push them to one side of the tray, drizzle/sprinkle and toss with the oil, spices, salt and pepper. Toss well using a rubber spatula, then return to the oven for a further 15 – 20 minutes until they’re crispy (they will clatter! Note 4).

  • Sweet potato charring (optional) – After 30 minutes, switch the oven grill/broiler to high. Tuck in or fold down excess paper around the tray edges (so it doesn’t touch heat element and catch fire). Stand the wedges sharp edge facing up, then pop it under the broiler for 3 to 5 minutes until a bit charred on the edges. ⚠️ SAFETY NOTE: Do not walk away, make sure the paper does not catch fire.
  • Whipped tahini – While the potatoes are roasting whisk ingredients in a heat-proof bowl just to combine. When ready to use, microwave for just 30 seconds on high, then whisk again for 10 seconds – it will resemble softly whipped cream. (Note 5)

  • Assemble – Spread the whipped tahini on a large plate. Pile the sweet potato on, mostly in a single layer. Drizzle with the spicy maple sauce, sprinkle with most of the pistachio and coriander. Sprinkle over chickpeas, then sprinkle with the remaining coriander and pistachios. EAT!

Recipe Notes:

1. Sweet potato – Try to get even shaped ones from which you can cut nice wedge shapes. Though, no one will be arrested if you cut the potato into different shapes – try thick medallions or half moons.
No need to peel! I only peeled the ones in the video because they were blemished so I used the peeler to remove those bruised parts of the flesh. 
2. Sriracha – The spicy maple sauce has a warm hum from the sriracha, but there’s only 1 tablespoon of sriracha which is used across the whole dish, so it’s not very much. If you want no spice at all, substitute the sriracha with equal parts ketchup and apple cider vinegar plus small garlic clove finely grated.
3. Pistachios – Toast over medium heat in a dry skillet (no oil) until there are small golden patches. Remove, cool, chop.
4. Roasted chickpeas should be crispy on the outside but still soft on the inside. The initial 10 minute dry roasting will make these oven chickpeas crispier than the usual technique of air or towel drying then roasting, but the fact is they will never be as crispy as deep frying (and that’s ok, our hips are happy with this) and they don’t stay crispy for longer than 2 hours UNLESS you roast them for 45 minutes until they are rock hard all the way through (these are a little too hard to eat, in my opinion)
5. No microwave? Use a bain-marie set up. Put the bowl on a saucepan filled with 1″/2.5 cm of simmering water. Then whisk – as the mixture warms up slightly, it will transform into the whipped cream texture.
Leftovers will keep pretty well for a day, bring to room temp them eat (it’s a bit messy to separate yogurt from carrots to heat the carrots). Otherwise keep the components separate and heat the carrots. Oven chickpeas don’t stay crispy for longer than a couple of hours.
Nutrition per serving, assuming 5 servings as a side.

Nutrition Information:

Calories: 304cal (15%)Carbohydrates: 41g (14%)Protein: 8g (16%)Fat: 13g (20%)Saturated Fat: 3g (19%)Polyunsaturated Fat: 2gMonounsaturated Fat: 8gCholesterol: 6mg (2%)Sodium: 632mg (27%)Potassium: 683mg (20%)Fiber: 8g (33%)Sugar: 20g (22%)Vitamin A: 20221IU (404%)Vitamin C: 14mg (17%)Calcium: 147mg (15%)Iron: 2mg (11%)

Life of Dozer

Visit to the dentist today! Not sure why he’s licking his lips….

This is at the Sydney Pet Dentistry this morning. The condition of his teeth has declined rapidly since he had to stop eating bones due to his medical condition, and it’s gotten to a point that I’ve been advised to take him to a dentist.

Fingers crossed it’s not a major issue. More to come when I know!


Bran Muffins

0


This is my go-to bran muffin recipe. They made an appearance years ago in Super Natural Every Day, and this is an updated recipe. You can have them coming out of your oven in under thirty minutes. These muffins bake hot and develop a substantial, crunchy muffin top. You get a tender, barely sweet, buttermilk crumb underneath. I love them warm, slathered with a bit of butter. Wayne likes his with butter and hot honey. They’re basically the opposite of a sweet, cupcake-style muffin in all the best ways possible. 
Bran Muffins

How To Make Bran Muffins

Quite honestly, there’s no reason to get out your electric mixer for these muffins. Hand mixing them in a bowl the old-fashioned way, is a breeze. And the clean-up is faster. To make these bran muffins:

  • Pre-heat your oven. Get it nice and hot, 400°F. If you aren’t sure how accurate your oven is, err on the side of caution and dial it back a shade. Get all your ingredients ready.
    ingredients to make bran muffins on a kitchen counter
  • Whisk together the wet ingredients. They all go in a big bowl – eggs, buttermilk, butter, maple syrup.
  • Add the first dry ingredients. Mix in the bran and cereal and let it sit for a few minutes, to absorb some of the moisture and thicken up a bit. Then you’ll fold in the rest.
    bran muffins with butter
  • Bake! Fill your muffin tins and bake until beautifully golden.
    bran muffin batter next to muffin tin being filled

More muffin recipes

bran muffins cooling on a rack after baking

Continue reading Bran Muffins on 101 Cookbooks

Strawberry Banana Smoothie (Excessive Protein and Fiber)

0


This post may contain affiliate links. Read my disclosure policy.

My go-to Strawberry Banana Smoothie is naturally sweet, creamy, and packed with protein. A refreshing, high-protein breakfast or post-workout drink.

Strawberry Banana Smoothie

Strawberry Banana Smoothie Recipe

This Strawberry Banana Smoothie is my go-to — quick, creamy, and packed with over 39 grams of protein and 9 grams of fiber. It’s the smoothie I make more than any other, especially when I need something fast that actually keeps me full. My daughter Madison loves it too, so it’s a regular in our rotation. Made with banana, strawberries, ground flax, and your favorite protein powder, it’s naturally sweet, kid-friendly, and easy to customize.

The best part? It comes together in just 5 minutes with a blender and a few simple ingredients — perfect for busy mornings or a quick post-workout snack. You can even prep it ahead to make your routine even easier.

Why This Smoothie Works!

Gina @ Skinnytaste.com

This quick, high-protein smoothie is perfect when you need a high-fiber breakfast on the go. Here’s why it’s a favorite:

  • High-Protein: Each serving has about 39 grams of protein
  • Customizable add nut butters, baby spinach, or seeds
  • Great for Busy Families: Kid-friendly, freezer-friendly, and perfect for busy mornings
  • Less Waste: A delicious way to use up those ripe bananas!
  • Dietary Restrictions: Weight Watchers-friendly, gluten-free, high-protein, high-fiber; vegan and dairy-free (if using plant-based milk and protein powder)


Gina signature

Ingredients You’ll Need and Helpful Tips

Here are the ingredients for this strawberry banana smoothie. See the recipe card below for the exact measurements.

  • Low-Fat Milk: Use your favorite type of milk. Fairlife is my go-to, but if you need a dairy-free alternative, I prefer those with higher protein content, such as soy or pea milk.
  • Banana: Use ripe, spotty bananas for a sweeter smoothie without adding sugar.
  • Strawberries also add sweetness. Fresh or frozen berries will work.
  • Ground Flax provides fiber, protein, and many vitamins and minerals, like thiamine and copper.
  • Protein Powder: I make this recipe with unflavored whey or pea protein, but vanilla protein powder would also be a good option.
  • Vanilla Extract is optional, but it enhances the flavor.
  • Ice makes the smoothie thicker, smoother, and colder. If it isn’t at your desired consistency, add more ice.
  • Sweetener: I prefer monk fruit since it has zero net carbs and calories. However, any sweetener, such as honey, maple syrup, or sugar, would work. Or simply omit if your bananas are sweet enough.

How to Make Strawberry Banana Smoothies

It only takes a few minutes to make this easy strawberry banana smoothie. Simply add all the ingredients to a blender and blend until smooth. See the recipe card at the bottom for printable directions.

Smoothie Tips

  • For a thicker consistency, use frozen fruit or add more ice.
  • A good blender is essential for a smooth, creamy texture. Here are all my recs for high-powered blenders!
Skinnytaste Simple promo banner

Prep: 5 minutes

Cook: 0 minutes

Total: 5 minutes

Yield: 1 serving

Serving Size: 1 smoothie

  • ¾ cup low-fat milk, such as Fairlife or protein dairy-free milk of choice
  • 1 medium banana, fresh or frozen (the riper the better)
  • ¾ cup strawberries, fresh or frozen
  • 2 tablespoons ground flax
  • ¼ cup unflavored whey protein powder, or pea protein, or a scoop of your favorite vanilla protein*
  • ½ teaspoon vanilla extract, optional
  • ¾ cup ice
  • 1 teaspoon monk fruit sweetener, or optional sweetener of choice, to taste
  • Optional add-ins: peanut butter, baby spinach, Greek yogurt

Last Step:

Please leave a rating and comment letting us know how you liked this recipe! This helps our business to thrive and continue providing free, high-quality recipes for you.

Meal Prep Tip: Double the recipe and make one today, and leave the second one ready in the fridge minus the ice and milk. Then you have breakfast ready for tomorrow!
*I make this recipe with unflavored whey or pea protein, but vanilla protein powder would also be a good option.

Serving: 1 smoothie, Calories: 415 kcal, Carbohydrates: 45.5 g, Protein: 39 g, Fat: 10.5 g, Saturated Fat: 3 g, Cholesterol: 15 mg, Sodium: 198 mg, Fiber: 9 g, Sugar: 26 g

Variations

  • Extra Protein: Add Greek yogurt for a protein boost.
  • Green Smoothie: Blend in a handful of spinach for vitamins A, C, and K.
  • Chocolate: Add cocoa powder or chocolate syrup.
  • Seeds: Swap flax for chia, basil seeds, or hemp seeds.
  • Nut Butter: A scoop of almond or peanut butter gives it more protein and creaminess.
  • More Fiber: Cauliflower rice blends in beautifully. You won’t even know it’s there.

Storage

This strawberry banana smoothie is best enjoyed right after making it, but you can refrigerate the leftovers for up to 24 hours.

Strawberry Banana Smoothie

How to Meal Prep Smoothies

Prepare it in advance to save time in the mornings.

  1. Put everything except the ice and milk in a zip-locked bag
  2. In the morning, add the frozen ingredients, along with the ice and milk, to the blender and blend.
    You can even prep multiple bags at once, so you have smoothies ready to go all week.
Strawberry Banana Smoothie (Excessive Protein and Fiber)

More Smoothie Recipes You’ll Love

For more breakfast and brunch ideas, plus these five delicious smoothie recipes, for more inspiration!

If you make this healthy strawberry banana smoothie recipe, I would love to see it. Tag me in your photos or videos on Instagram, TikTok, or Facebook! And be sure to join the Skinnytaste Community to see what everyone’s cooking!


Rooster Shawarma Wrap – Funds Bytes

0


Even though it’s been 14 years since I first shared this recipe, I still believe the marinade for this Chicken Shawarma Wrap is one of the best marinades I’ve ever made. EVER. It’s so good that I find myself using it on everything! If you’ve never had a shawarma wrap before, the flavor is an interesting mix of savory garlic and sweet spices, topped with a tangy yogurt sauce and wrapped in soft flatbread. It’s pure magic and much easier to make at home than you think.

Overhead view of two chicken shawarma wraps on a wooden cutting board.Overhead view of two chicken shawarma wraps on a wooden cutting board.

“This recipe is in my regular rotation of BB recipes. I always chop up the chicken so it gets more marinade up the garlic in the sauce. This time I didn’t have cucumber so I subbed spinach for both that and the lettuce. So good!”

Kelsey

Easy Chicken Shawarma Wrap Recipe

Shawarma is a Middle Eastern dish traditionally made from marinated meat that’s slow-roasted on a rotating spit. Lamb is a popular choice, but for my recipe, I use chicken because it’s a more accessible and budget-friendly option. I don’t have a rotating spit at home (and I’m assuming you don’t either!), so my take on this traditional recipe involves marinating the chicken and then cooking it on a grill. So while my recipe isn’t technically authentic, it’s an easy option for home cooks to try!

I mix warming spices like cinnamon, nutmeg, and cloves with yogurt, and let the chicken marinate in it for AT LEAST 4 hours. I even use the marinade in my roasted potato wedges with shawarma sauce recipe. So good!

  1. I used 2 large chicken breasts as that’s what I had to hand, but chicken thighs will also work (and are usually cheaper!). The fattiness of the thighs will make these wraps taste a little more like the traditional rotisserie version, too. The marinade will work for about 4-6 boneless, skinless chicken thighs.
  2. If you don’t want to buy two different types of yogurt (plain yogurt for the marinade and Greek yogurt for the sauce), you can just use Greek yogurt for both and save some pennies. The reason I use both is that plain yogurt is thinner and works best in marinades, while Greek yogurt makes a creamier sauce. But if you’re trying to stick to one tub, Greek yogurt can totally do double duty.

Chicken Shawarma Recipe

A magical blend of yogurt, lemon, and Mediterranean spices makes this homemade Chicken Shawarma Wrap mouth-wateringly delicious.Step-by-step photos can be seen below the recipe card.

Overhead view of a pair of hands holding a chicken shawarma wrap.Overhead view of a pair of hands holding a chicken shawarma wrap.

CHICKEN & MARINADE

  • 1/2 cup plain yogurt ($0.76)
  • 1 Tbsp lemon juice ($0.32)
  • 1 Tbsp garlic (minced, $0.04)
  • 1/2 tsp cinnamon ($0.05)
  • 1/2 tsp dried oregano ($0.05)
  • 1/2 tsp salt ($0.02)
  • 1/4 tsp ground nutmeg ($0.02)
  • 1/4 tsp ground cloves ($0.02)
  • 2 large chicken breasts (1.25 lbs, $2.67)

YOGURT SAUCE

  • 7 oz plain greek yogurt ($1.52)
  • 1/4 tsp garlic (minced, $0.02)
  • 1/4 tsp dried dill ($0.02)
  • 1/4 tsp salt ($0.02)

SANDWICH

  • 1/2 head romaine lettuce ($0.80)
  • 1 medium cucumber ($0.74)
  • 2 medium roma tomatoes ($0.49)
  • 1/4 red onion (optional, $0.27*)
  • 4 homemade naan (pita or flatbread, $0.64**)

  • In a small bowl, combine the ingredients for the marinade (yogurt, lemon juice, garlic, cinnamon, oregano, salt, nutmeg, and clove). Add chicken to the marinade, coat well, cover and refrigerate for 4-24 hours. If desired, slice the chicken into strips before marinating to maximize the flavor.

  • Prepare the yogurt sauce for the sandwiches. Combine the plain Greek yogurt with the garlic, dill, and salt. Refrigerate until ready to use.

  • After marinating the chicken, grill until cooked through (I use an indoor tabletop grill; the total amount of time it’ll take to cook will vary from grill to grill). Don’t forget to flip your chicken over if your grill doesn’t have a lid that cooks evenly from both sides (like a George Foreman grill).***

  • After it’s grilled, let it sit for a few minutes to let the juices redistribute and then slice it into strips (if not already sliced).

  • Prepare the vegetables for the sandwich. Chop, rinse, and drain the lettuce in a colander. Wash and slice the cucumber and tomato. Slice the red onion.

  • Build the sandwiches. Spread the yogurt sauce on your flat bread, top with the chicken and vegetables. Roll the sandwich closed. You can wrap the sandwich in foil to help it stay closed as you eat.

See how we calculate recipe costs here.


*I only used 1/4 red onion split between 4 wrap sandwiches. You can use more or less according to your preferences or leave it out altogether.
**I love serving this wrap in a homemade naan. Homemade pita or flatbreads are also perfect. But you can, of course, use a store-bought option to save time! Our cottage cheese wraps will also work as a protein-packed alternative.
***Don’t worry if you don’t have a grill; this chicken comes out just as delicious when cooked in a skillet. It won’t have the char marks, but it’ll still taste amazing. Cook the chicken until browned on both sides and cooked through!
 

Serving: 1ServingCalories: 592kcalCarbohydrates: 69gProtein: 43gFat: 15gSodium: 1462mgFiber: 5g

Read our full
nutrition disclaimer here.

How to Make Chicken Shawarma Step-by-Step Photos

The ingredients to make a chicken shawarma wrap.The ingredients to make a chicken shawarma wrap.

Gather all of your ingredients.

The ingredients to make a marinade for chicken shawarma in a mixing bowl.The ingredients to make a marinade for chicken shawarma in a mixing bowl.

Make the marinade: Add 1/2 cup plain yogurt, 1 Tbsp lemon juice, 1 Tbsp minced garlic, 1/2 tsp cinnamon, 1/2 tsp dried oregano, 1/2 tsp salt, 1/4 tsp nutmeg, and 1/4 tsp ground cloves to a small bowl. Mix to combine.

The marinade for chicken shawarma being spooned over two chicken breasts in a parchment lined baking dish.The marinade for chicken shawarma being spooned over two chicken breasts in a parchment lined baking dish.

Marinate the chicken: Coat both sides of 2 large chicken breasts in the marinade. Cover the chicken and refrigerate for 4-24 hours. You can also slice the chicken into strips before marinating to allow more flavor to permeate the chicken.

The ingredients to make a herb yogurt sauce in a mixing bowl.The ingredients to make a herb yogurt sauce in a mixing bowl.

Make the yogurt sauce: While you wait for the chicken to marinate, you can make the herby yogurt sauce. Add 7 oz plain Greek yogurt, 1/4 tsp minced garlic, 1/4 tsp dried dill, and 1/4 tsp salt to a mixing bowl.

A homemade yogurt sauce for chicken shawarma wraps in a mixing bowl.A homemade yogurt sauce for chicken shawarma wraps in a mixing bowl.

Mix to combine and then store the sauce in the fridge until you’re ready to assemble your wraps.

Marinaded chicken breasts on a grill.Marinaded chicken breasts on a grill.

Cook the chicken: Once the chicken has marinated for a least 4 hours, grill until the chicken is cooked through. (I’m using the Ninja Sizzle Indoor Smokeless Grill. The total amount of time it’ll take to cook will vary from grill to grill). You can also cook it in a skillet on the stovetop.

Cooked marinaded chicken breasts on a grill.Cooked marinaded chicken breasts on a grill.

Don’t forget to flip your chicken over, unless you’re using a grill with a lid that cooks it evenly from both sides (like a George Foreman grill).

An internal thermometer checking the temperature of a grilled chicken breast.An internal thermometer checking the temperature of a grilled chicken breast.

The chicken is done once it has noticeable grill marks on the outside, the juices run clear, and is no longer pink on the inside. If you’ve got a meat thermometer handy, you’re aiming for 165°F right in the thickest part. After it’s grilled, let the chicken sit for a few minutes to let the juices redistribute and then slice it into strips (if not already sliced).

Sliced tomatoes, chopped lettuce, sliced red onion, and sliced cucumber on a wooden cutting board.Sliced tomatoes, chopped lettuce, sliced red onion, and sliced cucumber on a wooden cutting board.

Prepare the vegetables: Chop, rinse, and drain 1/2 head Romaine lettuce in a colander. Then, wash and slice 1 medium cucumber and 2 medium Roma tomatoes into rounds. Slice 1/4 red onion into thin slices.

An assembled chicken shawarma wrap.An assembled chicken shawarma wrap.

Make the wraps: Spread the yogurt sauce on your chosen bread (naan, pita, or flatbread) and top it with the chicken and salad. Roll the wrap closed. You can also wrap it in foil or parchment paper to help it stay closed as you eat.

Overhead view of a pair of hands holding a chicken shawarma wrap.Overhead view of a pair of hands holding a chicken shawarma wrap.

Serving Suggestions

I made this grilled chicken shawarma with the sole intention of making sandwich wraps, but then I started topping salads with it and eventually just snacked on the chicken plain. It’s just that good. I even divided the ingredient list in case you want to use the marinade for something else because even if you don’t want the wrap, you NEED to at least try the chicken.

If you do make the recipe as written and serve it in wraps, there are so many sides you could add! Because I’ve already got the grill on, I like to throw on some sliced zucchini, onions, or bell peppers because grilled veggies go with everything. White bean hummus is another favorite with fresh-cut vegetables, as is quinoa tabbouleh. If I want to go take-out style, I’ll make some air fryer French fries. And if you’re not in the mood for the yogurt sauce from the recipe, tzatziki is a solid swap. I like it when I want something with a little more tang and cucumber kick.

Storage Instructions

Leftover cooked shawarma chicken can be stored in an airtight container in the refrigerator for up to 3 days. To reheat, pop it back in the grill or pan until heated through. The yogurt sauce can also be stored in the refrigerator for up to 4 days. I’d store everything separately and assemble when ready to eat.

Our Chicken Shawarma Wrap recipe was originally published 6/22/11. It was retested, reworked, and republished to be better than ever 6/9/25.

Easy methods to Freeze Cinnamon Rolls (Video)

0


Freezing homemade cinnamon rolls is a helpful way to prep ahead for a special breakfast or brunch. Here I’m sharing 3 reliable methods to freeze the pan at different stages—after shaping, after par-baking, or after fully baking—so you can choose what works best for your schedule. No matter which method you use, you’ll have warm, fresh-tasting rolls with minimal effort when it’s time to serve.

Easy methods to Freeze Cinnamon Rolls (Video)

Today I’m walking you through the best ways to freeze homemade cinnamon rolls. Because nothing beats the smell (and taste!!) of freshly baked sweet rolls, especially when most of the work is already done for you. 

Whether you’re prepping for a holiday morning, brunch with family and/or friends, or just indulging in a weekend treat, having cinnamon rolls ready in the freezer means less stress and scrambling at breakfast time. My team and I have tested several methods, and today I’m sharing the 3 most reliable ways to freeze cinnamon rolls at different points in the process.

These methods work for any of my homemade sweet roll recipes including classic homemade cinnamon rolls, chocolate sweet rolls, orange rolls, and more.

orange sweet cinnamon roll with icing on white plate.

6 Min. Video: How to Freeze Cinnamon Rolls

YouTube video

These Are The 3 Methods:

  1. Method 1: Freeze after shaping, before second rise.
  2. Method 2: Par-bake the rolls then freeze.
  3. Method 3: Freeze fully baked rolls.

Whichever method you use, the maximum time to freeze cinnamon rolls is 3 months. Any longer than that, and you may begin to taste a difference. Additionally, make the icing fresh. You can absolutely taste the difference between fresh and frozen icing.

Before I walk you through the steps, let’s talk about the supplies you need.


Method 1: Freeze After Shaping (Before 2nd Rise)

This is my preferred method because the rolls rise right before baking, which will always give you the softest, fluffiest rolls. If time allows, choose this method.

  1. Prepare the dough, let it rise, and shape the rolls per your recipe.
  2. Instead of letting the shaped rolls rise, cover tightly with plastic wrap.
  3. Label a piece of aluminum foil with the date (I usually put the use-by date 3 months from now), and some brief baking instructions for yourself.
  4. Freeze for up to 3 months.
  5. After freezing, thaw in fridge overnight, rise at room temp for 1.5–2 hours. Bake at 350°F until cooked through, around 25–30 minutes depending on your recipe.

This method produces the best results because the rolls rise right before baking.

hands covering pan of cinnamon rolls with aluminum foil.

Method 2: Par-Baking the Cinnamon Rolls Before Freezing

The second method requires you to par-bake the cinnamon rolls before freezing. This method saves you time on baking day since the rises are already done.

  1. Shape the rolls per your recipe, let them rise per your recipe, and then bake for just 10 minutes. They should look set on top, but not browned yet. (See image next.)
  2. Cool completely, and then cover with a layer of plastic wrap.
  3. Label a piece of foil with the date or use-by date 3 months from now, and some brief instructions for yourself.
  4. Freeze for up to 3 months.
  5. After freezing, thaw in the refrigerator overnight. Let rise/come to room temperature for around 30 minutes, then finish baking at 350°F cooked through, around 15-20 minutes depending on your recipe.

This is what par-baked cinnamon rolls looks like:

par-baked cinnamon rolls.par-baked cinnamon rolls.

How Do I Know When Cinnamon Rolls Are Done?

Tip: Since these freezing methods work for a variety of cinnamon roll and sweet roll recipes, your baking instructions may be different. I find that baking previously frozen cinnamon rolls, no matter which method you freeze them, a 350°F oven is ideal. To determine doneness, use an instant-read thermometer. Rolls are done when the center of the pan reads as 195°F (90°C).

Method 3: Fully Bake, Then Freeze the Cinnamon Rolls

This method requires the most time upfront, but is the quickest when it’s time to serve.

  1. Fully prepare and bake cinnamon rolls as instructed in your recipe. However your recipe says to prepare, shape, and bake the cinnamon rolls, follow it.
  2. Cool completely, then cover with a layer of plastic wrap.
  3. Label a piece of foil with the date or use-by date 3 months from now, and some brief instructions for yourself.
  4. Freeze for up to 3 months.
  5. After freezing, thaw in the refrigerator overnight. Let rise/come to room temperature for around 30 minutes, then loosely re-cover with a fresh layer of foil, and bake at 350°F until warmed through, about 20 minutes.
baked cinnamon rolls without icing.baked cinnamon rolls without icing.

No Matter Which Method You Choose…

My most important tip is to make the icing fresh the day you plan to serve them. It tastes SO much better fresh than frozen/thawed.

Now that you have 3 tried-and-true methods to freeze cinnamon rolls, you can plan ahead with confidence and enjoy fresh, warm cinnamon rolls!

Cinnamon Roll Recipes To Use


Print

clock icon cutlery icon flag icon folder icon instagram icon pinterest icon facebook icon print icon squares icon heart icon heart solid icon


Description

Choose between the 3 methods below, depending on what your schedule allows. Method 1 requires the least amount of time up front and the rolls have a rise after thawing. Method 2 requires par-baking the rolls, so there is more time upfront and less after freezing. Method 3 requires the most amount of time upfront, but the least after freezing. Follow your cinnamon roll recipe for preparation and initial rises, but use the freezing instructions below.


  1. Method 1: This is my preferred method because the rolls rise right before baking, which will always give you the softest, fluffiest rolls. If time allows, choose this method. Prepare the dough per your recipe, let it rise, and shape the rolls as your recipe instructs. Place them in a freezer-safe dish. Instead of letting the shaped rolls rise, cover tightly with plastic wrap. Label a piece of aluminum foil with the date (I usually put the use-by date 3 months from now), and some brief baking instructions for yourself. Freeze for up to 3 months. After freezing, thaw in the refrigerator overnight, rise at room temp for 1.5–2 hours. Bake at 350°F until cooked through, around 25–30 minutes depending on your recipe.
  2. Method 2: The second method requires you to par-bake the cinnamon rolls before freezing. This method saves you time on baking day since the rises are already done. Shape the rolls per your recipe, place them in a freezer-safe dish, let them rise per your recipe, and then bake for just 10 minutes. They should look set on top, but not browned yet. Cool completely, and then cover with a layer of plastic wrap. Label a piece of foil with the date or use-by date 3 months from now, and some brief instructions for yourself. Freeze for up to 3 months. After freezing, thaw in the refrigerator overnight. Let rise/come to room temperature for around 30 minutes, then finish baking at 350°F cooked through, around 15-20 minutes depending on your recipe.
  3. Method 3: This method requires the most time upfront, but is the quickest when it’s time to serve. Fully prepare and bake cinnamon rolls as instructed in your recipe, using a freezer-safe baking dish. However your recipe says to prepare, shape, and bake the cinnamon rolls, follow it. Cool completely, then cover with a layer of plastic wrap. Label a piece of foil with the date or use-by date 3 months from now, and some brief instructions for yourself. Freeze for up to 3 months. After freezing, thaw in the refrigerator overnight. Let rise/come to room temperature for around 30 minutes, then loosely re-cover with a fresh layer of foil, and bake at 350°F until warmed through, about 20 minutes.
  4. Whichever method you choose, make the icing/topping fresh. You can absolutely taste the difference between fresh and frozen icing.

YouTube video

Notes

  1. Whichever method you use, the maximum time to freeze cinnamon rolls is 3 months. Any longer than that, and you may begin to taste a difference. The minimum time to freeze is a few days.

Marinated Artichoke, Roasted Pink Pepper & White Bean Salad

0


Quick Summary

This Mediterranean-inspired white bean salad features marinated artichoke hearts, roasted red peppers, olives, and fresh herbs, all tossed in a zesty homemade dressing. It’s a no-cook, vegetarian-friendly recipe that’s perfect for easy lunches, meal prep, or a quick side dish. Ready in minutes and packed with bold flavor!

Marinated Artichoke, Roasted Red Pepper & White Bean Salad in bowl. Marinated Artichoke, Roasted Pink Pepper & White Bean Salad

Pin this now to find it later

Pin It

Marinated Artichoke, Roasted Red Pepper & White Bean Salad (Easy Pantry Salad)

I don’t want to be dramatic, but you HAVE to make this Marinated Artichoke, Roasted Red Pepper & White Bean Salad. It is one of the BEST salads I’ve ever made and I make A LOT of salads. I’ve been eating it every single day and it doesn’t get old. It’s everything I want in a meal right now: quick to prep, full of bold flavors, and completely satisfying.

What makes this salad so lovable is how effortlessly it comes together using mostly pantry staples—no cooking required. I actually call it my “Pantry Salad.”

This salad has it all: tangy marinated artichokes, sweet roasted red peppers, creamy white beans, briny olives, and thinly sliced red onion, all tied together with a zippy Italian-style vinaigrette and a sprinkle of fresh herbs.

It holds up beautifully in the fridge, which makes it a perfect option for meal prep. Best of all, it tastes even better after a little time to marinate, making it a low-effort, high-reward kind of dish.

This salad is delicious straight from the bowl, but it’s also great served over greens, piled onto crusty bread with a smear of ricotta or burrata, or tossed with warm pasta. However you serve it, it’s simple, flavorful, and super satisfying.

Key Ingredients

ingredients in bowls to make Marinated Artichoke, Roasted Red Pepper & White Bean Salad. ingredients in bowls to make Marinated Artichoke, Roasted Red Pepper & White Bean Salad.
  • Marinated Artichoke Hearts: Use marinated artichoke hearts for more flavor. Drain and chop them up a bit so they mix in nicely.
  • Roasted Red Peppers: Jarred peppers work great—just drain well and chop them up!
  • White Beans: I use cannellini beans, but Great Northern or Navy Beans work well too!
  • Red Onion: Thinly sliced for sharpness and crunch.
  • Kalamata Olives: Pitted makes life easier! You can also use Castelvetrano olives. And if you aren’t an olive fan, feel free to leave them out!
  • Fresh Herbs (Basil & Parsley): Fresh herbs really brighten up the salad.
  • Simple Italian Dressing: Olive oil, red wine vinegar, Dijon, garlic, a little Parmesan cheese, Italian seasoning, salt, and crushed red pepper. Whisk away!

Tips for the Best Pantry Salad

  • Use good olive oil: Since the dressing is simple, a good-quality olive oil makes a big difference.
  • Rinse your beans well: This removes the starchy liquid and gives the salad a cleaner, fresher flavor.
  • Let it marinate: The flavors get even better after sitting for 30 minutes. Perfect for making ahead!
  • Chop for scoopability: Cut everything into bite-sized pieces so it’s easy to eat with pita chips or pile onto toast.

Marinated Artichoke, Roasted Red Pepper, & White Bean Salad

A fresh, no-cook Mediterranean salad with marinated artichokes, white beans, roasted red peppers, olives, and herbs—all tossed in a zesty Italian dressing.

For the salad:

  • 15.5 oz can cannellini beans, rinsed and drained
  • 12 oz can marinated artichoke hearts, drained and chopped
  • 12 oz jar roasted red peppers, drained and chopped
  • 1/2 cup thinly sliced red onion
  • 1/4 chopped kalamata olives
  • 1/3 cup chopped basil
  • 1/4 cup chopped parsley

For the dressing:

  • 1/4 cup olive oil
  • 2 tablespoons red wine vinegar
  • 1 teaspoon Dijon mustard
  • 1 clove garlic, minced
  • 1 tablespoon freshly grated Parmesan cheese
  • 1/2 teaspoon kosher salt
  • 1/4 teaspoon Italian seasoning
  • 1/4 teaspoon crushed red pepper flakes
  • In a medium bowl, combine the beans, artichoke hearts, red peppers, red onion, olives, basil, and parsley.

  • In a small bowl, whisk together the olive oil, red wine vinegar, Dijon mustard, garlic, Parmesan cheese, salt, Italian seasoning, and crushed red pepper flakes.

  • Pour the dressing over the salad and stir until combined. Serve or let sit for 30 minutes so flavors can meld.

  • Serving suggestions: Enjoy with crusty bread, pita chips, or put on top of ricotta toast or avocado toast, or spoon over a bed of greens or pasta.

How to Store: Fridge: Store in an airtight container for up to 4 days. Make-ahead: Flavors deepen over time, making it even better the next day. Pro tip: Add fresh herbs just before serving if making ahead for max freshness.

Calories: 249kcal, Carbohydrates: 22g, Protein: 7g, Fat: 15g, Saturated Fat: 2g, Polyunsaturated Fat: 1g, Monounsaturated Fat: 7g, Cholesterol: 1mg, Sodium: 989mg, Potassium: 462mg, Fiber: 6g, Sugar: 1g, Vitamin A: 1178IU, Vitamin C: 43mg, Calcium: 108mg, Iron: 3mg

Keywords artichoke, beans, roasted red pepper

Have you tried this recipe?

Leave a comment below and share a photo on Instagram. Tag @twopeasandpod and hashtag it with #twopeasandtheirpod

Variations & Substitutions

  • Go spicy: Add chopped pepperoncini or a dash of hot sauce.
  • Add cheese: Stir in a little feta or shaved Parmesan for a salty, creamy contrast.
  • Swap beans: Try chickpeas or large butter beans for a different twist.
  • Add greens: Toss in baby spinach or arugula for extra color and nutrients.
  • Add protein: Add a soft-boiled egg, grilled chicken, chopped salami, or canned tuna to make it more filling.
marinated artichoke, roasted red pepper, and white bean salad on ricotta toast with fresh basil. marinated artichoke, roasted red pepper, and white bean salad on ricotta toast with fresh basil.

More Flavorful Salad Recipes


Caprese Pasta Salad. – Half Baked Harvest

0

This post may contain affiliate links, please see our privacy policy for details.

The basic (but Not So Basic) Caprese Pasta Salad. It’s fresh, flavorful, and just a little bit different—in the best way. A mix of roasted and raw cherry tomatoes, pasta, marinated mozzarella, creamy avocado, and a sweet peachy balsamic dressing. It comes together fast, with minimal effort, and always hits the spot. Serve it for dinner, pack it for lunch, or bring it to your next summer gathering. Add grilled chicken or steak if you want, but honestly? It’s perfect just as is.

Caprese Pasta Salad. – Half Baked Harvest

As we ease into summer mode, I’m feeling that familiar spark of inspiration. New seasons always bring fresh ideas, but there’s something especially energizing about summer. It’s my favorite (along with fall, of course)—I always feel my happiest this time of year, with the sun out, produce peaking, and so many delicious things to cook.

This season, I’ve been leaning into the idea of elevated basics. Recipes that feel simple and doable, but still have something special. That’s exactly what this pasta salad is—familiar and easy, but with my own little twist to make it just a bit more fun.

Because the truth is, “basic” doesn’t mean boring. It means you can make it on a busy weeknight or bring it to a party. It looks beautiful (we eat with our eyes first, always!), it’s full of flavor, and most importantly—it’s just really, really good.

This Caprese Pasta Salad checks all the boxes: fresh, colorful, quick, and beyond delicious. A summer staple, for sure!

Caprese Pasta Salad | halfbakedharvest.comCaprese Pasta Salad | halfbakedharvest.com

These are the details

Ingredients – for the salad

  • olive oil
  • salted butter
  • cherry tomatoes
  • shallots
  • salt, black pepper, chili flakes
  • short-cut pasta
  • mozzarella balls
  • fresh basil
  • avocado

Ingredients – for the dressing

  • olive oil
  • peach balsamic or balsamic vinegar
  • honey
  • shallots
  • garlic
  • fresh basil

Tools 

For this recipe, you’ll need a baking dish, a large pot, a salad bowl, and all the usuals: a cutting board, a knife, and a spatula!

Caprese Pasta Salad | halfbakedharvest.comCaprese Pasta Salad | halfbakedharvest.com

Steps

Step 1: Roast the Tomatoes

Start with the tomatoes. I like to roast half of the cherry tomatoes with a thinly sliced shallot, a drizzle of olive oil, a pat of salted butter, and a pinch of salt, pepper, and chili flakes. Roast until the tomatoes burst and become jammy and sweet—their flavor gets super concentrated and delicious.

This usually takes about 20 minutes in the oven.

Caprese Pasta Salad | halfbakedharvest.comCaprese Pasta Salad | halfbakedharvest.com

Step 2: Make the Dressing

Once the tomatoes have roasted and burst, pour all those flavorful pan juices into a glass jar or bowl. These roasted juices are the base of the dressing and add so much depth.

To the juices, whisk in a bit more olive oil, balsamic vinegar, lemon juice, honey, finely chopped shallots, and garlic. Season with salt and pepper to taste. It’s sweet, tangy, and just a little garlicky—so good.

Caprese Pasta Salad | halfbakedharvest.comCaprese Pasta Salad | halfbakedharvest.com

Step 3: Boil the Pasta

Bring a large pot of salted water to a boil and cook your pasta. I like using a short-cut pasta with some ridges—it catches all that dressing beautifully.

Once cooked, drain the pasta and let it steam off for a minute or two.

Caprese Pasta Salad | halfbakedharvest.comCaprese Pasta Salad | halfbakedharvest.com

Step 4: Toss the Salad

Add the hot pasta to a large salad bowl and toss it with half of the dressing to soak in all that flavor.

Then mix in the roasted tomatoes, the remaining fresh cherry tomatoes, marinated mozzarella balls, more shallots, lots of fresh basil, and of course—avocado. Don’t skip the avocado! It makes it extra creamy and summery.

Caprese Pasta Salad | halfbakedharvest.comCaprese Pasta Salad | halfbakedharvest.com

Some Ideas

This is one of those recipes that’s perfect for prepping ahead—whether for summer parties, weekday lunches, or just to have something delicious ready to go in the fridge. The pasta holds up really well and actually gets more flavorful as it sits. Just wait to add the avocado until the day of, so it stays fresh and doesn’t brown.

As I mentioned above, if you want to bulk it up with some protein, rotisserie chicken or sliced steak are both great options.

What I love most about this recipe is how it uses the best of what summer has to offer—sweet cherry tomatoes, fresh basil, and lots of vibrant flavor. If you’ve got a garden full of tomatoes or just picked up a few too many at the market, this is such a great way to use them.

I hope you love this pasta salad as much as I do!

Caprese Pasta Salad | halfbakedharvest.comCaprese Pasta Salad | halfbakedharvest.com

Looking for other great pasta salad recipes? Here are some favorites:

Pesto Chicken, Corn, and Avocado Bacon Pasta Salad

Avocado Caprese Pasta with Grilled Broccoli Rabe

Corn, Tomato, and Avocado Pasta Salad

Grilled Lemon Herb Chicken Avocado Orzo Salad with Honey Mustard Bacon Dressing

Lastly, if you make this basic (but not so basic) caprese pasta salad, be sure to leave a comment and/or give this recipe a rating! Above all, I love to hear from you guys and always do my best to respond to each and every comment. And of course, if you do make this recipe, don’t forget to tag me on Instagram! Looking through the photos of recipes you all have made is my favorite!

Caprese Pasta Salad

Prep Time 20 minutes

Cook Time 20 minutes

Total Time 40 minutes

Servings: 8

Calories Per Serving: 562 kcal

Nutritional information is only an estimate. The accuracy of the nutritional information for any recipe on this site is not guaranteed.

  • 1. Preheat the oven to 425°F.2. Toss the oil, butter, 3 cups tomatoes, and the shallots in a baking dish. Drizzle with 1/4 cup olive oil. Season with salt, pepper, and chili flakes. Bake for 20 minutes, until the tomatoes burst.3. Meanwhile, bring a large pot of salted water to a boil. Boil the pasta to al dente, according to package directions. Drain. 4. To make the dressing. Add any juices from the roasted tomatoes to a bowl/glass jar. To that, add all the dressing ingredients. Season with salt, pepper, and chili flakes.5. Add the pasta to a salad bowl and toss with half the dressing. Add the roasted tomatoes, remaining fresh tomatoes, mozzarella, basil, and avocado. Pour over the remaining dressing and toss well to combine. Serve warm or cold. The salad will develop more flavor as it sits.

Cannoli Dip Recipe – Simply 5 Elements, And So Creamy!

0


This creamy cannoli dip gives you all the flavor and texture of a classic Italian cannoli pastry. Whip up the fancy dessert dip for your next party, and watch it disappear!

Cannoli Filling Dip With Waffle Cones And Strawberries

The best chocolate chip cannoli dip

I count myself lucky to come from a large extended Italian family, where gatherings always include an abundance of authentic dishes.

Think lasagna, cacciatore, focaccia, antipasti, pignoli cookies, and my favorite ricotta filled homemade cannoli.

As a child, I loved to eat the cannoli filling first before the shell. Everyone knows the filling is the best part.

This quick no bake cannoli dip is easy to make and whips up in under a minute. Plus it is a huge crowd pleaser.

If you like the packaged cannoli dip from Trader Joe’s, you will love my 5 ingredient homemade version even more.

Just don’t expect any leftovers!

Also try this popular Protein Cookie Dough Dip

Cannoli dip recipe video

Ricotta Cannoli Dip IngredientsRicotta Cannoli Dip Ingredients

Key ingredients

You will need cream cheese, ricotta cheese, powdered sugar, pure vanilla extract, and mini chocolate chips.

Cream cheese – Use any full fat Philadelphia style cream cheese, or choose plant based cream cheese for a vegan cannoli dip. Low fat or fat free cream cheese may also work, but I have not tried these.

Ricotta – To mimic the texture of traditional cannoli filling, use whole milk ricotta cheese or a dairy free alternative. Mascarpone may be substituted in an equal amount.

Powdered sugar – Regular powdered sugar, or confectioners’ sugar, works. Or process coconut sugar in a blender to make unrefined powdered sugar. For a keto cannoli dip, use powdered erythritol or a monk fruit blend.

Vanilla – For the best flavor, look for pure vanilla extract. Do not omit this ingredient or substitute artificial vanilla flavoring, because the taste will not be the same.

Chocolate chips – I like semi sweet mini chocolate chips. Go with dark chocolate, milk chocolate, white chocolate, or even butterscotch chips of any size if you prefer.

Leftover cream cheese? Make Sopapilla Cheesecake Bars

Cannoli Dessert Dip For PartiesCannoli Dessert Dip For Parties

Step by step instructions

  1. Let the cream cheese come to room temperature so it will be easier to blend. This step is important to achieve a smooth texture.
  2. Gather all of your ingredients, as well as a stand mixer, food processor, or hand beaters and a medium serving bowl.
  3. Blend the cream cheese, ricotta cheese, powdered sugar, and pure vanilla extract until thick and smooth.
  4. Turn off the beaters, and stir in the chocolate chips by hand.
  5. Transfer the whipped cannoli cream to your serving bowl. Or if making the recipe ahead of time, scoop it into a container and store overnight in the refrigerator.
  6. When ready to enjoy, dust with powdered sugar and a sprinkle of chocolate chips or roasted pistachios.
  7. Refrigerate leftovers for up to a week. Frozen dip will yield an icy texture once thawed, so I do not recommend freezing the recipe.
Chocolate Chip Cannoli DipChocolate Chip Cannoli Dip

Cannoli dessert dip flavors

Snickerdoodle: Whip up to two teaspoons of ground cinnamon in with the other ingredients, and omit the chocolate chips.

Dark chocolate: Add one third cup of cocoa powder, increase the powdered sugar to two cups, and increase the vanilla extract to one tablespoon.

Pumpkin pie: Add one teaspoon each of pumpkin pie spice and cinnamon. Replace two ounces of the ricotta with canned pumpkin puree.

Strawberry shortcake: Buy strawberry flavored cream cheese. Serve with sliced strawberries and shortbread or pound cake cut into small squares.

Peanut butter cup: Whip in a fourth cup of softened peanut butter until smooth. Or try almond butter, cashew butter, or Homemade Nutella.

Tiramisu: Throw in a half teaspoon of instant coffee powder before blending. Garnish with a dusting of cocoa powder, and arrange on a platter with ladyfingers for dipping.

Chocolate Covered Katie Italian Cannoli DessertChocolate Covered Katie Italian Cannoli Dessert

How do you serve cannoli dip?

Serve on a tray with graham crackers, Oreo cookies, or ginger snaps.

Or create a cannoli charcuterie board with pizzelle or broken up waffle cones, fresh berries, apple slices, bananas, and other fruit.

Add it as frosting in between layers of Chocolate Almond Flour Cake.

The recipe is also fantastic as a healthy, low calorie spread over quick breads instead of butter or cream cheese.

Try it on top of this Strawberry Bread or my Chocolate Banana Bread.

Easy Creamy Cannoli Dessert Dip (Trader Joe's Copycat Recipe)Easy Creamy Cannoli Dessert Dip (Trader Joe's Copycat Recipe)
  • 8 oz cream cheese or plant based alternative
  • 16 oz ricotta cheese or vegan ricotta
  • 1 1/2 cups powdered sugar or erythritol
  • 2 tsp pure vanilla extract
  • 1/2 cup mini chocolate chips or more as desired
  • To prepare the no bake cannoli dip, let cream cheese come to room temperature. Use a stand mixer, food processor, or hand beaters to blend all ingredients except chocolate chips until smooth. Stir in the chocolate chips by hand, then transfer the recipe to a serving bowl. Garnish with powdered sugar and serve with fresh strawberries and pizzelle if desired. Refrigerate leftovers in a covered container for up to a week.View Nutrition Facts

More Easy Dessert Dips

Whipped Oreo FluffWhipped Oreo Fluff

Whipped Oreo Fluff

Chocolate Dessert Dip RecipeChocolate Dessert Dip Recipe

Brownie Batter Dip

chickpea cookie dough recipechickpea cookie dough recipe

Chickpea Cookie Dough Dip

Pumpkin Pie Dip For A PartyPumpkin Pie Dip For A Party

Pumpkin Dip

Banana Pudding DipBanana Pudding Dip

Banana Pudding Dip

Rainbow Unicorn DipRainbow Unicorn Dip

Rainbow Unicorn Dip

Peanut Butter DipPeanut Butter Dip

Peanut Butter Dip

Keto Chocolate Chip Cookie Dough DipKeto Chocolate Chip Cookie Dough Dip

Keto Cookie Dough Dip

Chocolate Blueberry Protein Fluff BowlChocolate Blueberry Protein Fluff Bowl

Protein Fluff

Sourdough Discard Banana Bread – Skinnytaste

0


This post may contain affiliate links. Read my disclosure policy.

This sourdough discard banana bread is my go-to whenever I have extra discard in the fridge and ripe bananas on the counter.

Sourdough Discard Banana Bread

Sourdough Banana Bread

Any time I have ripe bananas on the counter, I make banana bread. It’s one of those feel-good bakes I come back to again and again. My daughter Madison loves it, and I love having something ready for her to pack in her lunchbox or enjoy as a quick snack after school. Since I bake sourdough bread every week and am always looking for ways to use up my discard, I adapted my go-to banana bread recipe with a sourdough twist.

The Best Way to Use Up Ripe Bananas and Sourdough Discard

Gina @ Skinnytaste.com

If you bake sourdough at home, you probably know the feeling: that container of discard in the fridge that’s too good to waste. I’ve been experimenting with more ways to use it, and this banana bread turned out better than I hoped!

  • Moisture + Tang: It adds a subtle tang while also keeping the crumb soft and tender.
  • Less Waste: It puts that extra sourdough starter to good use—no tossing required.
  • Use Up Ripe Bananas: A delicious solution for those overripe bananas sitting on your counter.
  • Dietary Restrictions: Weight Watchers-friendly, vegetarian; dairy-free (if substituting the butter)

Another sourdough discard recipe you might like is these sourdough waffles.

Gina signature

Ingredients You’ll Need and Helpful Tips

Here’s what you need to make this healthy sourdough discard banana bread. See the recipe card below for the exact measurements.

Ingredients for sourdough banana bread

  • Bananas become sweeter as they ripen, so be sure to use ones with lots of brown spots.
  • Sourdough Discard is the portion of the starter that’s removed when feeding your sourdough starter. It provides a subtle tangy flavor, adds moisture, and tenderizes the batter.
  • Unbleached All-Purpose Flour gives it a tender crumb, but I gave instructions for using some whole wheat flour below for extra fiber.
  • Baking Soda and Baking Powder: I found using both leavening agents helped get the best rise.
  • Salt balances the sweetness and improves the texture.
  • Butter: This is pretty low-fat, I use just a couple of tablespoons, which keeps it moist. Make sure it’s at room temperature before beating it with the sugar.
  • Light Brown Sugar adds sweetness, but you can also use brown monk fruit sweetener. It’s one of my favorite baking tricks to decrease carbs and added sugar.
  • Eggs: Adding an egg white with a whole egg was the trick to getting the bread to rise better.
  • Vanilla Extract for flavor

Testing Tips from My Kitchen

I tested this sourdough discard banana bread recipe at least four times to perfect it. At first, the loaf didn’t rise well—it was a little too flat and moist. The sourdough discard added extra liquid, so I had to tweak the flour ratio and reduce some of the moisture. I also found that adding baking powder (in addition to baking soda) helped give it the lift it needed. A little egg white added just the right amount of structure.

Now, it’s everything I want in banana bread: moist, tender, just sweet enough, and with a subtle tang from the sourdough discard that deepens the flavor in the best way. If you’ve got ripe bananas and sourdough discard to use up, this recipe is a win- win.

How to Make Sourdough Discard Banana Bread

Making sourdough discard banana bread is just as easy as making a regular loaf. Mix the wet and dry ingredients, then bake! See the recipe card at the bottom for printable directions.

  1. Mash the bananas and mix them with the sourdough discard.
  2. Whisk the dry ingredients in a separate bowl before adding them to the wet to ensure everything’s evenly mixed.
  3. Combine the Wet Ingredients: Beat the brown sugar and butter with a hand or stand mixer until light and fluffy. Stir in the egg, egg white, and vanilla, followed by the banana mixture.
  4. Fold the dry ingredients into the wet until they’re just combined.
  5. Bake Banana Bread: Pour the batter into a parchment-lined loaf pan and bake at 350°F for 40 to 45 minutes. When a toothpick inserted into the center comes out clean or with just a few crumbs, it’s ready.

Variations

This moist sourdough discard banana bread is super versatile. Here are a few ways to make it your own:

  • Add chocolate chips: Fold in 1/3 cup of mini or regular chocolate chips. It’s my daughter’s favorite way to eat it! 
  • Swirl chocolate on top: Melt 1/3 cup chocolate and pour it over the batter, use a toothpick to swirl it in.
  • Make it nutty: Stir in chopped walnuts or pecans (about ⅓ to ½ cup) for crunch and healthy fats.
  • Spice it up: Warm up the bread with a teaspoon of ground cinnamon or a pinch of nutmeg.
  • Dairy-free: Use a plant-based butter alternative or coconut oil (melted and cooled) in place of the butter.
  • Try whole wheat flour: Replace up to half the all-purpose flour with white whole wheat for a heartier loaf. (If you substitute all of it, the bread will be too tough.)
  • Make muffins: Divide the batter between 12 muffin cups and bake at 350°F for 18–22 minutes, or until a toothpick comes out clean.
banana bread
Skinnytaste Simple promo banner

Prep: 15 minutes

Cook: 45 minutes

cooling time: 15 minutes

Total: 1 hour 15 minutes

Yield: 13 servings

Serving Size: 1 slice

  • Preheat oven to 350°F. Spray a metal loaf pan with baking spray and line it with parchment paper, leaving some overhang on the long sides for easy removal.

  • Mash the bananas in a medium bowl until mostly smooth with some chunks. Stir in the sourdough discard.

  • In a separate bowl, whisk together the flour, baking soda, baking powder, and salt.

  • In a large bowl, beat the butter and brown sugar until light and fluffy, about 1–2 minutes. Add the egg, egg white, and vanilla; mix until smooth. Stir in the banana mixture.

  • Gradually fold in the dry ingredients with a spatula until just combined—do not overmix.

  • Pour the batter into the prepared loaf pan and smooth the top. Bake for 40 to 45 minutes, or until a toothpick inserted in the center comes out clean or with a few moist crumbs.

  • Lift the loaf out using the parchment overhang and transfer to a wire rack to cool completely.

Last Step:

Please leave a rating and comment letting us know how you liked this recipe! This helps our business to thrive and continue providing free, high-quality recipes for you.

  • For a higher rise, don’t skip the baking powder or the extra egg white.
  • Use ripe bananas for best flavor and sweetness.

Storage

  • Room Temp: Store covered at room temperature for up to 3 days.
  • Fridge: For longer storage, refrigerate for up to 1 week.
  • Freeze: You can also freeze individual slices! Wrap each slice in parchment or plastic wrap and store in a freezer-safe bag for up to 3 months.

Serving: 1 slice, Calories: 110 kcal, Carbohydrates: 20.5 g, Protein: 2.5 g, Fat: 2 g, Saturated Fat: 1.5 g, Cholesterol: 19 mg, Sodium: 149 mg, Fiber: 1 g, Sugar: 8.5 g

Storage Tips

This banana bread keeps beautifully! Just make sure to let it cool to room temperature before wrapping it up.

  • Room Temp: Store covered at room temperature for up to 3 days.
  • Fridge: For longer storage, refrigerate for up to 1 week. Just bring it to room temp or warm it slightly in the microwave before serving.
  • Freeze: You can also freeze individual slices! Wrap each slice in parchment or plastic wrap and store in a freezer-safe bag for up to 3 months. Great for quick grab-and-go school snacks.

FAQ

Sourdough Banana Bread

More Banana Bread Recipes You’ll Love

For more breakfast and brunch ideas, check out my Baked Breads and Cakes collection, plus these five delicious banana bread recipes, for more inspiration!

If you make this healthy sourdough discard banana bread recipe, I would love to see it. Tag me in your photos or videos on Instagram, TikTok, or Facebook! And be sure to join the Skinnytaste Community to see what everyone’s cooking!


Bruschetta Rigatoni alla Vodka – Funds Bytes

0


If you love bruschetta and vodka sauce, you NEED to make this Bruschetta Rigatoni alla Vodka recipe. It’s a comforting, restaurant-quality dinner recipe that feels both fancy and unfussy. Creamy tomato vodka sauce swirls together with fresh tomatoes, ground chicken, garbanzo beans, spinach, and tender rigatoni to make a budget-friendly meal that comes together in one pan. I made mine using ingredients straight from my Hungryroot box (the tomato-basil-garlic ground chicken is unreal), and it’s perfect for busy weeknights or stocking the fridge for easy lunches all week long.

Overhead view of a bowl of Bruschetta Rigatoni all Vodka.Overhead view of a bowl of Bruschetta Rigatoni all Vodka.
This post is in partnership with Hungryroot. As always, thank you for supporting the brands we love.

Easy Recipe for Bruschetta Rigatoni alla Vodka

I love a good pasta and vodka sauce recipe, so as soon as I saw this one from Hungryroot, I knew I had to give it a go (and give it a Budget Bytes twist, of course). To keep things easy, I turned it into a one-pot meal by cooking the pasta right in the sauce with a bit of added water. I also leaned on shelf-stable, pantry-friendly ingredients like garbanzo beans from my Hungryroot box, which helped stretch this dish further while keeping costs down.

But what I like most about my Hungryroot subscription is how it actually makes it super easy to cook wholesome meals without the stress. They send full-sized groceries (plus snacks and breakfast options), and the more I add to my order, the more I save (how many grocery stores can say the same?!) It all started with a quick quiz, and then Hungryroot suggested personalized recommendations based on me and my family. Over time, it’s learned more about what I like and what I actually use, so I waste less, save more, and have way fewer “what’s for dinner?” moments. Yay!

PS: If you want to give Hungryroot a try, we have a great discount for you! Click this link to get 40% off your first box PLUS a free gift. Thanks Hungryroot!


Bruschetta Rigatoni alla Vodka

This one-pan Bruschetta Rigatoni alla Vodka combines veggies, ground chicken, a creamy vodka sauce, and rigatoni. A restaurant quality meal on a budget!Step-by-step photos can be seen below the recipe card.

Overhead view of a bowl of Bruschetta Rigatoni all Vodka.Overhead view of a bowl of Bruschetta Rigatoni all Vodka.

  • 1 Tbsp vegetable oil
  • 16 oz ground tomato, basil, and garlic chicken
  • 2 beefsteak tomatoes, chopped
  • 1 onion, small dice
  • 2 ½ cups vodka sauce
  • 16 oz uncooked rigatoni pasta
  • 1.5-2 cups water
  • 10 oz fresh spinach
  • 13.4 oz organic garbanzo beans, drained and rinsed
  • ¼ tsp salt
  • ¼ tsp freshly cracked black pepper
  • ¼ tsp red pepper flakes

  • Gather and prepare all ingredients.

  • Heat the oil in a medium sauté pan over medium heat. Add the ground chicken, break it into small pieces, and sauté for 4-5 minutes, until cooked. Then, remove the chicken from the pan and set aside.

  • Add the diced tomatoes and onion and cook for 5 minutes, gently scraping the bottom of the pan.

  • Add the vodka sauce, uncooked pasta, and 1.5 cups of water to the pan. Bring to a simmer and cover. Simmer for 10 minutes, stirring periodically.

  • Add the chicken, spinach, garbanzo beans, salt, pepper, and red pepper flakes. Continue to cook for 8-10 minutes while covered, stirring occasionally, until the pasta is done. If the pasta is not fully cooked, add the last ½ cup of water and continue cooking until the pasta is done.

See how we calculate recipe costs here.


Serving: 1servingCalories: 488kcalCarbohydrates: 66gProtein: 24gFat: 15gSodium: 628mgFiber: 9g

Read our full
nutrition disclaimer here.

how to make Bruschetta Rigatoni alla Vodka step-by-step photos

The ingredients to make Bruschetta Rigatoni all Vodka.The ingredients to make Bruschetta Rigatoni all Vodka.

Gather all of your ingredients.

Seasoned ground chicken in a pot.Seasoned ground chicken in a pot.

Cook the ground chicken: Set a medium sauté pan over medium heat. Add 1 Tbsp vegetable oil, and once heated, add 16 oz ground tomato, basil, and garlic chicken to the pan. Break it into small pieces and sauté in the hot oil for 4-5 minutes until cooked through. Remove the chicken from the pan and set it aside for now.

Diced onion and diced tomatoes in a pot.Diced onion and diced tomatoes in a pot.

Sauté the veggies: Add 2 diced beefsteak tomatoes and 1 diced onion to the same pan you cooked the chicken in. Cook for 5 minutes while gently scraping the bottom of the pan to pick up any stuck-on-ground chicken (which will add even more flavor!).

Vodka sauce and dried pasta added to sauteed onions and tomatoes in a pot.Vodka sauce and dried pasta added to sauteed onions and tomatoes in a pot.

Add the pasta and sauce: Once you’ve sauteed the tomatoes and onion for 1 minute, add 2.5 cups vodka sauce, 16 oz uncooked rigatoni pasta, and 1.5 cups of water. Bring the pot to a simmer and cover with a lid. Let the pasta and sauce simmer for 10 minutes, stirring periodically.

Browned ground chicken, chickpeas, and spinach added to sauteed veggies and vodka sauce in a pot.Browned ground chicken, chickpeas, and spinach added to sauteed veggies and vodka sauce in a pot.

Add the remaining ingredients: Now, return the cooked ground chicken to the skillet along with 10 oz fresh spinach, 13.4 oz organic garbanzo beans, ¼ tsp salt, ¼ tsp freshly cracked black pepper, and ¼ tsp red pepper flakes. Cook while covered for a further 8-10 minutes until the pasta is done. Be sure to stir the pasta occasionally. If you find that your pasta isn’t fully cooked at this point, add the last ½ cup of water and keep cooking until the pasta is finished.

Finished chicken Bruschetta Rigatoni all Vodka in a pot.Finished chicken Bruschetta Rigatoni all Vodka in a pot.

Serve: Plate up your homemade bruschetta rigatoni alla vodka, and enjoy!

Overhead view of a pot of Bruschetta Chicken Rigatoni.Overhead view of a pot of Bruschetta Chicken Rigatoni.

I’m 100% ordering these ingredients again in my next Hungryroot box…this pasta is too good NOT to! 😉

A stock image of a Hungry Root box surrounded by examples of foods you can receive from them.A stock image of a Hungry Root box surrounded by examples of foods you can receive from them.
  1. Add more water if needed. One-pot pastas are one of my favorite midweek meals for something that’s both delicious and easy to clean up. One tip I’ve learned from making one-pot recipes like this is to know when your pasta needs a little extra love! If it’s still a bit firm after simmering at first, just add ½ cup more water and keep it going until it’s tender.
  2. Break up the ground chicken as it cooks. I use a wooden spoon or spatula to break the chicken into small pieces while it’s browning. Doing this helps it cook evenly and gives you a nice, crumbly texture.
  3. Keep the chicken warm. After cooking the chicken and removing it from the pan, you can cover it loosely with foil so it stays warm while you prep everything else.
  4. Stir the pasta occasionally. Be sure to simmer the pasta with a lid ON to keep the moisture and heat in the pan. I also like to stir it every few minutes so nothing sticks to the bottom. This is especially important in a hearty dish like this bruschetta vodka pasta, where the sauce thickens as it cooks.

Serving Suggestions

If you ordered some shredded sharp cheddar cheese in your Hungryroot box, sprinkle some over each bowl for an extra tasty finish. I love serving this with a slice of garlic bread for dipping, but you could even add a piece of fresh bruschetta on the side if you’re craving more of that tomato-basil flavor!

Storage & Reheating

Let your rigatoni alla vodka with chicken cool completely before storing. It’ll keep well in an airtight container in the fridge for 3-4 days. To reheat, just pop it in the microwave or warm it gently on the stove with a splash of water to loosen the sauce. The pasta will soak up some of the sauce as it sits and may get a bit softer during storage, but it’ll still taste amazing. I usually don’t recommend freezing pasta dishes like this since the noodles can turn mushy when thawed (but you can try if you don’t mind the texture change!)